April 15, 2026
A quiet craft project often starts the same way. You want something absorbing, hands-on, and calm, but you don’t want another object that feels disposable once the afternoon is over.
That’s where a bonsai tree lego build earns its place. Not as a boxed task to finish and shelve, but as a small sculpture you shape over time, adjusting the trunk line, changing the foliage, and making it sit naturally among the objects you already care about.
A custom bonsai made from LEGO works best when you treat it less like a model and more like a piece of interior craft. The appeal isn’t only in the building. It’s in the small decisions. Which way the trunk leans. How sparse or full the crown should feel. Whether the pot should read as ceramic, stone, or painted wood.
That’s why many builders end up moving beyond the official version. The official LEGO Bonsai Tree set (10281) has 878 pieces and stands 18cm high, according to Brickranker’s set profile for LEGO 10281. It’s popular for good reason. But a custom build gives you room to control size, colour, silhouette, and mood in a way a fixed set never can.
The official set solves the design for you. A custom bonsai asks more from your eye, but it gives more back.
You start noticing the same qualities that make Scandinavian interiors feel settled rather than styled. Restraint. Material contrast. Negative space. A sense that every object belongs.
A good miniature bonsai shares that language. It doesn’t need to be loud. It needs a clear profile, a considered palette, and a base that feels intentional.
A custom bonsai succeeds when it looks calm from across the room and interesting up close.
That’s also why this project pairs so naturally with folk objects and carved wooden decor. LEGO is industrial and modular. Traditional Scandinavian craft is tactile and irregular. Put them together, and the contrast helps both.
The builds that hold up in a curated room usually have three things:
What doesn’t work is overbuilding. Too many branch tips, too many colours, too much symmetry. Bonsai at miniature scale needs editing. If every part calls for attention, the eye can’t rest anywhere.
That’s the quiet pleasure of this kind of build. You’re not only assembling parts. You’re practising selection.
The easiest mistake in a bonsai tree lego project is to begin with parts alone. Start with mood first. Decide what sort of tree belongs in your room, then gather pieces that support that choice.
For a Scandinavian look, I’d keep the main palette soft and grounded. Brown for the trunk. Black, dark grey, or muted tones for the pot. Green that feels natural rather than neon. If you want blossom, let that be the one brighter note.
Think in materials, not just colours. The trunk should suggest bark. The pot should suggest ceramic or painted timber. The foliage should look light enough to breathe.
Useful combinations often include:
If your collection is mixed and uneven, that’s fine. A bonsai benefits from slight tonal variation in the trunk. It makes the bark feel more natural.
You don’t need rare elements to make this work. You need parts that offer angle, texture, and compact strength.
I prioritise these categories first:
The exact inventory can vary. What matters is function. Every part should either support the structure, refine the silhouette, or improve texture.
Custom builds stall when builders become too loyal to one exact piece. Bonsai rewards substitution.
If you don’t have a perfect curved trunk element, stack smaller slopes with slight offsets. If you don’t have dedicated leaf pieces, build foliage from clustered plates, flower stems, or tiny round elements. If a pot wall looks flat, change one layer to tiles or recessed studs for a more crafted look.
Practical rule: keep the pot and trunk exacting. Let the foliage be adaptive.
That rule saves time and keeps the build coherent. The base and trunk carry the sculpture. Leaves and blossoms can be interpreted more freely.
Most builders end up mixing sources. A custom bonsai often begins with your own spare parts and then gets refined with a small targeted order from a marketplace such as BrickLink. That second pass is usually where the model comes together, because you can buy the missing handful of colours or connectors instead of compromising the whole design.
If you enjoy cross-medium miniature projects, this guide to 3D printable miniatures is worth a look for ideas about scale, styling, and how small crafted objects can sit together in one display.
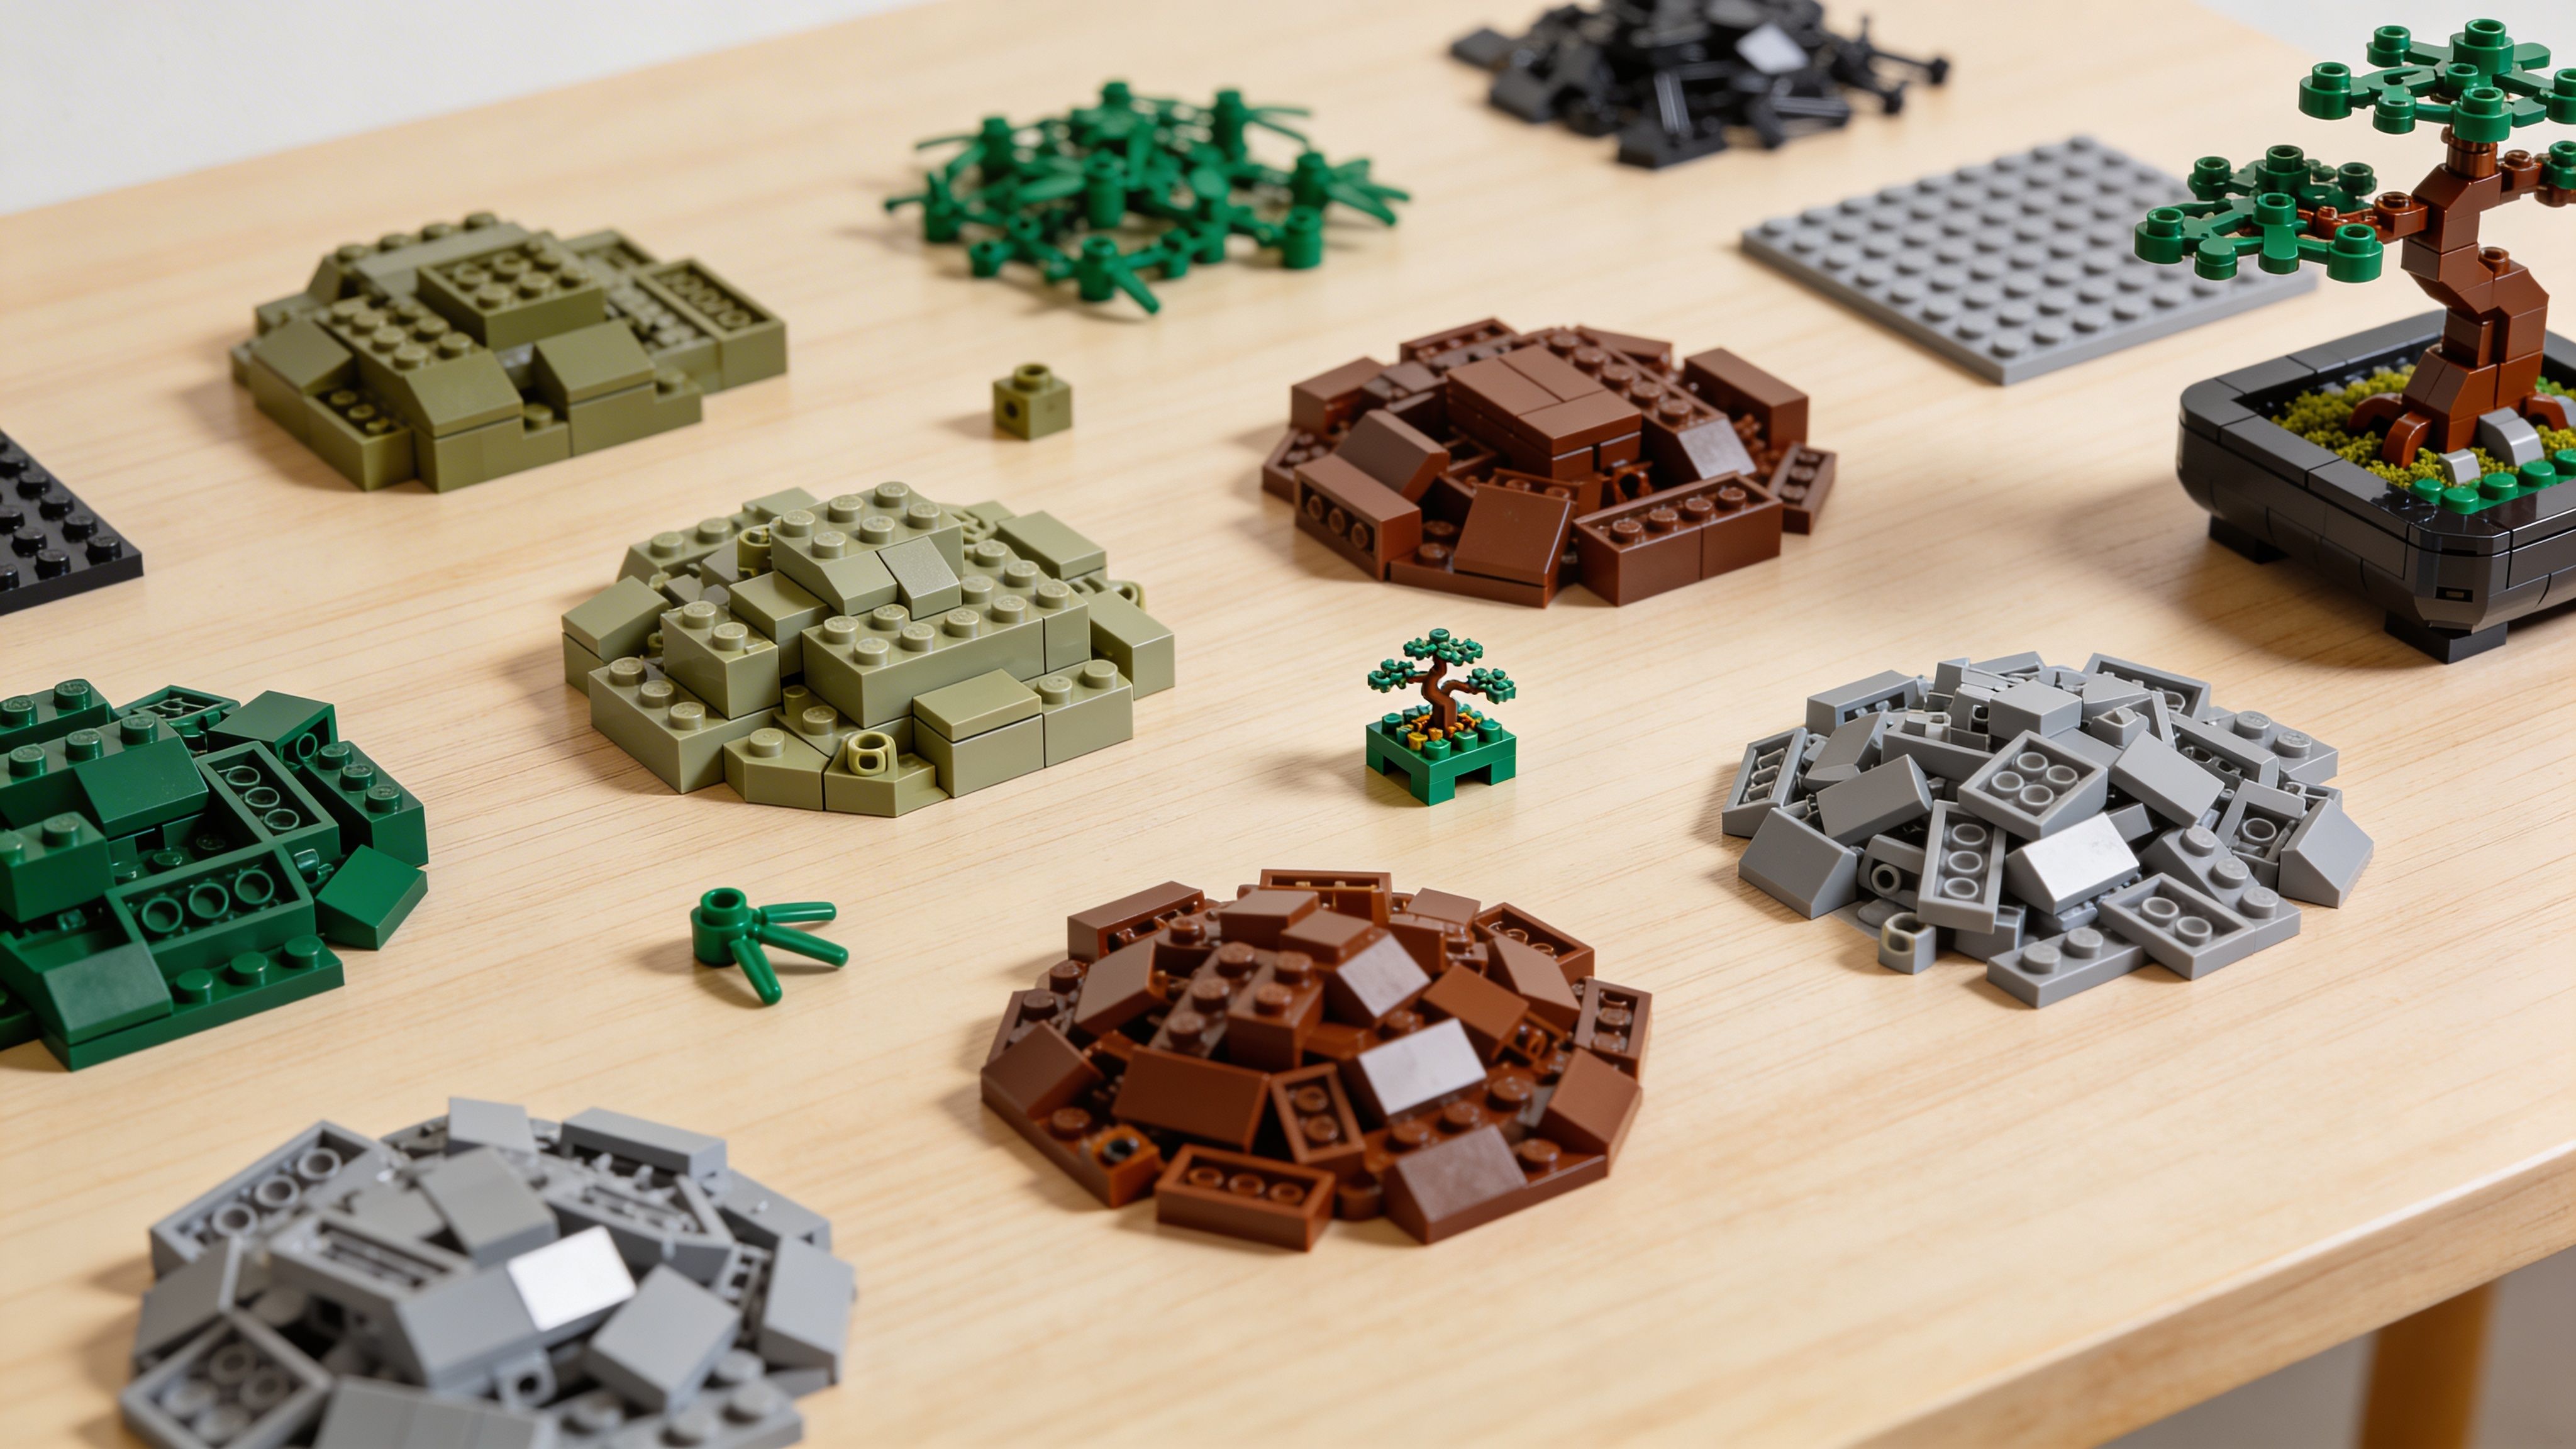
Before building, separate parts by role rather than by official category. I’d make small groups for pot pieces, trunk pieces, branch joints, and foliage.
That matters because the design decisions happen in clusters. When all the trunk pieces sit together, you can test two or three bark textures quickly. When foliage parts are gathered in one place, it becomes easier to judge density and colour balance before attaching anything.
A neat tray of sorted bricks doesn’t just save time. It changes the way you compose.
The foundation decides whether your bonsai feels sculptural or flimsy. Most custom builds that disappoint don’t fail at the canopy. They fail lower down, where the pot looks too toy-like or the trunk doesn’t have the strength to carry visual weight.
A bonsai pot should feel calm and architectural. That means straight edges, a defined rim, and enough visual thickness to support the tree.
Build the pot in layers, not as a hollow box rushed together. Plates and bricks give the walls body. Tiles on the outer faces make the finish cleaner. A slight lip at the top helps the pot read as an object rather than a container built only to hide connection points.
For a Scandinavian interior, black and dark grey are dependable choices. They don’t compete with the trunk, and they let the tree read as the focus.
Try this sequence:
A little asymmetry on the soil surface helps. The pot should stay disciplined. The interior can feel more organic.
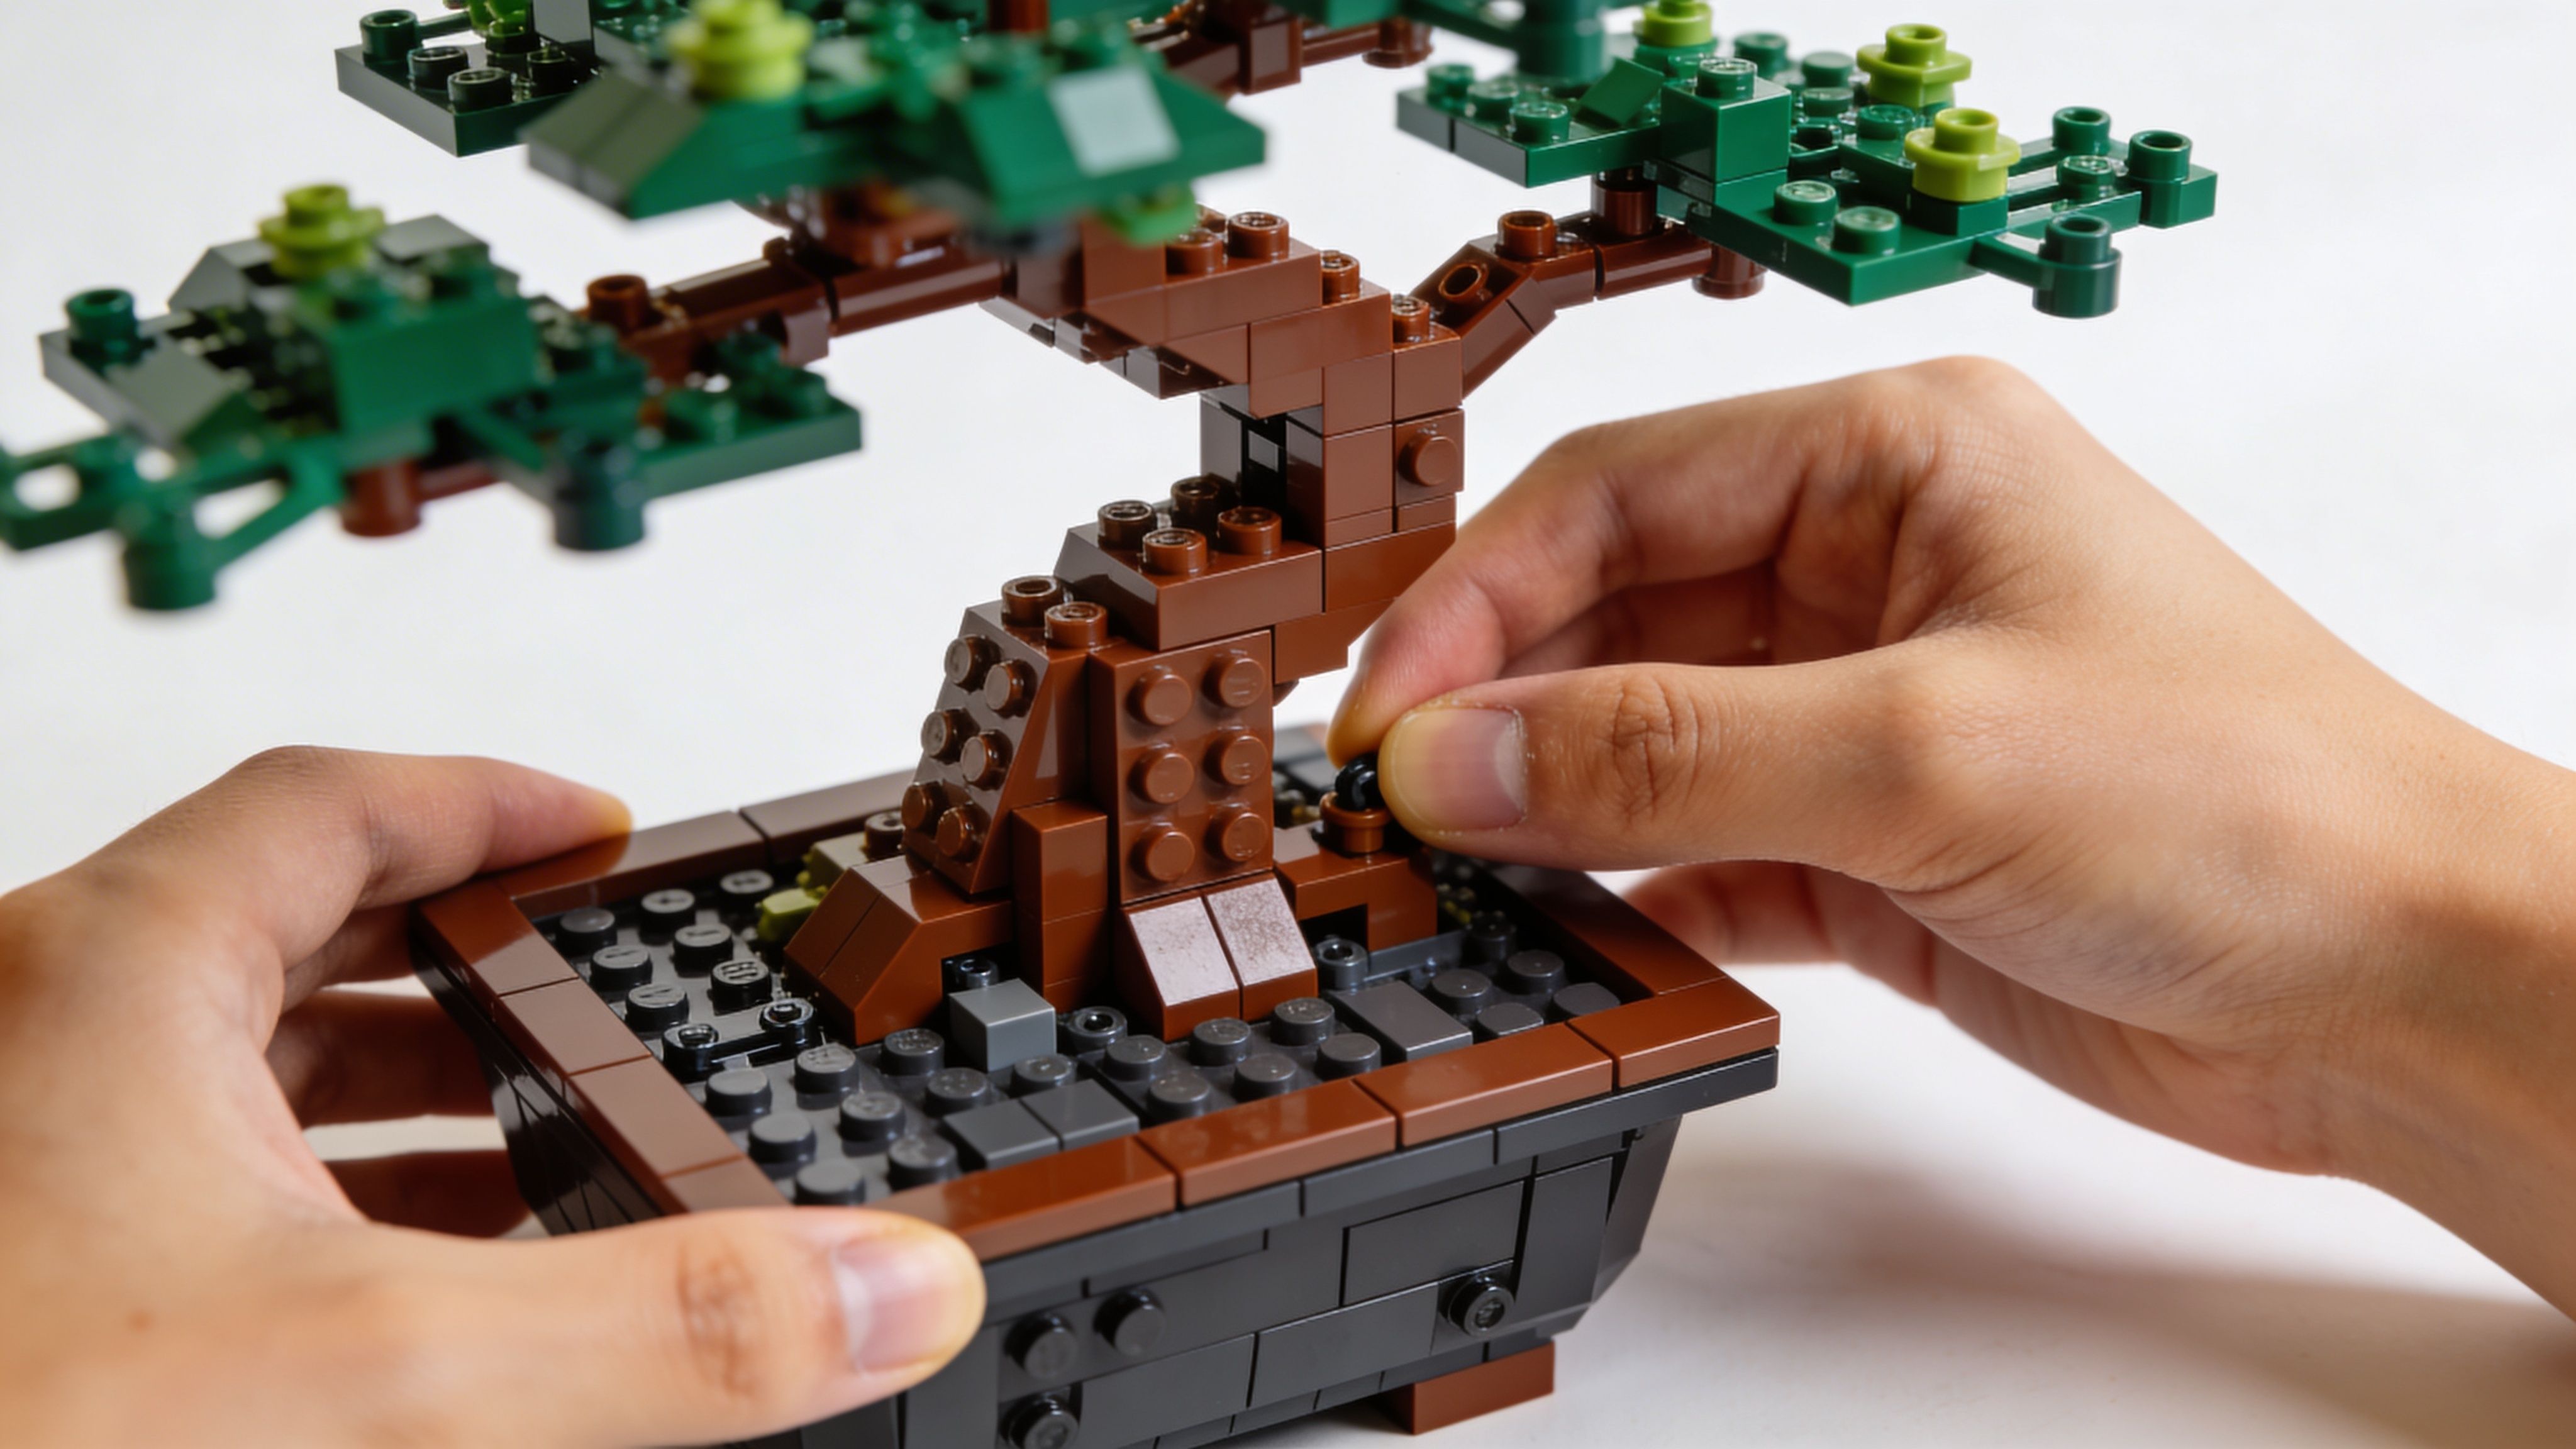
The strongest trunks begin with an inner spine. Then you sculpt around it.
That core can be simple. What matters is that it locks firmly into the pot and gives you attachment points higher up. Once that inner structure is stable, add bark texture with slopes, curved pieces, and offset plates.
The official regional build notes for the set describe a process that begins with a slatted stand and stable pot base, then moves into a curved trunk built from layered brown slopes, using angled placement to create organic asymmetry. The same notes also mention a 12% failure rate in trunk alignment when builders over-tighten curved slopes, and recommend dry-fitting first, according to BRICKshop’s LEGO 10281 product page.
That trade-off matters in custom work too. If you force the bark shaping too early, the line stiffens and the trunk starts looking mechanical.
A convincing bonsai trunk isn’t straight. It narrows, bends, and changes tempo.
Build from the roots upward with these ideas in mind:
What usually doesn’t work is perfect symmetry. If the left and right sides mirror each other, the tree loses age and tension.
A trunk should appear to have grown around pressure. Even in LEGO, that impression comes from small changes in angle and contour.
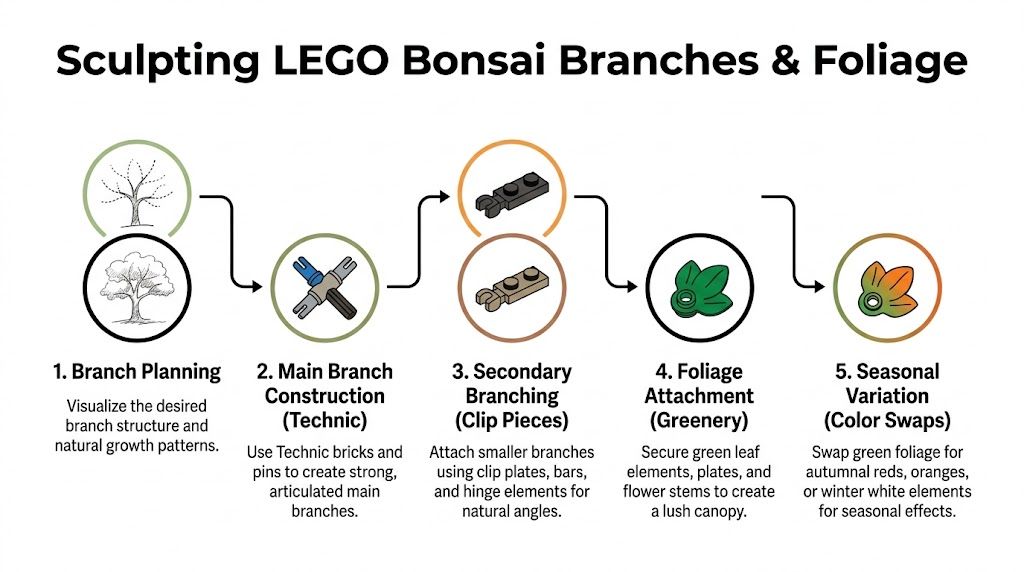
Here’s a helpful visual reference for the early structure and shaping rhythm:
There’s always a temptation to texture every inch of bark immediately. Resist it. Test the trunk by lifting the model from the pot base and gently adjusting the upper section. If the core shifts, stop and strengthen before adding more surface detail.
A stable custom bonsai usually has:
If the trunk only looks right when untouched, it isn’t finished yet.
That’s the standard I use. The build should survive being moved from shelf to shelf without losing its line.
The build ceases to be structural, taking on an expressive quality. The branches set the gesture of the tree. The foliage sets the season, mood, and level of softness.
A lot of custom bonsai builds go wrong because the branches are treated as supports for leaves. In a good model, the branches matter even when the tree is bare.
Begin with the main line of the tree. Pick one branch that extends with confidence in the direction opposite the trunk’s lean, then support it with secondary branches that soften and balance the composition.
Avoid spacing every branch evenly. Real bonsai has rhythm. One branch may sit low and horizontal. Another lifts gently. A third turns back inward to keep the silhouette compact.
The most useful building approach here combines rigid and flexible parts. According to the same BRICKshop source cited earlier, expert builders use SNOT for dense foliage and flexible Technic axles to allow 15 to 20 degrees of branch flexibility without stressing the plastic. That same guidance notes that dense crowns can use up to 300 small elements per crown in foliage-heavy designs, as described on the BRICKshop product page for LEGO 10281. Since that URL has already been cited above, I’d treat the key lesson as the takeaway here: combine fixed branch structure with a little controlled flexibility.
Think in tiers. The first branch establishes direction. The next creates spread. Smaller offshoots fill gaps and hold foliage pads.
A practical sequence looks like this:
If every branch tries to be interesting, the tree gets noisy. The better approach is to let one or two lines carry the character and let the rest provide unobtrusive support.
You can treat your bonsai as a seasonal object. That’s one of the pleasures of LEGO over a fixed craft material. The armature stays. The mood changes.
A green crown should look gathered into pads, not packed into a ball. SNOT techniques help here because they let you face small elements in different directions and create more density without building a chunky mass.
Aim for several separated pads rather than one continuous dome. That spacing creates depth and gives the branch structure room to show through.
Use variation carefully:
Blossom works best when it feels delicate. Too much pink turns the tree into novelty décor.
The official set is known for its blossom option and hidden frog details. In the Sweden regional notes, each pink blossom cluster is described as using small frog elements, which is a useful reminder that playful parts can still serve a refined visual result when handled with restraint. In a custom build, pink, white, or a mix of both can produce a softer spring canopy.
If you’re refining your own blossom shades, this colour mixing chart is a useful companion for thinking about warm versus cool pinks and how surrounding neutrals affect them.
Leave some branch tips exposed. Blossom looks more convincing when the structure still reads beneath it.
If you want interchangeable seasons, don’t lock the foliage directly into the branch skeleton in too many places. Build removable clusters. That way you can lift off a green pad and replace it with blossom without rebuilding the whole tree.
What works well is a small set of consistent attachment points. What doesn’t is improvising a different connection every time. You’ll forget the logic later, and future swaps become fiddly.
A custom bonsai is at its best when it invites revisiting. Green in one month. Blossom in another. Bare branches if you want the trunk to take centre stage.
A finished bonsai tree lego build shouldn’t feel like it has been inserted into a room. It should look as though the room had been waiting for it.
That depends less on the model itself than on context. Scandinavian interiors tend to reward objects with clean silhouettes, natural references, and enough visual stillness to coexist with wood, textiles, ceramics, and folk forms.
A bonsai needs negative space around it. Don’t tuck it between tall books, crowded frames, and unrelated ornaments.

Good placements usually include:
The point isn’t to spotlight the model dramatically. It’s to let the shape read clearly without visual noise.
The build develops into something more than mere display. LEGO has precision. Scandinavian folk objects often carry brushwork, carving marks, and soft irregularity. Put the two together, and the arrangement gains warmth.
A black or charcoal bonsai pot sits especially well near hand-carved wooden animals because the pot acts as a visual pause. The tree’s small branching forms then echo the curved silhouettes of carved figures without competing with them.
I’d compose a vignette in one of these ways:
Three or more decorative accents can work, but the risk rises quickly. The bonsai already has fine detail. It usually needs one companion, not a crowd.
If your room already uses pale oak, painted timber, wool, linen, or matte ceramics, your bonsai should join that language rather than interrupt it.
A few reliable pairings:
For broader inspiration on Swedish colour and form in interiors, this piece on färg och form in Sweden is a helpful way to think about balance, tradition, and decorative restraint.
A bonsai display looks finished when each object improves the one beside it.
Some display choices flatten the whole effect, even if the build itself is strong.
Avoid these if you want the model to feel at home in a curated space:
A little asymmetry in styling mirrors the bonsai itself. That’s part of the charm. The arrangement should feel composed, not rigid.
When the placement is right, the bonsai stops reading as “LEGO decoration” and starts reading as miniature design.
The value of a bonsai tree lego project isn’t only in the finished object. It’s in the pace it asks of you.
You can’t rush a good trunk line. You can’t force balance in the branches. You have to look, adjust, remove, try again, and accept that one small change can improve the whole silhouette more than adding ten new parts.
That’s why this kind of building feels close to other handcraft traditions. The materials differ, but the discipline is familiar. Attention matters. Restraint matters. So does the willingness to stop before the piece becomes overworked.
A custom bonsai gives you something many hobbies don’t. It leaves behind an object that still carries the memory of making.
You remember which branch was difficult. Which colour substitution solved the canopy. Which version of the pot looked too heavy, and which one finally felt right.
That memory changes the display piece. It’s no longer generic décor. It becomes part of the room’s story.
If you enjoy Scandinavian interiors, folk craft, or small-scale design, this project sits in a satisfying middle ground. It has the order and geometry of LEGO, but it also invites judgement, taste, and a quiet hand.
That combination is rare.
The finished tree matters. The slower way of seeing you develop while building it matters more.
A custom bonsai doesn’t need to be large or complex to feel complete. It only needs coherence. A pot that belongs to the trunk. A trunk that belongs to the branches. A crown that belongs to the season you want to suggest.
Once you build one, you’ll probably keep changing it. That isn’t a flaw. It’s part of the form. Bonsai has always been about tending, refining, and returning.
If you enjoy objects that carry both craft and character, take a look at Dalaart. Their collection of authentic Swedish Dala horses and companion animals offers the same sense of handmade presence that makes a miniature bonsai so rewarding to display.


.svg)


.png)


