January 5, 2026
Turning a simple, unpainted wooden figure into a beautiful, functional piece of art is a surprisingly easy key ring diy project. With just a few basic craft supplies, like acrylic paint and a small screw eye, you can create a personalised key ring in an afternoon. This guide will walk you through turning a classic Scandinavian-inspired Dala animal into an accessory you'll be proud to carry.
Ready to dive into the world of personalised crafting? This guide is your starting point for transforming a plain wooden Dala animal into a durable, charming key ring that's all your own. We'll cover everything, from choosing the perfect miniature model to picking the right paints and hardware.
Think of this as more than just another craft project. It’s a chance to create a little piece of Swedish heritage that you can carry with you every day or give as a thoughtful, handmade gift. The process itself is quite straightforward, so even if you're a complete beginner, you'll be able to get a lovely, professional-looking result.
We're going to break down the entire key ring diy process into clear, manageable stages. This way, there's no guesswork, making the project feel approachable no matter your skill level.
By following along, you'll learn how to:
My goal here is to give you the skills and confidence to create something really special.
This project is more than just making an accessory; it’s about the joy of making something with your own hands. It’s a chance to disconnect, engage your creativity, and produce a functional piece of art that tells a story.
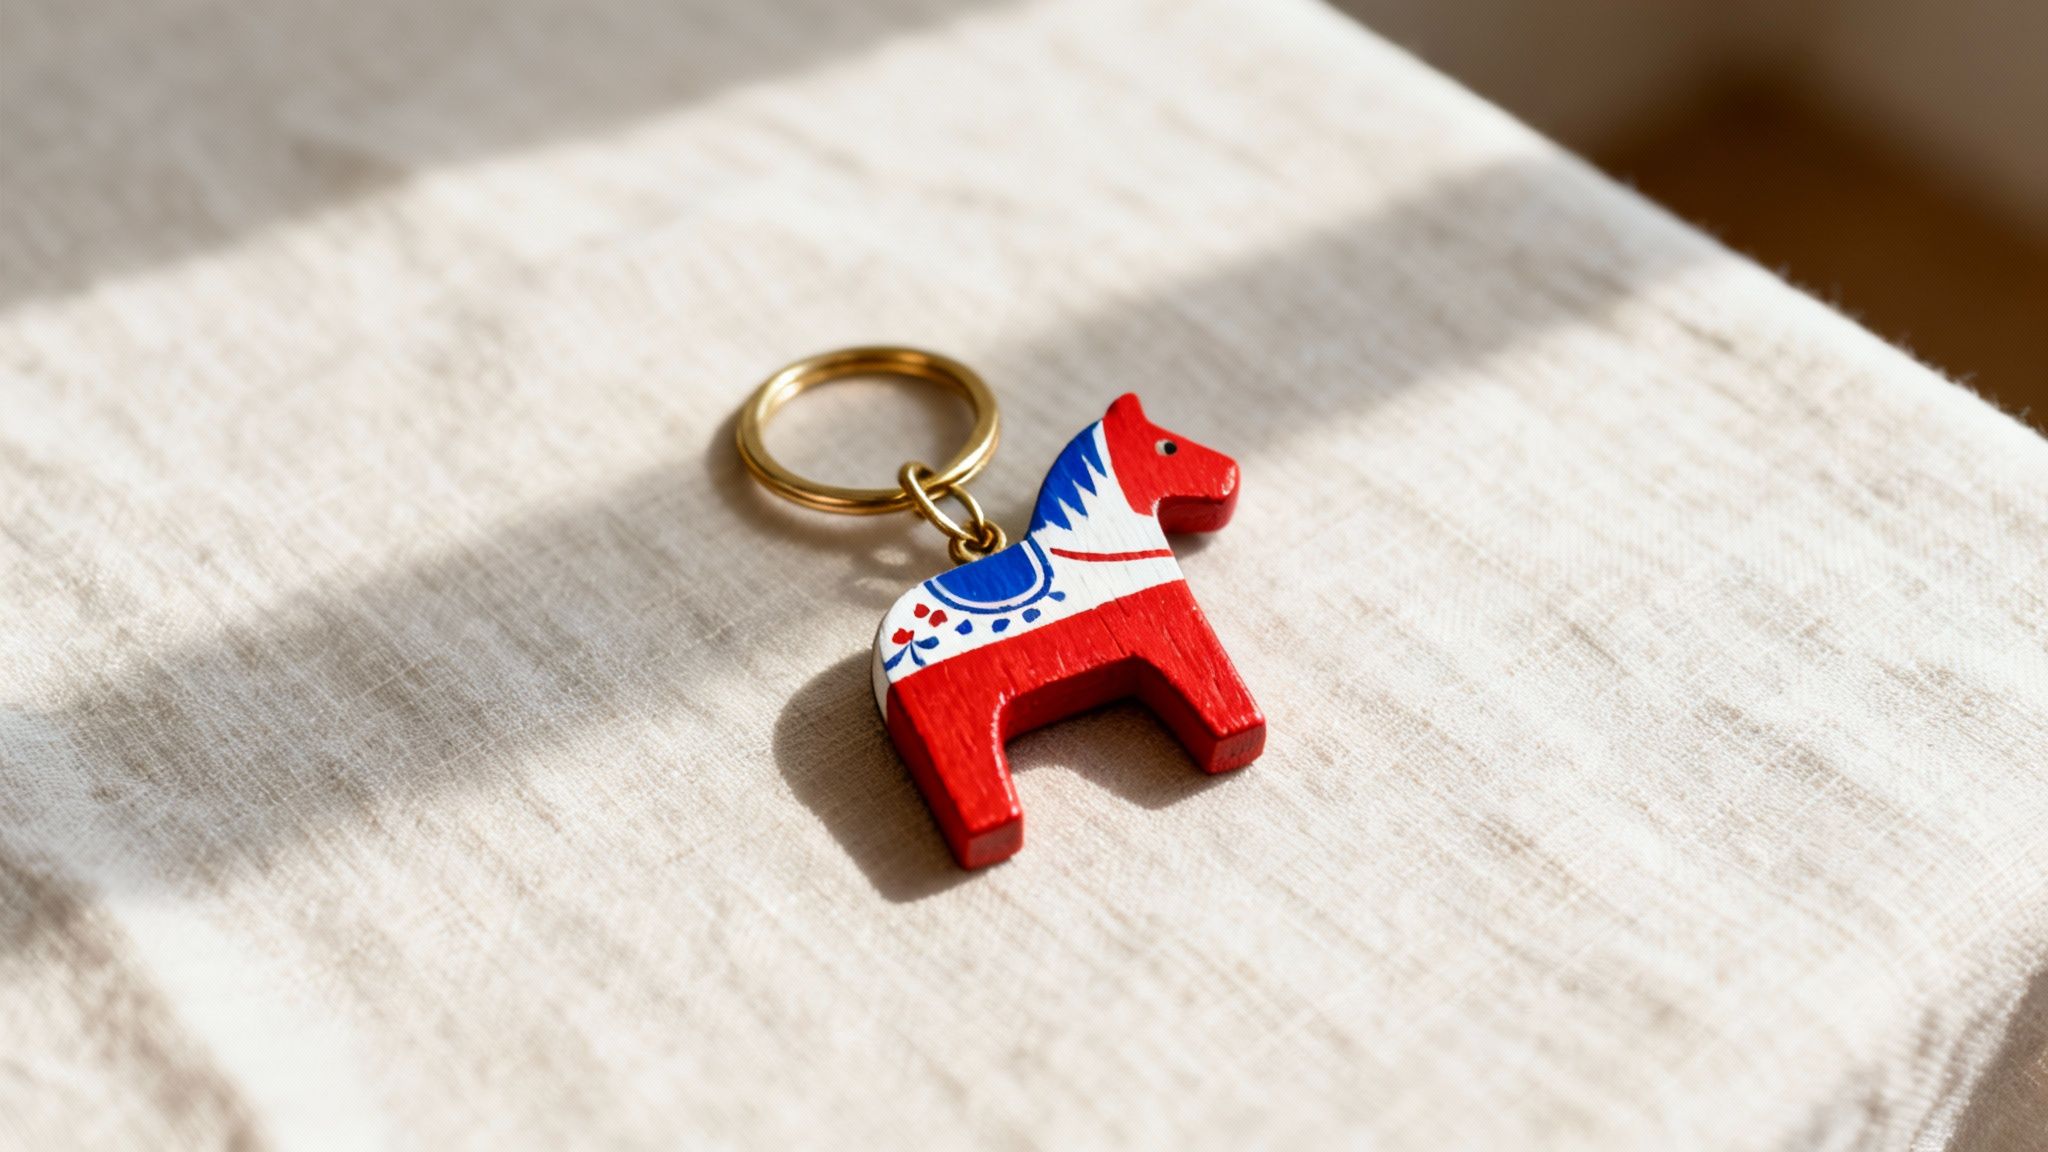
A Dala animal offers a wonderful canvas for your creativity. These figures are deeply rooted in Swedish tradition and have a distinctive shape that's both iconic and surprisingly easy to decorate. Unlike painting on a flat piece of wood, the three-dimensional form of the Dala animal adds real character and substance to your finished key ring.
Plus, the compact size of a Dalaart mini model makes it the perfect weekend project. It doesn’t require much space or a huge amount of supplies, making it a fantastic entry point into the world of woodworking crafts and miniature painting. So, let’s get ready to make a key ring that’s not just practical, but also rich with cultural heritage.
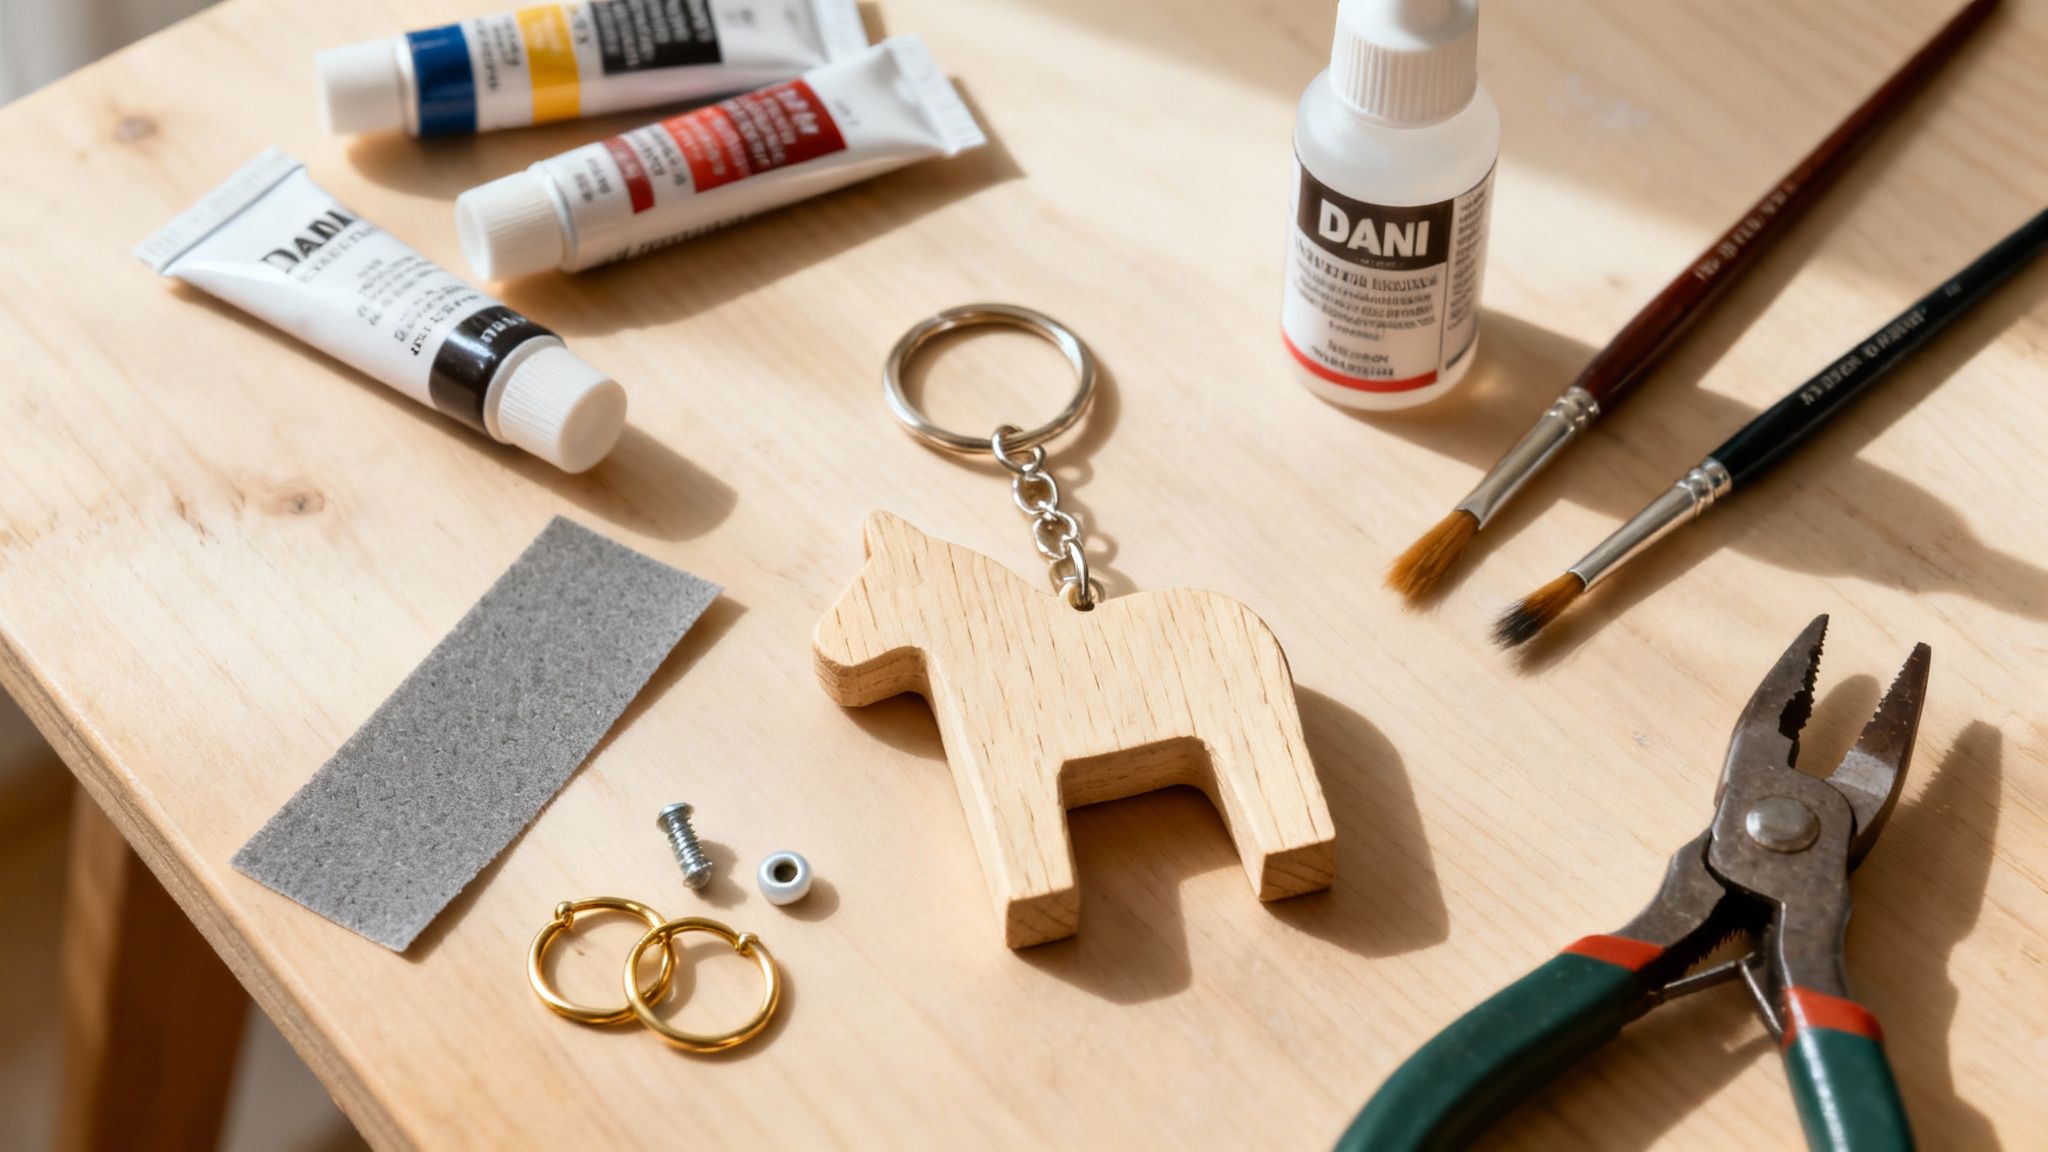
Before you let your creativity run wild on your key ring diy project, it’s a good idea to get all your supplies organised. Trust me, having everything laid out and ready to go makes the whole process so much more relaxing and fun. It means you can get lost in the art, rather than hunting for a specific brush at the last minute. Let’s go through everything you'll need to turn that simple wooden figure into a little personalised treasure.
The centrepiece of this project is, of course, your unpainted wooden model. A classic Dala animal is a fantastic choice, giving you a beautiful three-dimensional canvas with a rich story behind it. For an authentic start, an unpainted Dala horse from Dalaart is perfectly sized for a key ring and is just waiting for your personal touch.
The right paint is what will really make your design pop and, just as importantly, make it last. For wooden models like these, acrylic craft paints are my go-to. They're water-based, dry fairly quickly, and come in a huge range of vibrant colours, which makes them perfect whether you're a seasoned painter or just starting out.
You don't need a huge collection of brushes, just a few key sizes to cover all your bases:
With these three on hand, you’ve got the flexibility to tackle pretty much any design you can dream up. You'll be able to cover the larger areas flawlessly and still get in there for those tiny, character-filled details that make the piece truly yours.
Remember, the goal is to create a durable piece of art that can handle daily use. Prepping the wood correctly is just as important as the paint you choose. A quick, gentle sanding followed by a quality primer creates the perfect canvas.
Once your masterpiece is painted and dry, it's time to turn it into a functional key ring. This is where your hardware comes into play. You’ll need a small screw eye—it’s a tiny screw with a loop on the end that you’ll twist into the top of your Dala model.
For the key ring part, you have a couple of solid options. A standard split ring is the classic, super-secure choice you see on most keychains. If you want something a bit more convenient, a lobster clasp is fantastic because it lets you easily clip your keys onto a bag strap or belt loop. It really just comes down to personal preference and how you see yourself using it.
Finally, let's talk about the protective finishing touches that you absolutely shouldn't skip.
Here comes the fun part! This is the stage where your simple wooden figure starts to show its true personality and becomes a little piece of art for your key ring diy project.
Before you get carried away with colours, a tiny bit of prep work makes a world of difference. Grab some fine-grit sandpaper and give your Dala model a very light sanding. This quick once-over smooths out any rough patches and gives the paint a perfect surface to grab onto.
Once you’re done sanding, just wipe away the dust with a soft, dry cloth. Now you’re ready for primer. Trust me on this one—applying a thin, even coat of acrylic gesso or a good wood primer is a game-changer. It stops the wood from soaking up your paint unevenly and makes your final colours look so much brighter and richer.
With your primer completely dry, it's time to lay down the first layer of colour. This base coat really sets the whole mood for your design. Using a small, flat brush is best for this. Apply your acrylic paint in smooth, even strokes, trying to follow the direction of the wood grain.
Don’t stress if the first coat looks a bit thin or streaky. That’s totally normal. The idea is to build up the colour in layers. Let this first coat dry completely before going in with a second one. A bit of patience here is key to getting that solid, opaque finish and avoiding a tacky mess.
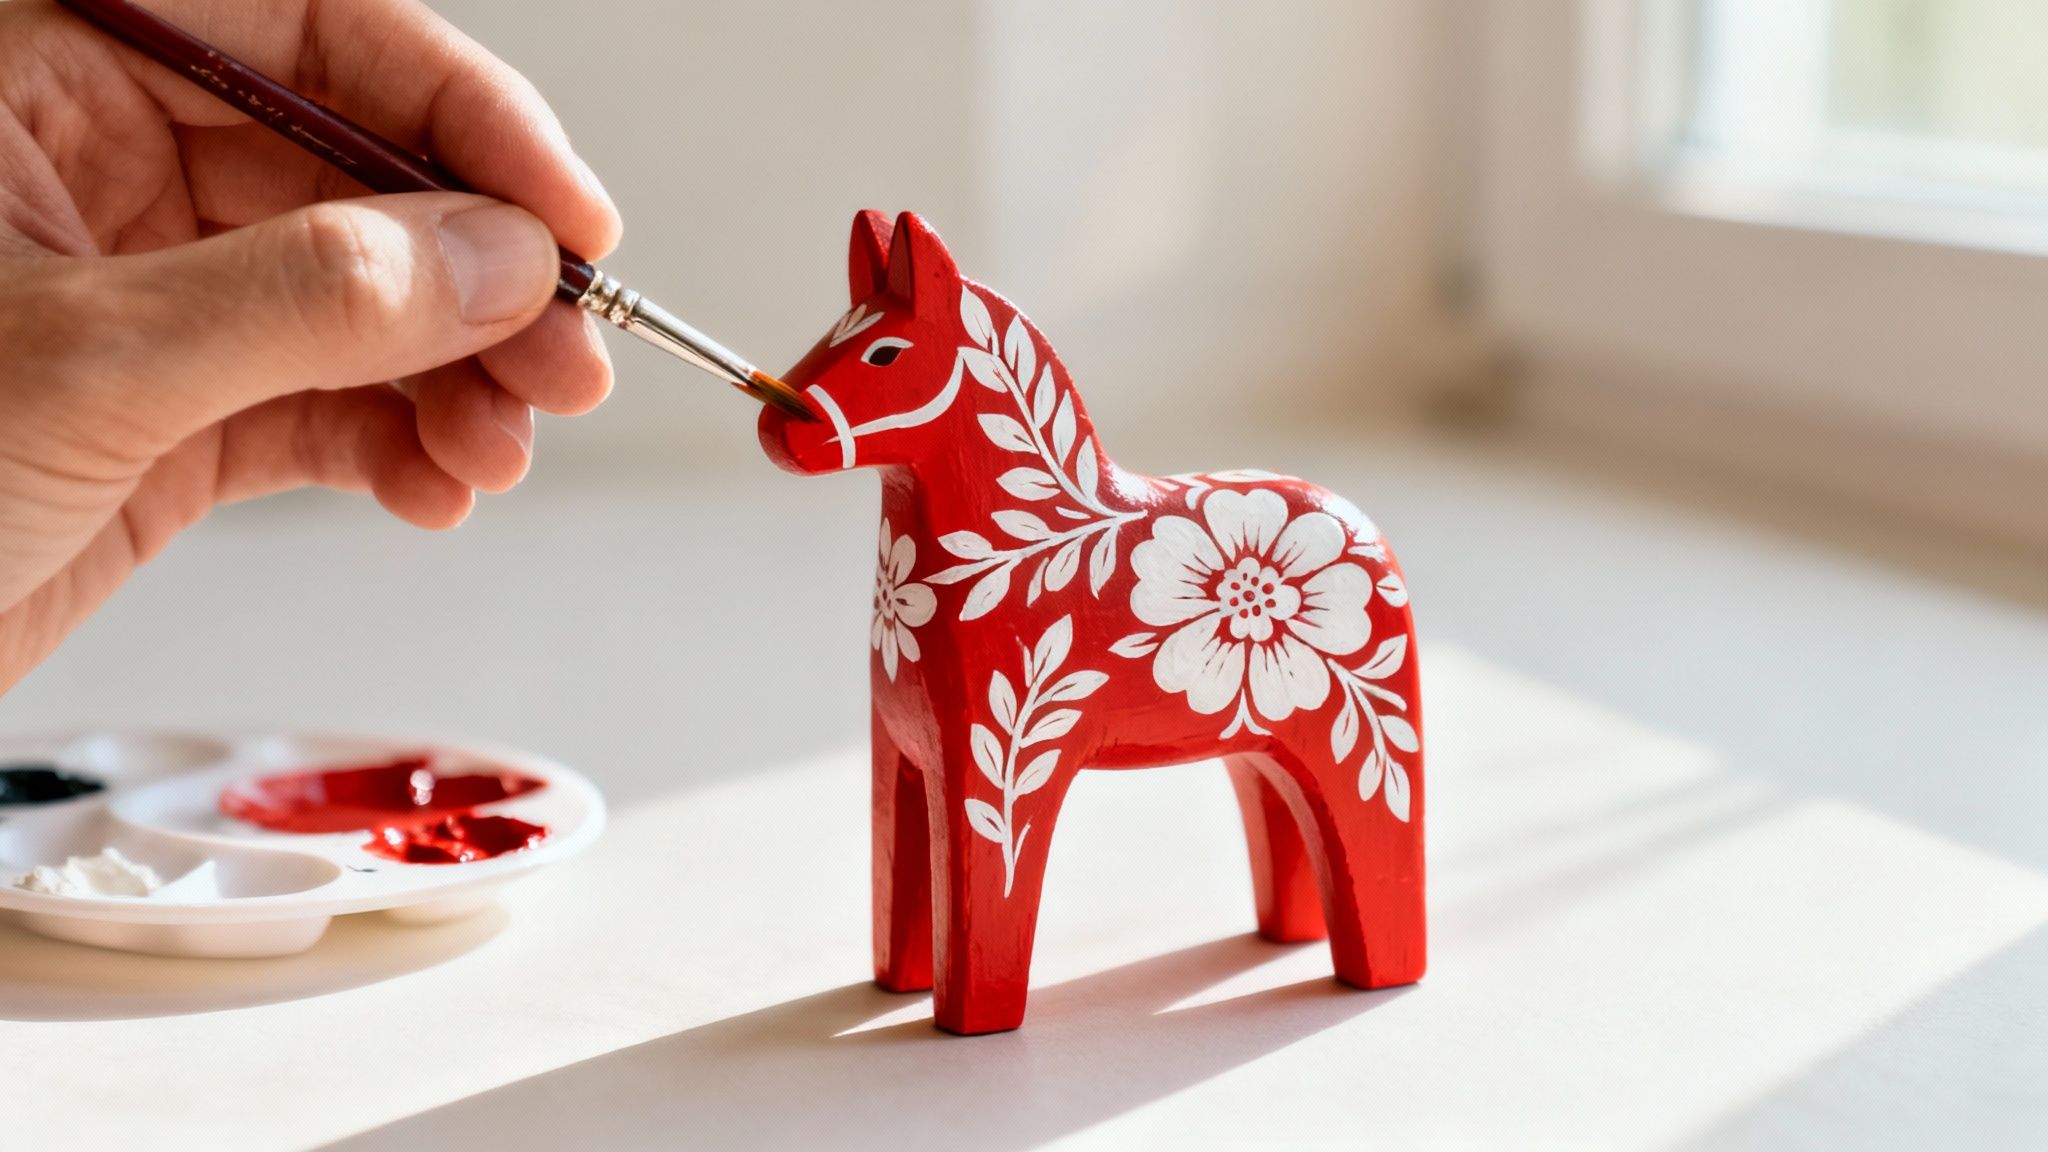
Okay, your base colour is solid and dry—now the real magic begins. You can stick to traditional Dala patterns or let your creativity run wild and invent something completely new. For this part of the process, a fine-tipped detail brush will be your absolute best friend.
Getting those classic, crisp folk-art details is easier than it looks. Here are a few tricks I’ve picked up:
Here’s a piece of advice from years of painting these little figures: always work from the biggest details down to the smallest. Paint the main harness and floral shapes first. Let them dry, and then add the finer lines, dots, and other accents on top. This layering technique not only prevents smudging but also adds a lovely depth to your design.
Whether you're going for a classic Swedish vibe or something more modern and minimal, the approach is the same. Build your design layer by layer, giving each element time to dry before you add the next. It’s this methodical process that leads to a professional-looking key ring diy project you can be proud of.
And if you want to get really creative with your palette, our guide to understanding colour mixing charts can help you mix custom shades for a truly one-of-a-kind finish.
Now for the fun part! Your painted Dala model is dry, sealed, and looking absolutely beautiful. This is the final, and I think most satisfying, step of your key ring diy adventure—turning that miniature work of art into a durable accessory you can use every single day. Let's add the hardware and give it that polished, professional finish. This ensures it's sturdy enough to handle being tossed into a bag or pocket without a second thought.
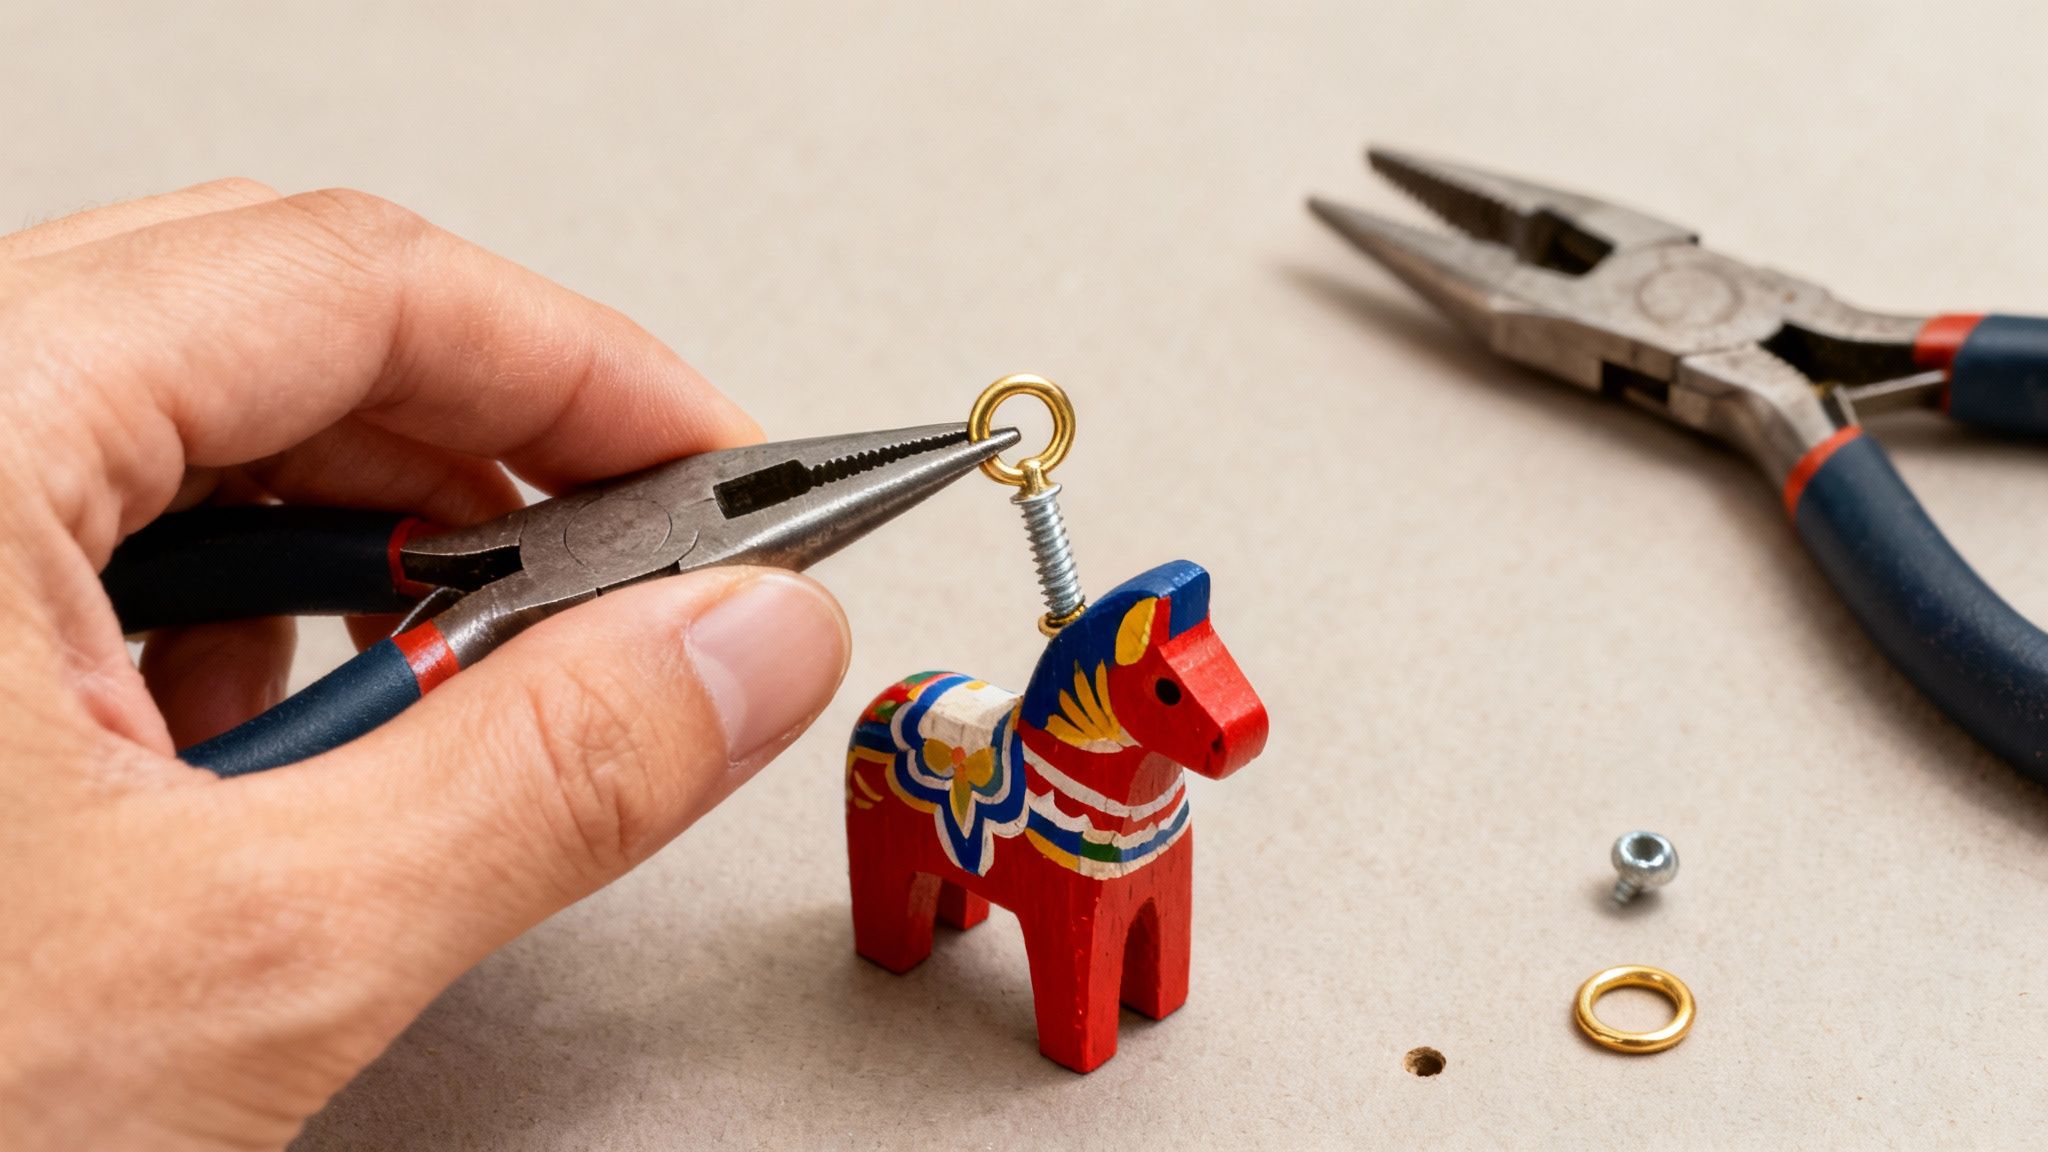
The first piece you'll need is a small but mighty component called a screw eye. It's just a tiny screw with a closed loop on the end. Getting the size right is key; you want something that looks proportionate to your model but is still substantial enough to be secure. The goal here is a firm hold that doesn't overpower the delicate design you've worked so hard on.
If you remember only one thing from this section, let it be this: always create a pilot hole. Wood, especially on a small, delicate model, can split under pressure with surprising ease. Trying to force the screw eye in directly is a recipe for disaster—and a cracked Dala horse.
To avoid a heartbreaking split, grab a tiny drill bit that's just a little narrower than the threaded part of your screw. Using a pin vice (a small, handheld drill) or even a power drill on its lowest setting, carefully drill a shallow hole right into the top centre of your Dala model. This tiny hole gives the screw's threads somewhere to go, allowing them to grip the wood securely without causing any damage.
With your pilot hole ready, you can gently twist the screw eye into place. I always start it by hand for the first few turns to make sure it's going in straight. If you feel some resistance, a pair of needle-nose pliers can help. Just grip the loop and slowly turn it until the base sits snug against the wood.
With the screw eye securely in place, it’s time to add the final piece of the puzzle: the key ring itself. You've got a couple of great options here, and the best choice really comes down to personal preference.
Whichever you choose, you'll need two pairs of pliers for this next bit. Grip one side of the split ring's opening with one pair of pliers and the other side with your second pair. The trick is to gently twist one hand forward and the other back, opening the ring sideways instead of pulling it apart. This technique preserves its original shape perfectly.
Slide the loop of your screw eye onto the opened ring, then use your pliers to twist it back into its closed position. Give it a gentle tug just to make sure everything is tightly connected. And that's it! Your beautiful Dala model, perhaps one of those charming mini Dala horses, is now a fully functional key ring.
Pro Tip: Never, ever pull a split ring open into a 'C' shape. This will permanently distort the metal and create a weak spot or a gap, which is just an invitation for your keys or your lovely new charm to slip right off. The gentle twisting motion is the secret to a secure, long-lasting connection.
This trend of creating personalised accessories is really taking off, especially in Southeast Asia, where the DIY keychain market is part of a much larger e-commerce boom. With homeware sales projected to soar past $27 billion by 2025, unique handmade items like these are more popular than ever. If you're curious, you can learn more about this regional growth and its impact on crafting trends in the full McKinsey report on e-commerce transformation.
So, you’ve put all the pieces together and your unique Dala key ring is finished! But the creative journey doesn't have to stop here. Now comes the fun part: adding those final personal touches and thinking about how to present it.
Whether this charming accessory is for you or destined for a friend, a few extra details can take it from a simple craft project to a truly cherished keepsake. This is where your key ring diy project really shines.
A few extra embellishments can be a fantastic way to complement your painted design. I love threading a few wooden beads onto the key ring for a more rustic feel, or attaching a soft leather tassel to add a bit of texture and movement. You could even find a small, custom-engraved metal tag with initials or a significant date for an incredibly thoughtful touch.
Here are a few simple additions that I've found work wonders:
These little extras don't take much time at all, but they make a huge difference to the final look, making your key ring feel complete and thoughtfully designed.
If you're giving your key ring as a present, the packaging is your chance to make a great first impression. It shows the recipient just how much care went into their gift, right from the start. Instead of reaching for standard gift wrap, why not try some more unique and sustainable options?
A small linen or cotton drawstring bag is one of my go-to choices. It’s reusable, has a lovely natural texture, and just feels like the right kind of container for a handmade item. Another idea is to find a small, sturdy craft box and fill it with natural crinkle paper or wood shavings to nestle the key ring inside. A simple piece of twine or a colourful ribbon is all you need for a finishing touch.
The whole point of handmade gifting is to share a piece of your creativity. When you pair your beautiful key ring with equally thoughtful packaging, you're not just giving an object—you're creating a memorable experience from the moment they receive it.
Finally, don't forget a small note. You could explain the significance of the Dala animal or simply share that you handmade it with them in mind. That personal connection is what makes a key ring diy project such a meaningful gift.
As you get ready to start your project, a few questions are bound to pop up. That’s perfectly normal! Here are some straightforward answers to the things crafters often wonder when they first start making key rings with our Dala models.
My goal here is to give you quick, practical solutions so you can sail past any little bumps in the road and keep the creative process fun from beginning to end.
For wooden models like these, acrylic craft paint is your best friend, and for good reason. It’s water-based, so cleaning your brushes is a snap, and it dries quickly while coming in an incredible rainbow of colours.
Since a key ring gets knocked around in pockets and bags, durability is key. For the best, longest-lasting results, always lay down a coat of primer before you start painting. Once you’re happy with your masterpiece, seal it with a clear, non-yellowing varnish. Both matte and gloss finishes look fantastic; it really just comes down to the look you’re going for.
This is a worry I hear a lot, but the solution is surprisingly simple. The secret to preventing the wood from splitting is to drill a small pilot hole before you twist in the screw eye. Honestly, this is the single most important step for getting a clean, professional finish.
Just grab a drill bit that is slightly smaller than the diameter of the screw's threads. This creates a neat little path for the screw, taking all the pressure off those delicate wood fibres. From there, you can gently turn the screw eye in, either with your fingers or a pair of pliers, until it’s perfectly snug and secure.
Think of the pilot hole as a guide. Without it, you're forcing the metal to push wood out of the way, which is an easy way to cause a fracture. With the hole, you're simply guiding the screw into a channel you've already made, ensuring a strong, damage-free connection every single time.
Absolutely! Making it your own is what a key ring diy project is all about. Paint is just the starting point.
Here are a few ideas to get you thinking:
Just be sure that whatever you add is attached securely and sealed properly so it can stand up to the rigours of daily use.
The time you’ll need really depends on how complex your design is. For a simple, single-colour key ring with just a few details, you could be all finished in about 1-2 hours, not including the drying time.
But if you’re planning on more intricate patterns, like the traditional Dala folk art style, it’s a good idea to set aside 3-4 hours or more. And remember to factor in enough drying time between each layer of paint and for the final varnish, which can take anywhere from a few hours to a full 24 hours to cure completely.
Ready to create something unique? Dalaart offers authentic, unpainted Dala models that are the perfect canvas for your imagination. Explore the collection and get started.


.svg)


.png)


