February 11, 2026
To måla om cykel (repaint a bike) is one of those fantastic DIY projects that can totally transform a tired old bike into something you're genuinely proud to ride. It’s about more than just slapping on a new colour; it’s a whole process of taking your bike apart, prepping it properly, painting it with care, and putting it all back together. The end result is a functional piece of art that’s 100% you. This guide will walk you through the entire journey, from rusty frame to road-ready masterpiece.
Giving your bicycle a fresh coat of paint is one of the most satisfying hands-on projects you can tackle. It’s a chance to take something old, worn out, or just plain boring and breathe new life into it. This isn't just about changing the colour—it's an opportunity to really get to know your bike on a mechanical level and stamp your personality onto something you use every day.
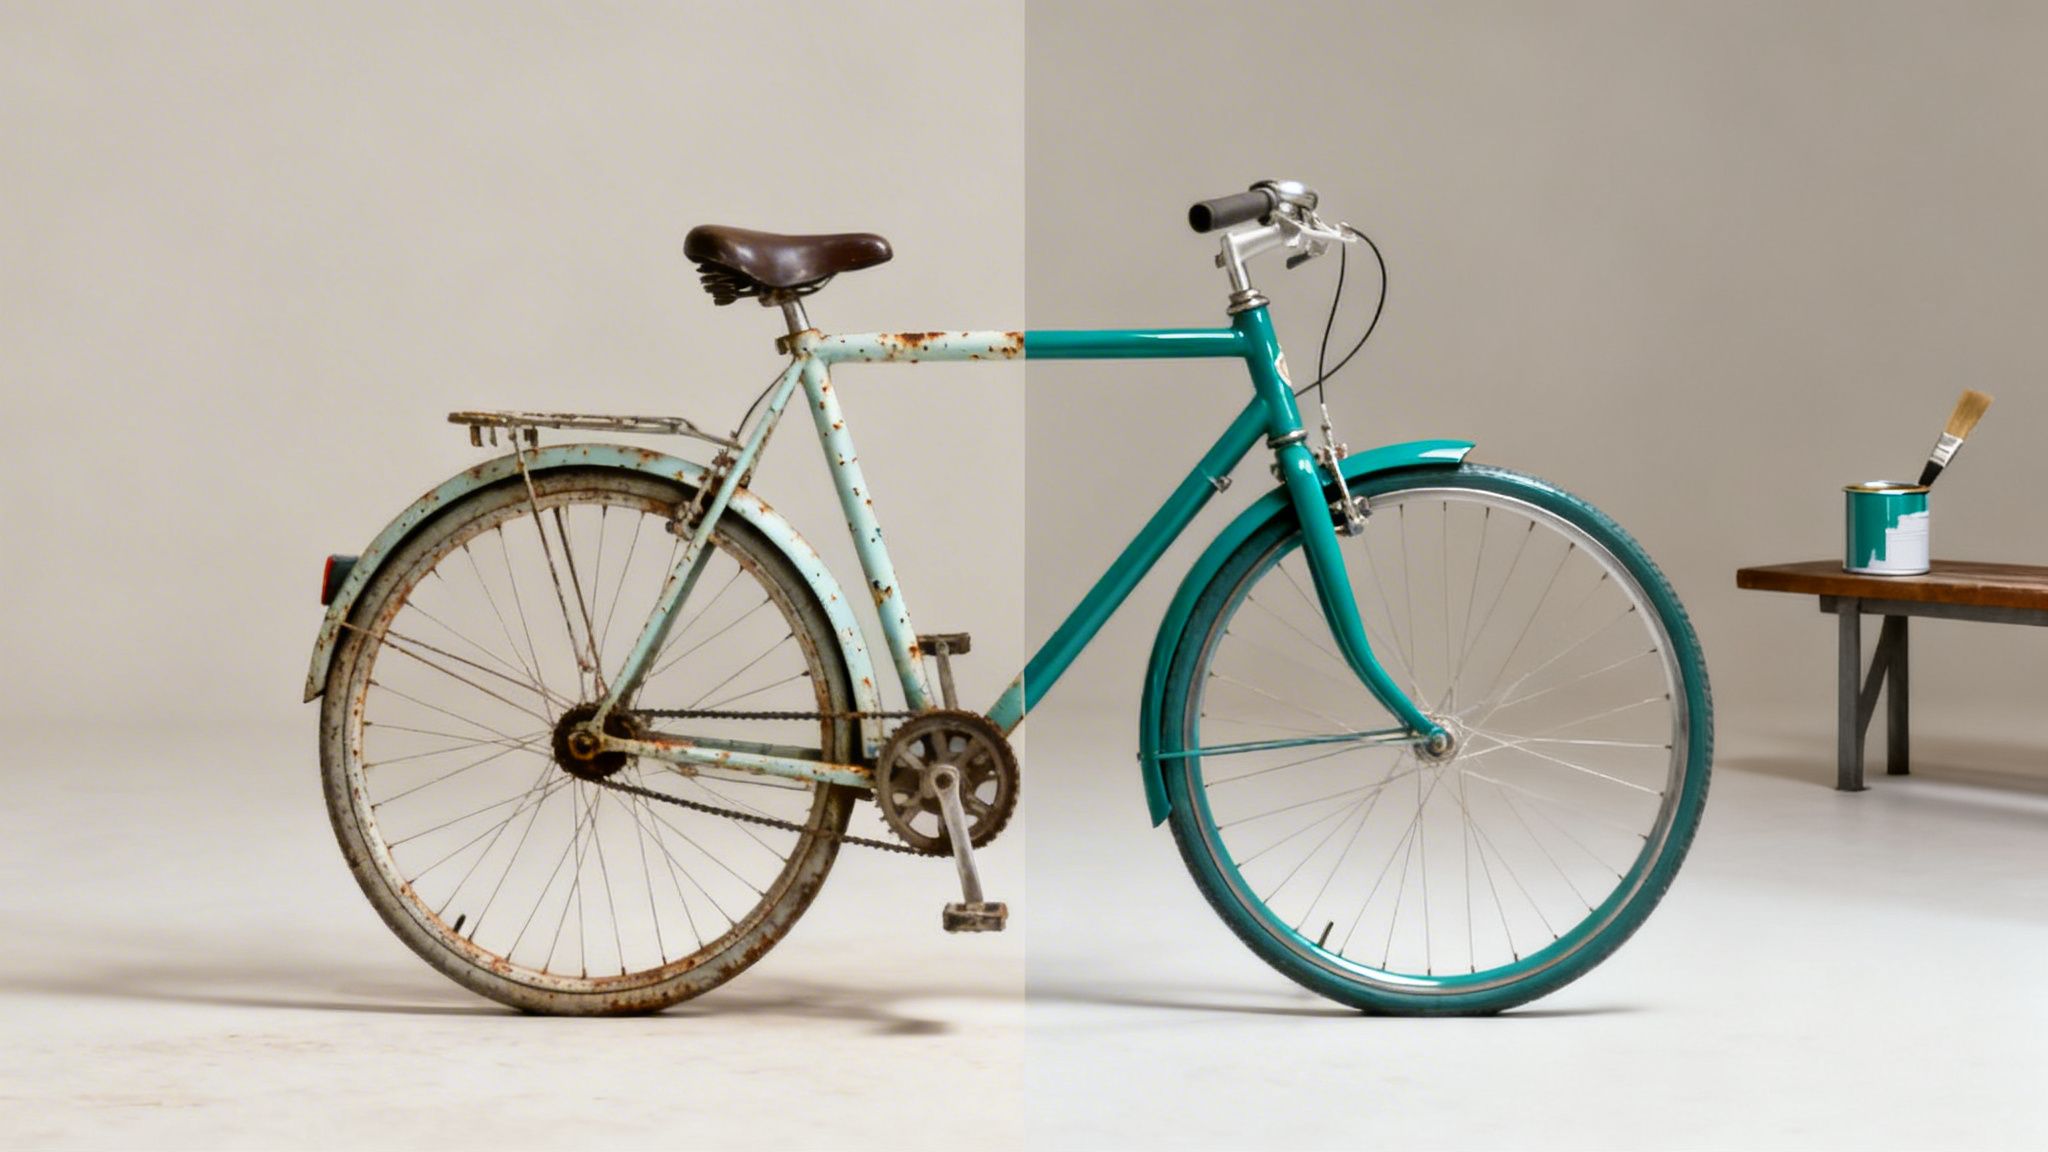
The journey to måla om cykel is incredibly rewarding, mixing pure creativity with practical, hands-on skills. You’ll learn the fundamentals of prepping a surface, different painting techniques, and how to put everything back together without losing any screws. Think of it as creating a functional piece of art you’ll be proud to show off.
Let's be honest: this project requires patience and a good eye for detail. But the payoff is huge. Every step, from sanding down the old paint to laying down that final clear coat, adds up to a result you just can't get from buying off the shelf.
This sustainable mindset is definitely catching on. The Swedish DIY market has seen a real boom in demand for eco-friendly and sustainable paint options, as people become more aware of what goes into traditional products. It shows a clear shift toward making more conscious choices in our hobbies. You can find more insights into these Swedish consumer trends over at Statista.
The real satisfaction comes from the transformation itself. Watching your old, scratched-up bike turn into a gleaming, custom machine through your own efforts is an incredible feeling of accomplishment.
So, you've got a vision for your revamped bike. Excellent. Now comes the really critical part: gathering your arsenal. The success of any project to måla om cykel (repaint a bike) truly hinges on getting the right materials together before you start. Think of it as your pre-flight checklist; skipping a step here almost always leads to a disappointing finish later.
Your shopping list is more than just paint. You'll need the essentials for prep and safety, too. This means various grits of sandpaper (a coarse one for stripping old paint, a fine one for smoothing), a wire brush for any stubborn rust, a good degreaser to get the surface surgically clean, and quality masking tape to protect the bits you don't want painted.
Walking into the paint aisle can feel a bit overwhelming, but picking the right type for your bike frame is simpler than it looks. It really just comes down to balancing durability, how easy it is to use, and the finish you're dreaming of. The choice you make now will define the look and resilience of your bike for years to come.
What's available to you is also shaped by bigger trends. Here in Sweden, the paint industry is made up of 83 different businesses, and it's going through a bit of a shift. While the big international names have dominated for ages, there's a growing demand for more eco-friendly and sustainable paint options, which is changing what we hobbyists can find on the shelves. You can read more about the Swedish paint and coatings sector in this industry report.
Whatever you do, don't underestimate the importance of primer and a clear coat. They are the unsung heroes of a paint job that actually lasts.
A good primer is non-negotiable. It does two vital things: first, it gives the colour coat something to grip onto, ensuring it adheres properly to the metal. Second, it adds another layer of protection against corrosion. Always pick a primer that’s compatible with your paint; most brands will point you to the right one.
Finally, the clear coat is your bike's armour. It’s what protects that beautiful colour from scratches, UV rays, and the general abuse of daily life. You can pick from gloss, satin, or matte finishes to get the exact look you want. The secret is applying several thin layers—that’s how you get a durable, professional-looking result. If you're getting creative and mixing custom colours, a solid grasp of how they work together is a must. You might find our guide on creating a colour mixing chart handy for nailing that perfect hue.
Key Takeaway: Your final paint job is a complete system. The primer, colour, and clear coat have to work together. Investing in quality products for each stage is the single best way to guarantee a finish you'll be proud of for years to come.
This is where the magic really happens, long before you even think about popping the lid on a can of paint. If you’re dreaming of a flawless, professional-looking finish when you måla om cykel, patient and methodical preparation is everything. Trust me on this one – rushing this part almost guarantees you’ll be disappointed with the result.
So, take a deep breath, put on some good music, and get ready to do it right. The first big job is carefully taking the bike apart.
A proper teardown means going way beyond just taking the wheels off. You need a completely bare frame, a blank canvas. This is the only way to reach every single nook, cranny, and tube joint without accidentally spraying your delicate mechanical parts.
To save yourself from a reassembly nightmare down the road, you need a system. Grab some small ziplock bags or containers and label everything as you remove it. It might feel a bit fussy at the time, but this simple habit will save you from a world of frustration later.
Here’s a rundown of what absolutely has to come off the frame:
Pro Tip: Use your phone to take photos at each stage of disassembly. These visual notes are an absolute lifesaver when you're trying to remember how that tricky brake cable was routed or which tiny washer went where.
With the frame completely bare, it’s time to get rid of the old paint and decals. This step creates the perfect raw surface for your new primer to bite into, ensuring a durable, long-lasting finish. You’ve got a few options here, and the best one for you depends on your frame material, your budget, and how much patience you have.
This simple diagram breaks down the whole project into its core phases, giving you a clear overview of the journey ahead.
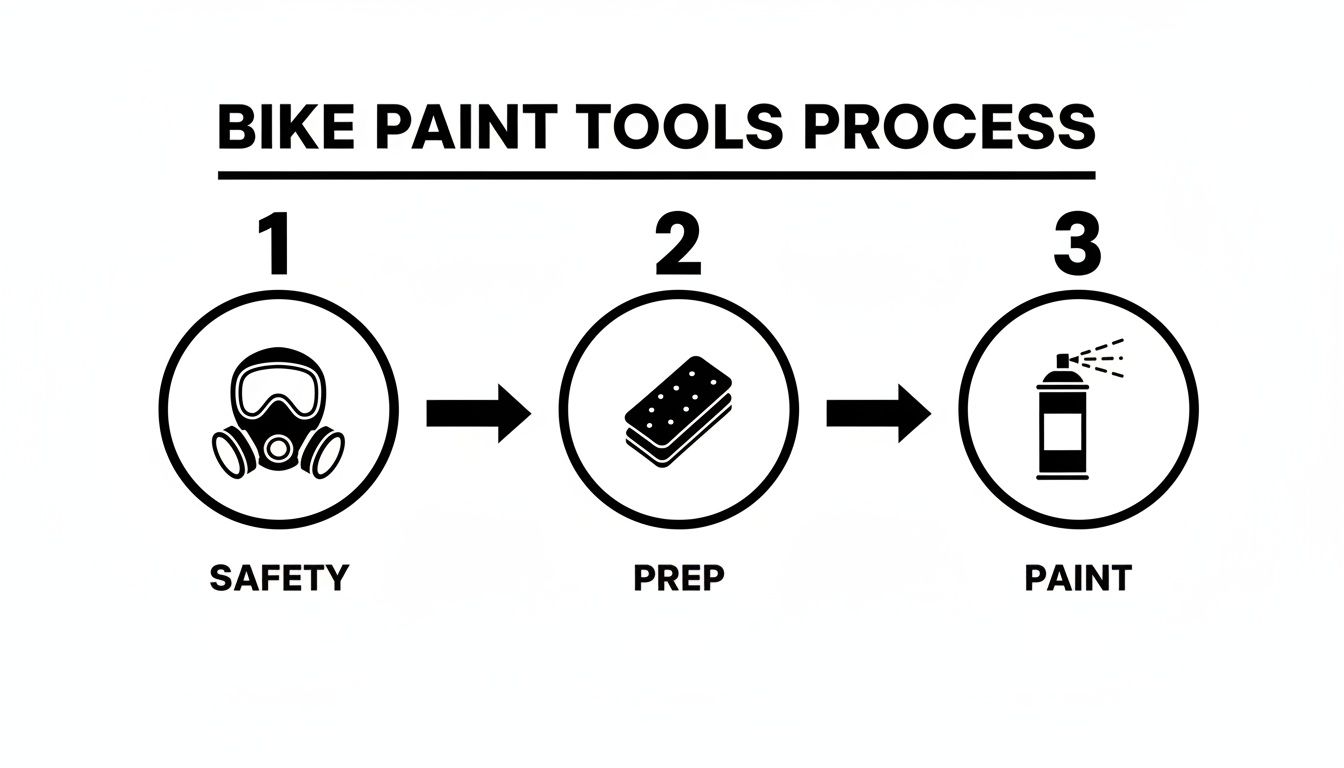
As you can see, it all boils down to three key pillars: starting with safety, moving to solid preparation, and finishing with the fun part – the painting itself.
Chemical strippers are the fast and dirty option. They dissolve old paint quickly, allowing you to just scrape it away. The downside? They are full of harsh chemicals and require excellent ventilation and full safety gear. We’re talking chemical-resistant gloves, and proper goggles are a must. This method is usually best for steel frames, as it can be too aggressive for aluminium or carbon fibre, so always read the label to check compatibility.
Manual stripping with sandpaper is the most budget-friendly route. It just takes a lot of elbow grease. The upside is that you have total control over the process and it works on any frame material. Start with a coarse grit paper (like 80-grit) to power through the old paint, then gradually move to a finer grit (around 220-grit) to leave a perfectly smooth surface for the primer. The quality of your sanding directly impacts the final look, much like any hands-on project where the prep work is king. If you enjoy this kind of meticulous work, you might also like our guide to creating your own DIY wine rack.
Finally, there’s sandblasting. This is by far the quickest and most thorough option, stripping the frame to bare metal in minutes. It’s a professional service, so it will add to the cost of your project. But for a frame with lots of intricate details or significant rust, it’s often the best way to get a perfectly clean slate to work with.
With your bike frame stripped bare and immaculately clean, you’ve hit the most exciting part of the project to måla om cykel. This is where the magic happens, turning that blank canvas into something you can really be proud of. The secret to a professional-looking finish isn't about rushing; it’s all about patience, precision, and building up your layers methodically.
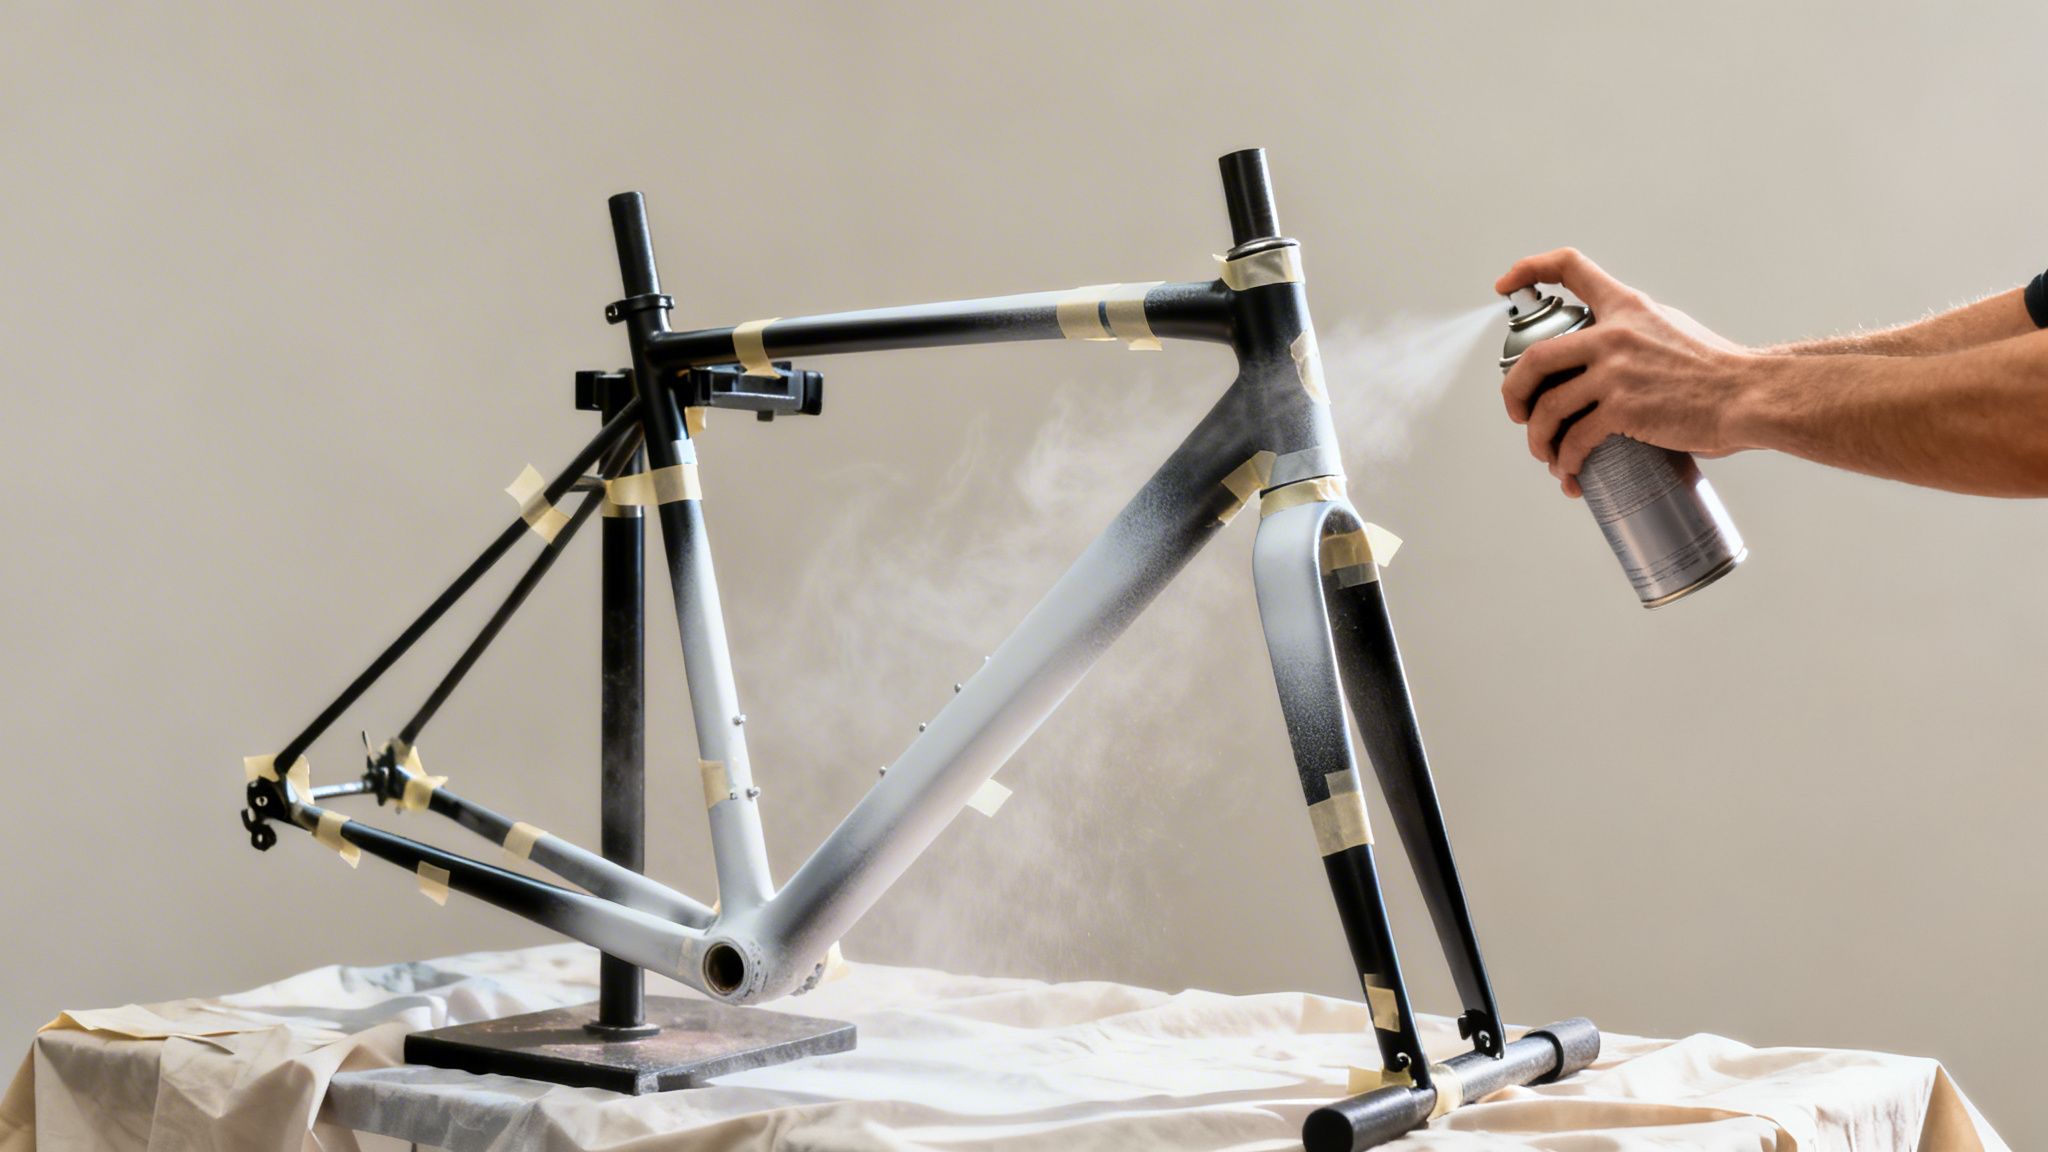
Think of it as a three-step performance. The primer sets the stage, your colour is the star of the show, and the clear coat is the grand finale that protects all your hard work. For a spectacular result, each layer has to be perfect, because it relies completely on the one before it.
Whatever you do, don't skip the primer. I can’t stress this enough. It is the single most important step for making sure your paint actually sticks and lasts. Primer is formulated to bond aggressively to bare metal, creating a perfect, uniform surface for your colour coats to grab onto. Without it, your beautiful new paint job will be much more likely to chip, peel, or flake off at the first knock.
When it comes to primer, your mantra should be "thin to win." Several light, misty coats are always better than one thick, heavy one. A thick coat will only obscure the frame's finer details and is far more likely to run or drip.
Here’s how to get it right:
Let each coat of primer dry for the time recommended on the can—usually about 15-20 minutes between coats. After two or three thin coats, the frame should have a solid, opaque finish.
Applying your chosen colour uses the exact same principles as priming. The goal is to build up the colour gradually with thin, even coats. This is where your patience will really be rewarded. Rushing this stage is the fastest way to get drips, runs, and blotchy patches that are a real headache to fix.
Work methodically around the entire frame, making sure you get coverage from every possible angle. Pay close attention to the trickier areas like the bottom bracket shell, the dropouts, and any lug details. Once you’ve applied two to four coats of colour, let it dry thoroughly before you even think about the next step.
Remember, the time between coats isn't just for drying—it's for "flashing off." This is when the solvents in the paint evaporate, which allows the next layer to bond properly without dissolving the one beneath it. Ignoring these intervals is a recipe for a weak, unstable finish.
The final step in painting is the clear coat. This is your frame's armour, protecting that vibrant colour from scratches, UV rays, and the weather. A good clear coat also adds incredible depth and richness to the finish, whether you’re going for a high-gloss, satin, or matte look.
Apply the clear coat using the same technique: multiple thin, sweeping layers. Two or three coats are usually more than enough to provide solid protection and a beautiful, even sheen. Once that final coat is on, the hardest part begins—the waiting game. While the frame might feel dry to the touch within a few hours, the paint needs a lot longer to fully cure and harden. We'll get into that critical curing period next.
So, the final clear coat is on, and your frame is looking absolutely spectacular. This is where your patience gets its biggest test, and it's what separates a good måla om cykel (paint a bike) project from a truly professional-looking one. You have to fight that massive urge to start bolting everything back on immediately.
Right now, your paint needs time to fully cure. This is a chemical process that goes way beyond just being dry to the touch.
Think of it like this: "dry" paint is when the solvents on the surface have evaporated, so it no longer feels tacky. "Cured" paint is when the finish has hardened all the way through, forming a tough, durable shell.
If you start clamping parts onto a frame that's only surface-dry, you're almost guaranteed to leave permanent marks, smudges, or imprints in the soft layers of paint underneath. It’s a heartbreaking mistake to make right at the finish line.
Most spray paints need at least 24-48 hours before you can safely handle them. But the full curing process? That can take anywhere from 5 to 7 days, sometimes even longer depending on the paint you used, the temperature, and the humidity. Find a warm, dry, dust-free spot to hang your frame and just let it be. Consider this waiting period the final investment in a finish that will last for years.
Once you’re confident the paint is rock-hard, the really satisfying work begins. It’s time to turn that beautiful frame back into a rideable bicycle. Grab those bags of parts you so carefully labelled during disassembly and start putting it all back together.
It's best to work methodically, starting with the components closest to the frame (like the bottom bracket and headset) and moving outwards.
A few tips I've learned for a smooth reassembly:
With your bike fully reassembled, the last step is to give it that showroom finish. Carefully remove any bits of overspray from components using a soft cloth and a little isopropyl alcohol.
For the frame itself, a high-quality carnauba wax or a dedicated bike polish will add another layer of protection and give your new paint job an incredible, deep shine. This is also the perfect moment to add custom details that make the bike truly yours. If you're looking for ideas on how to add a personal touch, check out our article on how to apply custom decals to surfaces.
The personal satisfaction you get from reviving an old bike is huge. It’s a trend that’s even showing up in market data. While e-bike sales in Sweden shot up by 50% between 2017 and 2020, sales of standard bikes have nearly halved over the last decade. This suggests more people are getting interested in upgrading and personalising what they already have instead of just buying new. You can find more insights on the Swedish e-bike market share on Research and Markets.
It’s totally normal for questions to pop up, even with the best-laid plans. It’s all part of the creative process! Here are a few quick answers to the things people ask most when they decide to måla om cykel, from what it'll cost to how to handle those little "oops" moments.
Your budget can swing quite a bit depending on how you approach this. For a solid DIY job using good quality spray cans, sandpaper, and primer, you're probably looking at somewhere between 500-800 SEK. This is a fantastic starting point and can get you a result you’ll be really proud of.
On the other hand, if you’re chasing that showroom-perfect, ultra-durable finish with automotive-grade 2K paints and fancy chemical strippers, the cost can easily climb to 1500-2500 SEK. The paint itself is the biggest variable, but don't skimp on a quality primer and clear coat—that’s what really makes a finish last.
Technically, you could, but if you want a result that doesn’t scream "I did this in a hurry," you really shouldn't. It's almost impossible to get smooth, even coverage in all the nooks and crannies like around the bottom bracket, inside the dropouts, or near the head tube.
Worse yet, you're guaranteed to get overspray on critical parts like your chain, brake pads, and bearings. That isn’t just messy; it can seriously mess with how they work and compromise your safety.
Taking the time to fully disassemble the frame is the single best investment you can make in the project. It’s the difference between a job that looks homemade and one that looks professional.
First off, don't panic! The absolute worst thing you can do is try to wipe a drip while it's still wet. Trust me, you’ll only turn a small drip into a big, ugly smear.
The trick is to let it be. Just let the drip dry completely for a day or two until it's rock hard. Once it's fully cured, you can carefully wet-sand just the raised drip with some very fine-grit sandpaper (1500-2000 grit) until it’s perfectly level with the paint around it. Clean off the dust, then apply a couple of very light mist coats of your colour to blend it all back in seamlessly. Patience is your best friend here.
At Dalaart, we celebrate the hands-on creativity that turns everyday objects into personal works of art. If you love the idea of personalising your own Swedish treasures, explore our collection of unpainted DIY Dala horses at https://dalaart.com.


.svg)


.png)


