April 9, 2026
You have probably had that moment where a Minecraft build session ends, the tea is still warm, and your hands want to keep making something. Not another screenshot. Not another saved pin. Something real.
That is exactly where a pärlplatta minecraft enderman project fits so well. The Enderman is one of those rare game characters that already looks like bead art waiting to happen. It has the rigid pixel silhouette, the dark palette, and those sharp little eyes that read instantly even from across a room.
In Sweden, that idea lands especially well. Searches for “pärlplatta Minecraft Enderman” show a clear gap in localised tutorials using sustainable, Swedish-sourced materials, even though Etsy Sweden listings skew toward generic imported items and craft bead sales grew 25% year on year in 2025 according to the Etsy market context provided for Sweden and the linked listings at Etsy Sweden’s perler bead Enderman market page. The same context also points to an audience that includes 1.2M active SE Minecraft players who want to blend gaming nostalgia with folk craft traditions.
That gap matters because a Swedish craft project is rarely just about copying a pattern. The pleasure is in choosing materials well, working neatly, and making the finished piece feel like it belongs in your home. A bead Enderman can be playful, but it can also look surprisingly collectible when you build it with restraint and finish it properly.
I also think this is why gaming craft and Scandinavian handmade culture sit so naturally together. Pixel forms translate cleanly into physical materials, much like painted folk miniatures do in another medium. If you enjoy the charm of tactile display pieces, the world of 3D printed miniatures for creative collecting scratches a similar itch, even if the making process is completely different.
The best version of this project is not the quickest one. It is the one with crisp lines, controlled melting, and enough intention that it looks at home on a shelf rather than tossed in a toy box. That is the version worth making.
A strong Enderman design works because it respects the character’s restraint. Too many colours and it starts to look muddy. Too much melt and the silhouette softens. Too much improvisation and the eyes lose that slightly eerie expression.
Pärlplattor already have a place in Swedish making culture. Many people first met them as a childhood craft, but the medium has enough precision to support much more polished work. The Enderman is a good example. It can start as a simple bead figure and end as a display piece that nods both to gaming culture and to a Scandinavian love of clean forms.
That local angle matters because many online tutorials are broad, generic, and not adapted to the materials people buy in Sweden. The demand is there, but the guidance often is not. A careful, localised approach solves that.
A shelf-worthy piece usually comes down to three choices:
The difference between a child’s craft and a collectible-style piece is often just control. A calm workspace, sorted beads, and steady ironing do more for the result than any gimmick.
Treat the Enderman like a miniature design object. The fewer things you force into it, the stronger it looks.
A good finished piece carries a little contrast. It is slightly spooky, but still cosy in the context of a handmade room. That contrast is part of the charm.
A good Enderman starts to succeed before a single bead is placed. The materials set the line quality, the stability, and the final feel on the shelf. If the goal is a display-worthy piece rather than a quick afternoon craft, choose supplies that hold shape cleanly and fuse evenly.
For this build, a small pile of well-chosen basics gives a better result than a big mixed hobby kit.
Material quality shows up most clearly in black-heavy projects. With bright characters, a slightly uneven bead can disappear into the colour play. With an Enderman, every crooked line stands out.
For a flat pärlplatta, mixed brands can be fine if the peg fit and bead height are close enough. For anything collectible in finish, or anything that may become a 3D build, consistency saves frustration. Even bead height gives a more even fuse. Even fuse lines make assembly cleaner.
That is why many crafters in Sweden stick with Hama for this kind of project. The colours are easy to match across packs, replacement beads are easier to find, and the boards fit the beads without that slightly loose wobble some budget brands have. Cheaper options can still work, but they often cost you time in sorting, test fusing, and correcting edges.
If you enjoy precise pixel work, the same logic shows up in other game-inspired projects too. This guide to Pokémon bead pattern layouts and counting methods is useful for understanding how bead choice affects pattern clarity.
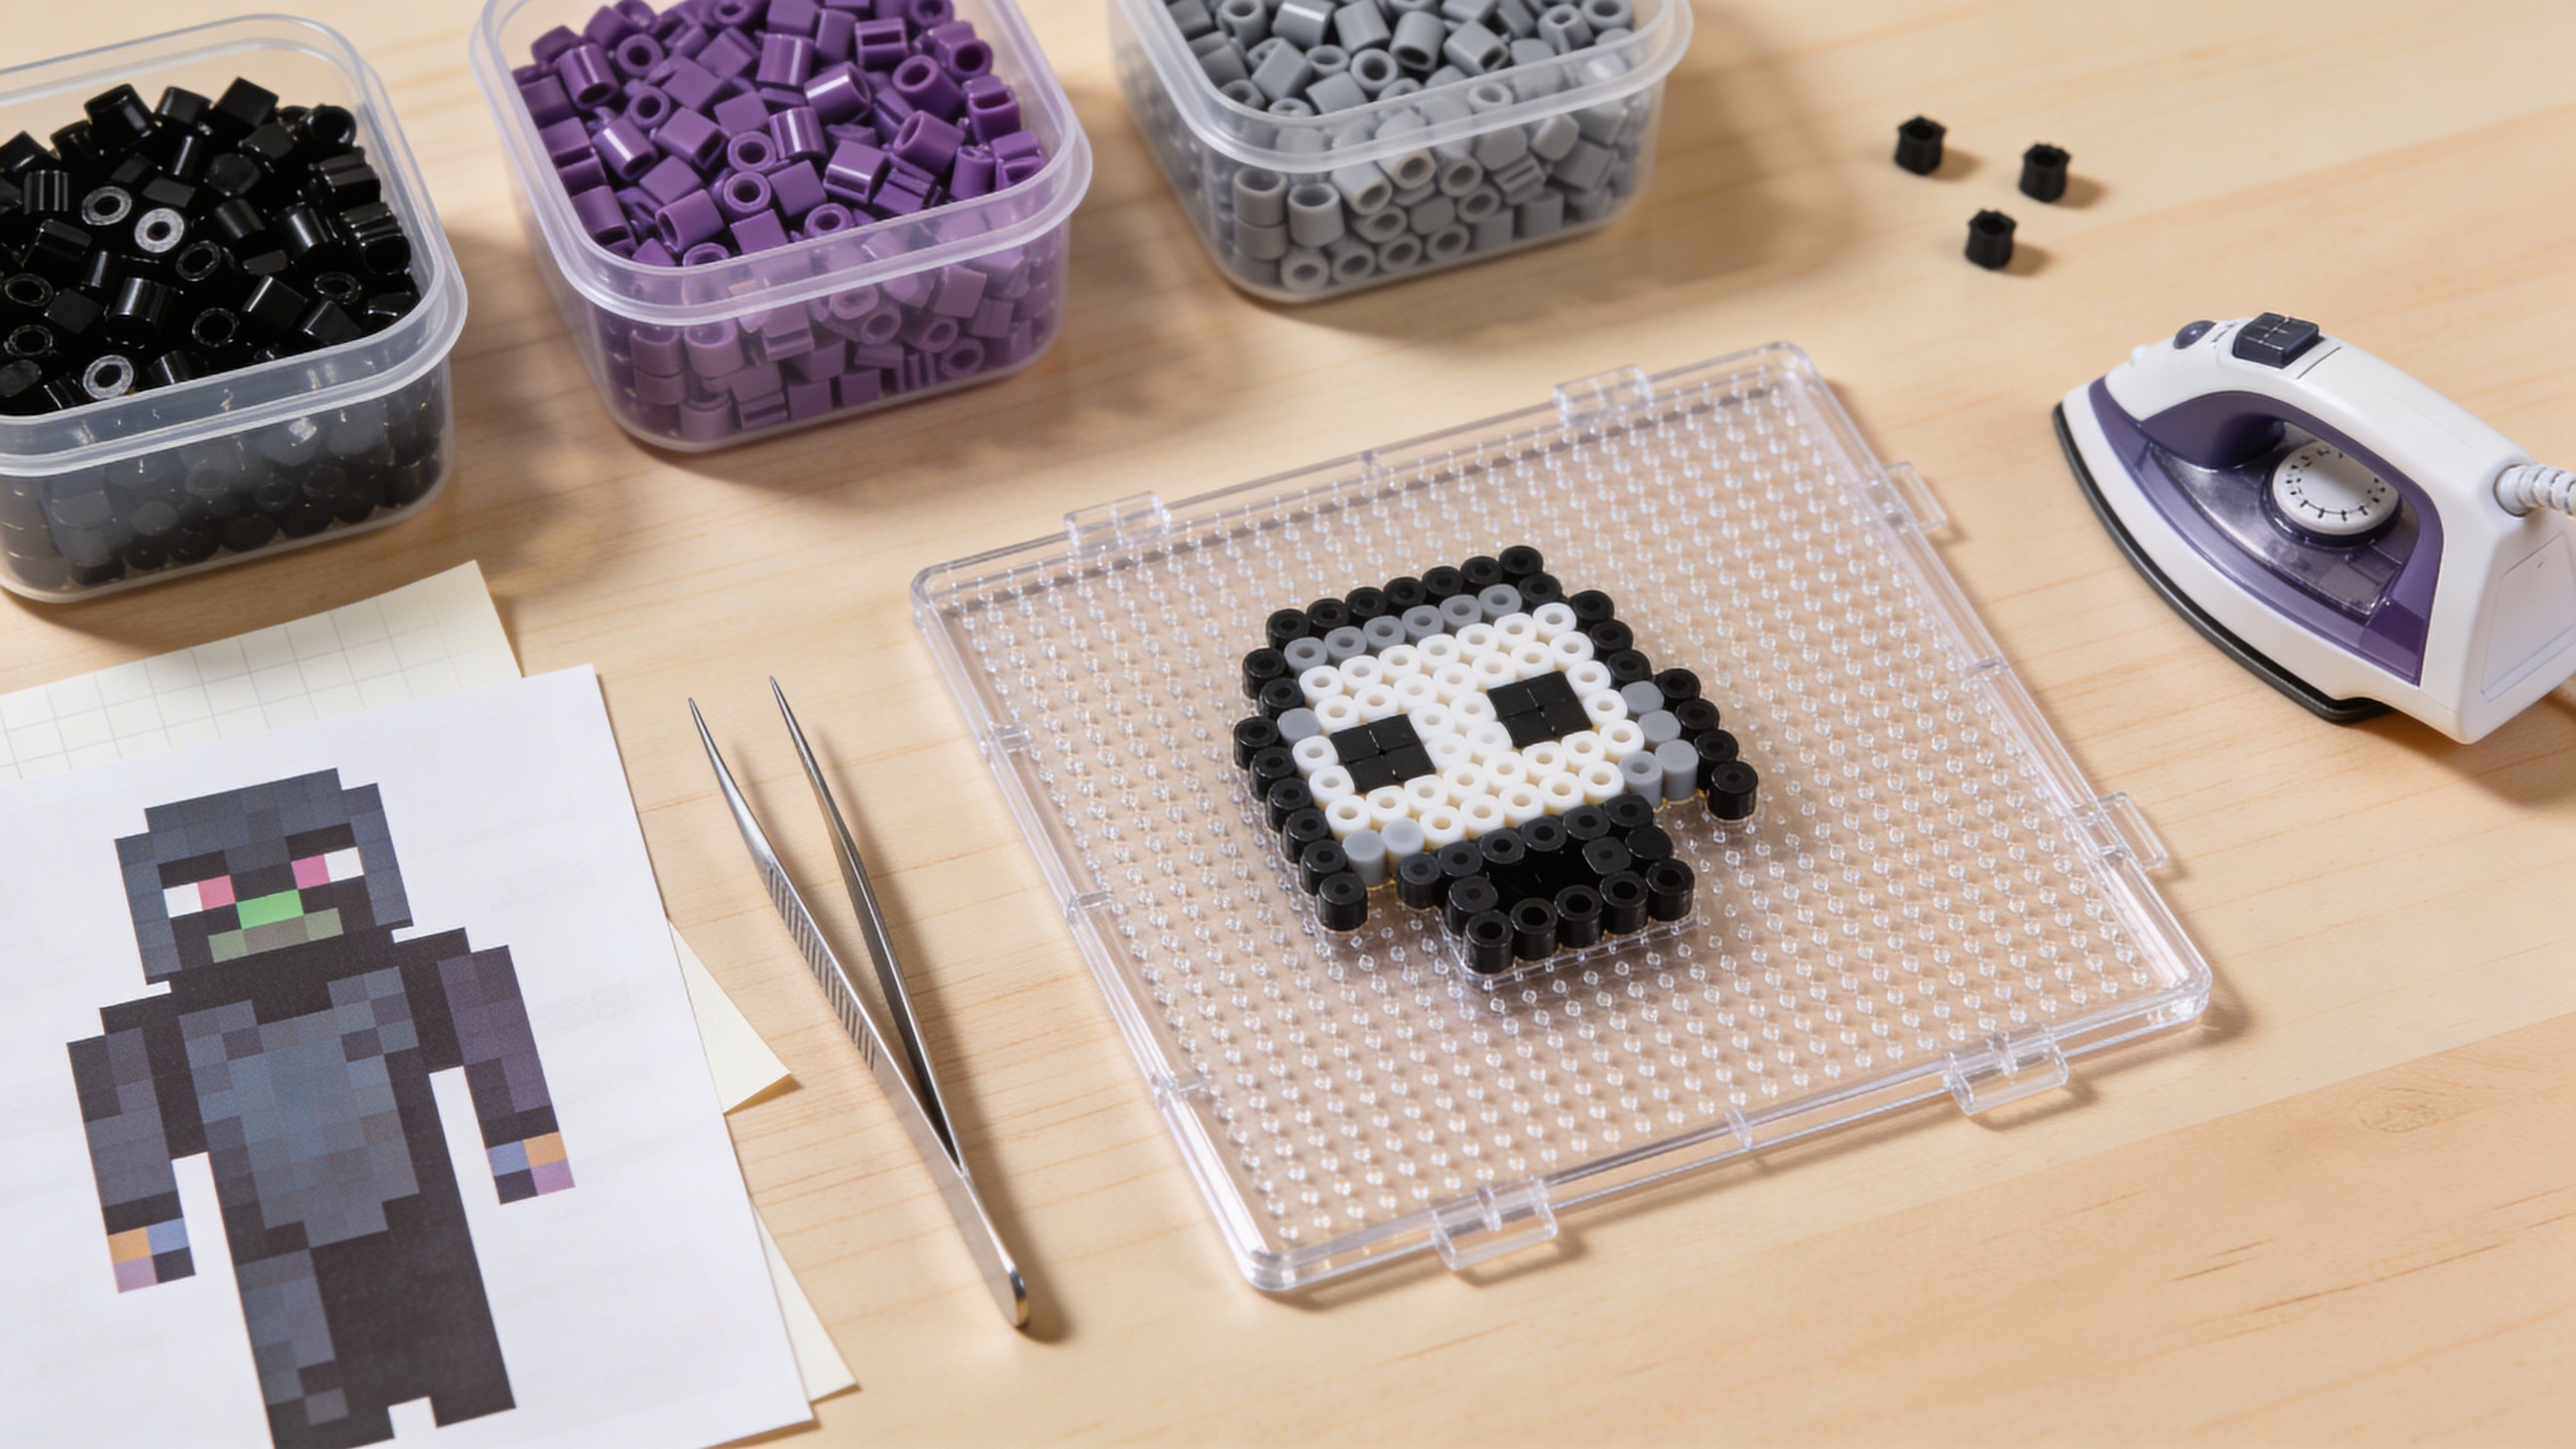
An Enderman uses long runs of dark beads, which can become tiring if the table is messy. A tidy setup keeps the work pleasant and helps you protect the silhouette.
Use a simple layout:
I also like to check the room light before I begin. Under warm evening lamps, dark purple and black can start to blend together. Daylight or a neutral task lamp makes a noticeable difference.
A calm setup suits the project. The Enderman is a modern gaming figure, but the making process feels closer to traditional Scandinavian handwork when the tools are ordered, the pace is steady, and each choice is made with care. That is usually what lifts the finished piece from simple craft to something you want to display.
The pattern is your blueprint. If the setup is messy, the build becomes fiddly. If the setup is clear, the bead placement becomes almost meditative.
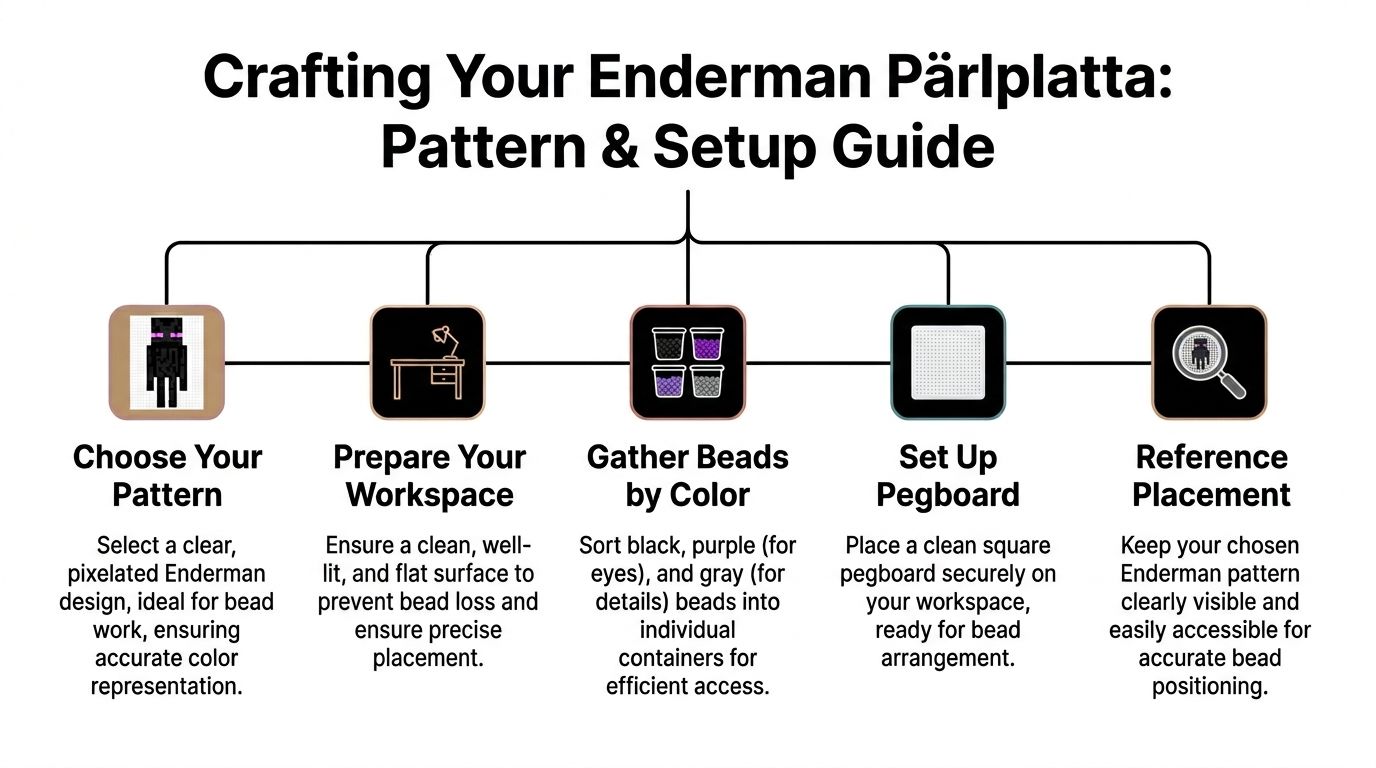
An Enderman pattern should be simple enough to read at a glance. Long legs, narrow torso, straight arms, small eyes. That is the whole personality of the figure.
Avoid patterns that over-render shading. In bead work, too much internal detail often weakens the outline. If the outer shape is right, the character already reads correctly.
If you like working from pixel references, a good companion resource for understanding bead-based pattern logic is this guide to Pokémon beads pattern ideas and layout approaches. The subject is different, but the counting mindset carries over well.
Before you place anything, do three checks.
First, find the centre line of the torso. The Enderman is unforgiving when it leans even one peg off balance.
Second, identify where the eyes sit. In the verified 3D method, the pink eye beads are positioned at 1.9-block eye level for Minecraft fidelity. That sounds technical, but the practical takeaway is simple. The eyes should sit slightly above centre, not halfway down the face.
Third, decide whether you are making a flat piece or preparing separate components for a 3D model. A flat wall piece can be built as one panel. A standing figure is easier when you treat torso, limbs, and face details as planned modules.
Counting the full project bead by bead is tiring and easy to lose track of. I prefer to break it into shape zones:
This method helps you notice shortages early. It also keeps mirrored elements consistent, which matters a lot on an Enderman.
Your hands should not fight your setup. Use a flat surface with enough room for the board, sorted beads, tweezers, and the pattern reference.
A few practical habits make a big difference:
When a pattern uses large dark areas, pause every few rows and check the silhouette from arm’s length. It is the fastest way to catch a missed bead or accidental bulge in the outline.
If you are working on interlocking boards for a larger display piece, tape the undersides lightly so they do not shift. For a standard Enderman, one square board is usually enough. What matters most is not size. It is alignment.
A good Enderman can look sharp on the pegboard and still lose its character in the ironing. The tall silhouette is unforgiving. If the shoulders slump, a leg bows, or the purple eyes blur, the piece stops feeling collectible and starts feeling rushed.
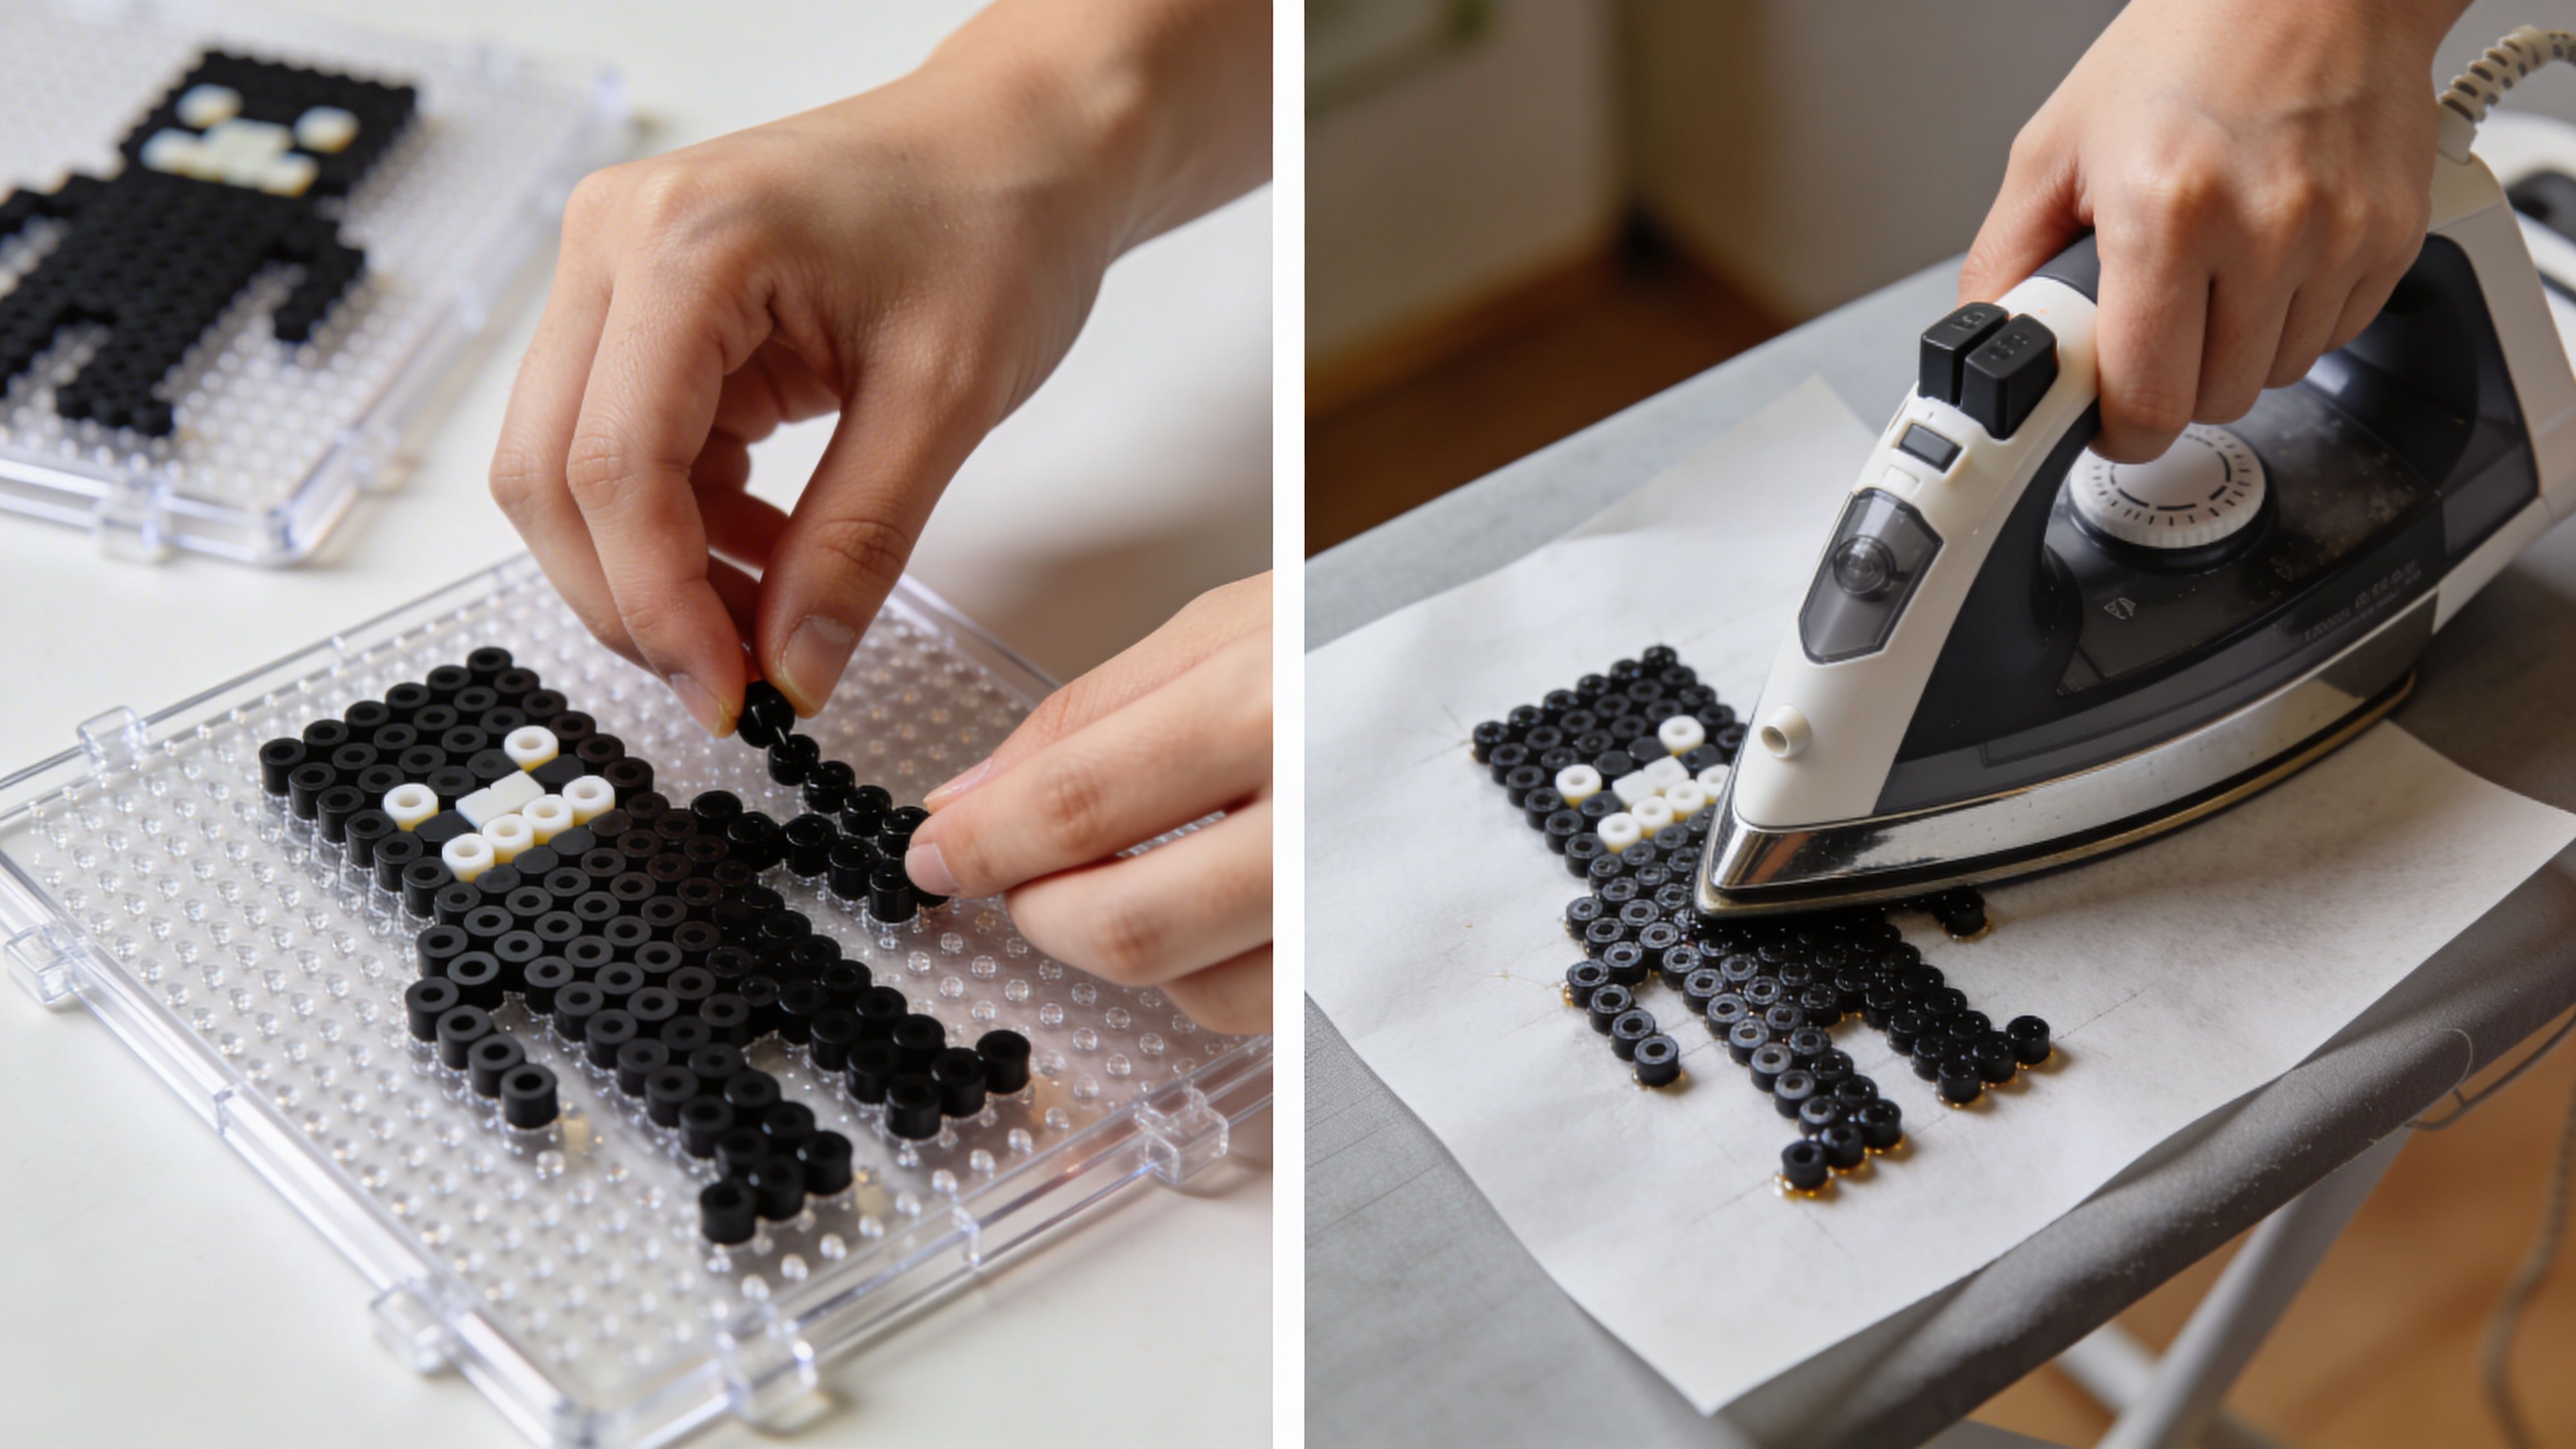
Build the silhouette first, then fill the body. That keeps the Enderman tall, narrow, and unmistakable from a shelf-distance view.
I usually place the figure in this order:
That sequence protects the posture of the design. The eyes matter, but the outline carries the whole piece.
For a 3D version, keep the black sections disciplined. Slight shifts are hard to spot while you work, then obvious once the panel is fused. If you are using several dark tones for shading, a quick check against a bead colour mixing chart for controlled palette choices helps you keep the purple accents clean rather than muddy.
Use a dry iron and parchment paper. Steam adds moisture, and moisture makes results less predictable.
Set the iron to a medium heat and start with light pressure. Small circular motions work well on compact areas, while slow overlapping passes give better control on long limbs. For an Enderman, I prefer passes. They keep the melt more even across those tall straight lines.
Watch the bead tops closely. They should soften and begin to join, but they do not need to collapse flat unless you want a very sealed, polished look. For display pieces, a partial melt usually looks better because it keeps the bead texture visible. That handmade surface is part of the charm, especially if you want the piece to feel closer to crafted folk art than mass-produced wall decor.
A timer can keep you from overdoing the first side, but the plastic itself gives the better signal.
Look for these cues:
If one area is behind, return to that spot with lighter passes. Do not keep cooking the whole panel just to fix one cold corner.
A visual reference can help if you are still learning how the melt should look in motion:
Heat changes the shape fast. Cooling sets it.
As noted earlier from the Enderman video source already cited in this article, warping is a common failure point, especially on long narrow builds. The fix is practical and reliable. Move the fused panel onto a flat surface, cover it with clean paper if needed, and press it under a smooth board while it cools.
Use something rigid. A wooden board, a heavy book with a flat cover, or an acrylic sheet all work better than soft stacks of magazines. Soft pressure lets the piece curve. Even pressure keeps those legs straight and the body square.
Once the panels are cool, dry-fit every joint before adding glue. That extra minute saves a lot of frustration.
A sturdy method is to use short toothpick connectors through the fused side holes, then reinforce with a small amount of PVA glue. The toothpick gives the joint structure. The glue keeps it from working loose over time.
For assembly, keep it tidy:
The finished Enderman should look slender and slightly eerie, not bulky or over-melted. That balance is what lifts it from simple game craft to something more in line with Scandinavian display making. Clean lines, restrained colour, and careful finishing give it that shelf-worthy, folk-gaming feel.
A well-fused Enderman deserves a finish that looks deliberate on the shelf, not improvised at the craft table. The final choices decide whether it reads as a quick Minecraft project or as a small collectible that sits comfortably beside wood, ceramics, and other Scandinavian handmade pieces.
My rule is simple. Let the silhouette do the work.
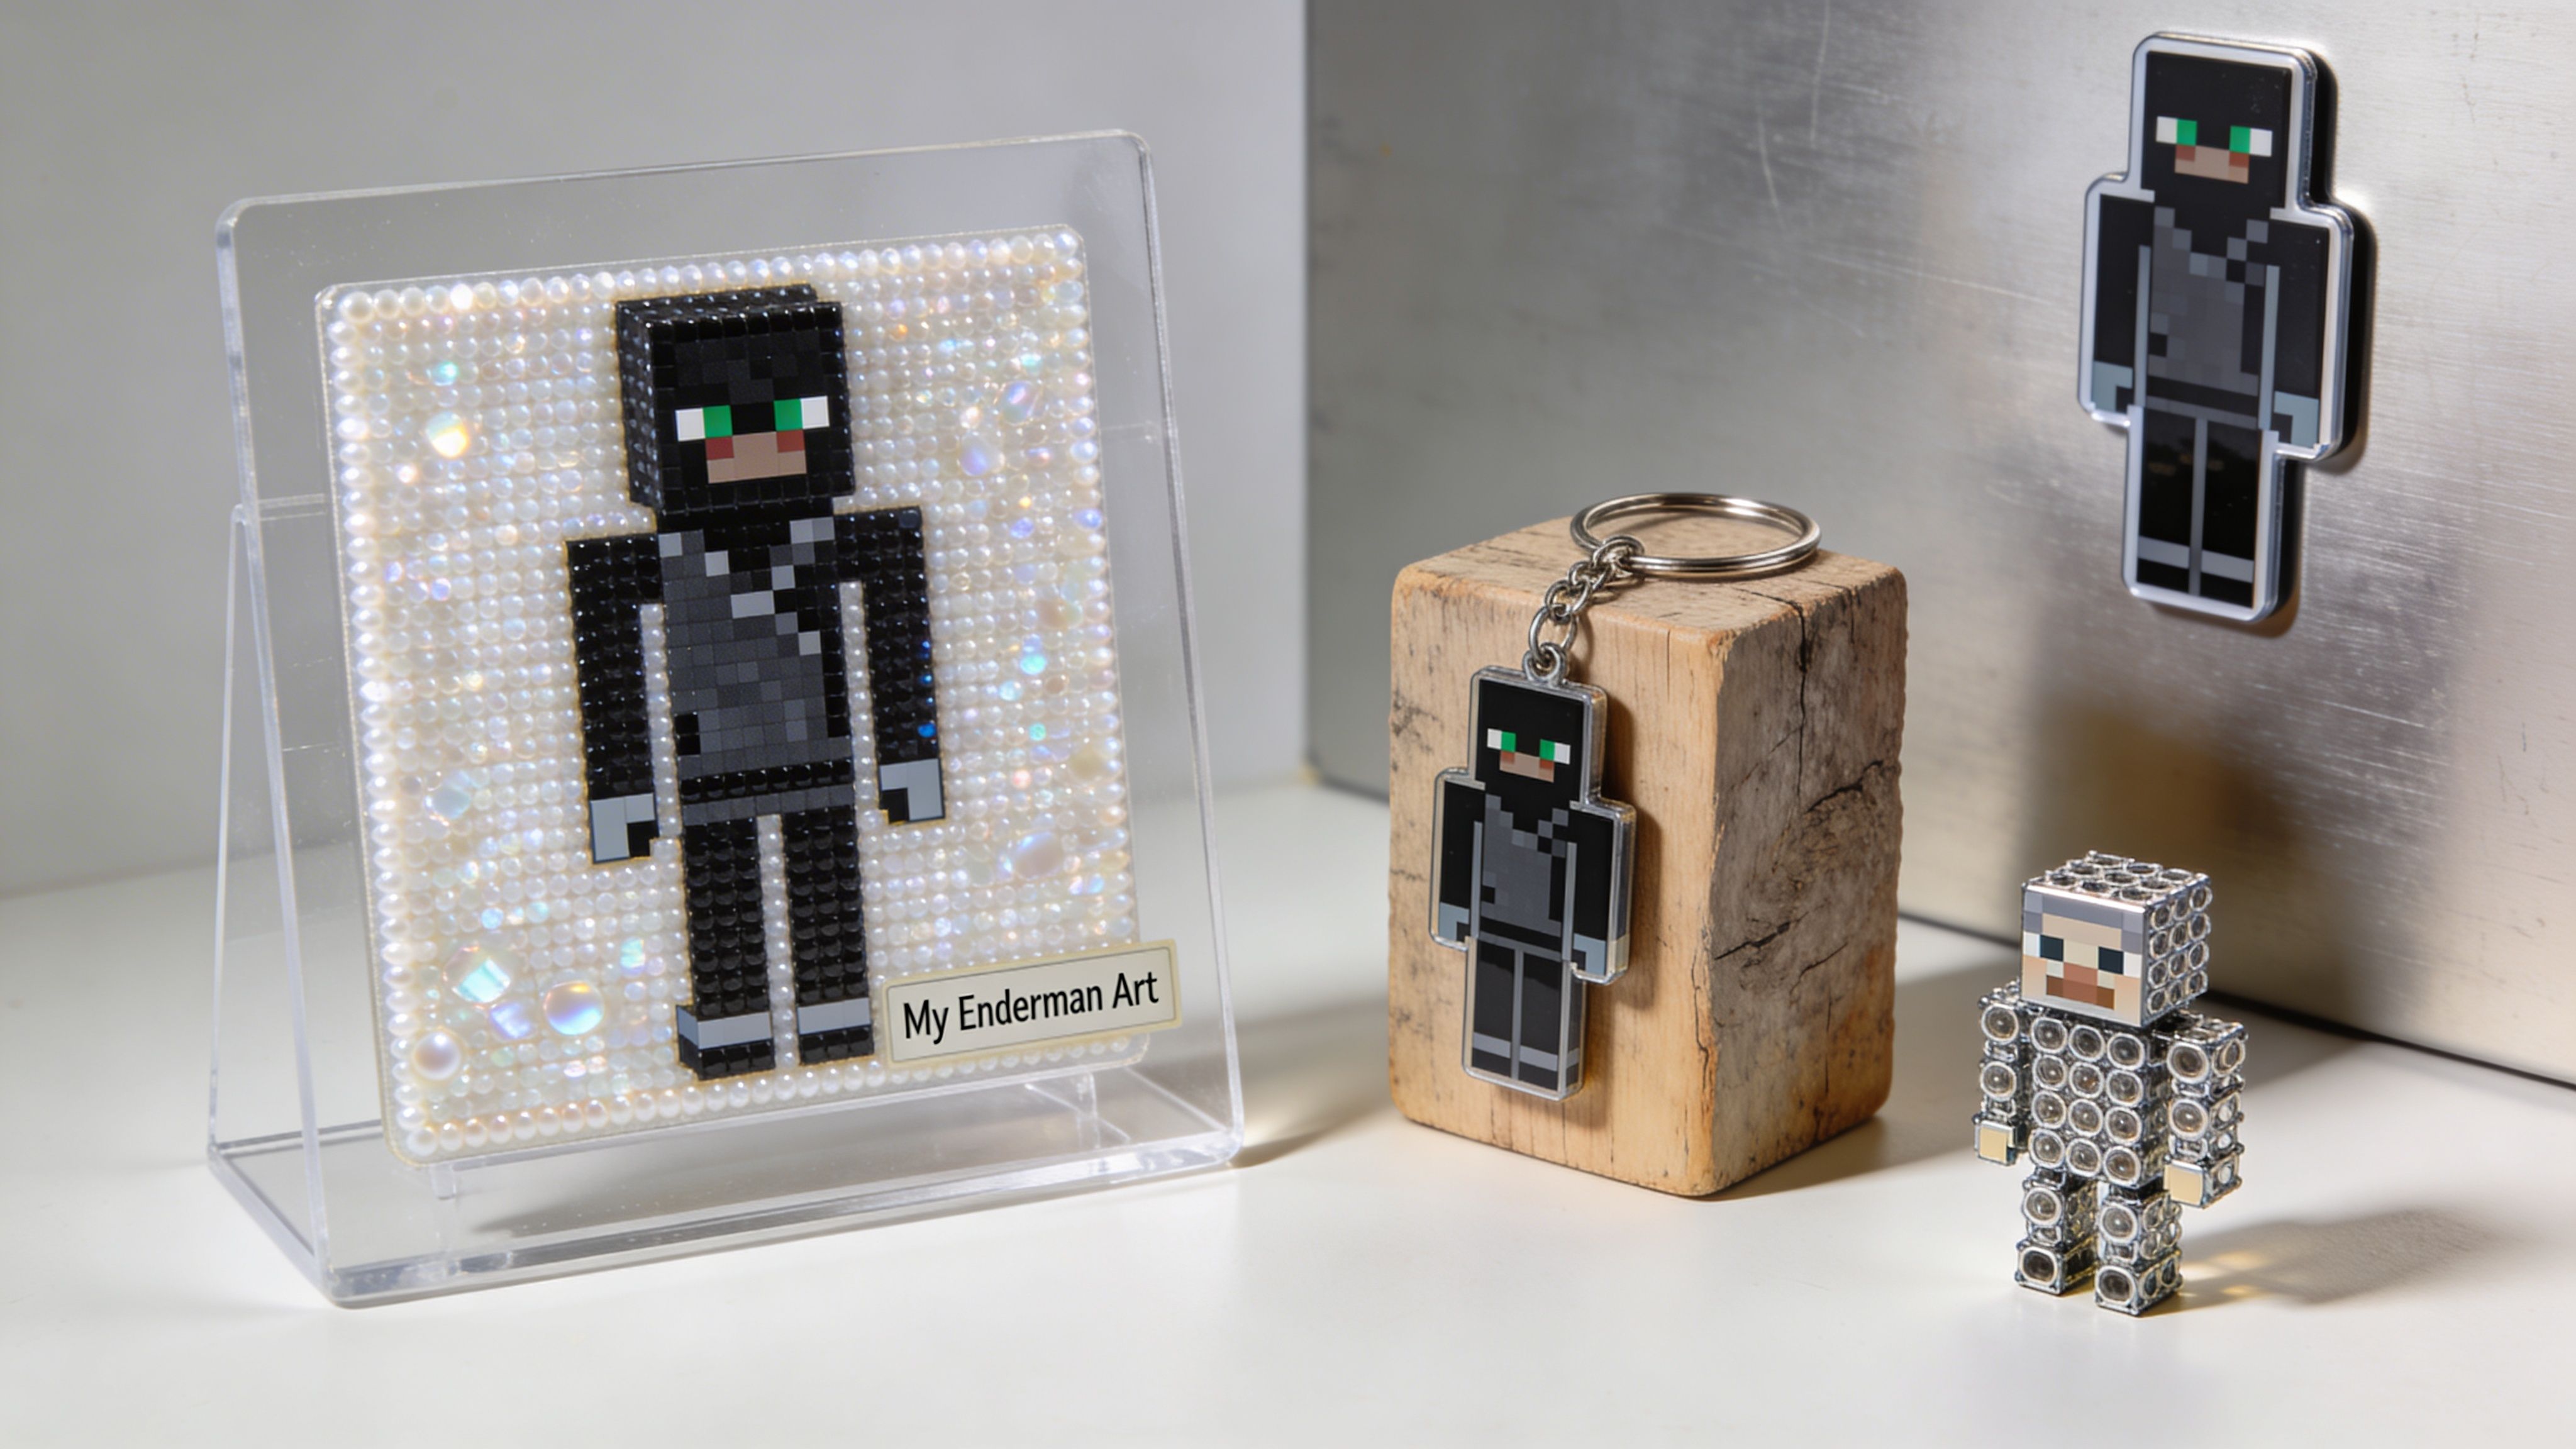
An Enderman already has strong geometry, so the best display solutions support that shape instead of competing with it. A quiet presentation usually looks more expensive and more finished.
Good options include:
Keep frames, backgrounds, and extra decoration restrained. Black, natural wood, grey linen, or off-white board all suit the Enderman better than bright printed backings.
Alternative colourways work best when the character stays recognisable at a glance. The body should remain dark, and the eyes need enough contrast to hold that slightly eerie Minecraft expression.
Three variants tend to work well:
If you want to refine the mood before placing beads, this colour mixing chart guide is useful for judging contrast families and temperature shifts, even though bead colours are fixed rather than mixed.
Functional versions need cleaner finishing than purely decorative ones. A shelf ornament can get away with a slightly uneven edge. A memo magnet, light panel, or collectible stand piece cannot.
Etsy's market page for perler bead Enderman listings shows both the existing demand for this motif and the gap between simple novelty pieces and more polished display-ready builds with practical use. That trade-off matters during finishing, because each added function asks more from the structure.
Useful adaptations include:
The best results usually come from one clear function, not three at once. Once you add lights, magnets, and a stand to the same piece, the finish often starts to feel cluttered.
For a more display-worthy result, simplify rather than decorate. A straight stance, a neat wooden base, and crisp proportions give the figure more presence than extra bead embellishment ever will.
That is where the project becomes more than a children's craft. Minecraft supplies the block geometry. Scandinavian making adds calm materials, restraint, and care in the final presentation. When those two traditions meet cleanly, the Enderman feels like folk-gaming art rather than merchandise.
Even careful crafters get the occasional bent limb, patchy melt, or fragile seam. Most failures are fixable if you diagnose the cause correctly.
Symptom: Some beads are very flat while others still look untouched.
Probable cause: The iron stayed too long in one spot, or pressure changed across the surface.
Solution: Re-cover the piece with parchment and reheat gently with broader, more even passes. Rotate the work if one side is harder for your hand to reach. A dry iron with steady movement almost always gives a better result than pressing hard.
If the centre is melting faster than the edges, you are probably lingering unconsciously where your hand feels most comfortable.
Symptom: The finished panel lifts at the corners or bows through the middle.
Probable cause: Heat distribution was uneven, or the piece cooled without enough flat pressure.
Solution: While the piece is still warm, place it between clean sheets and press it under a flat board. If it has already cooled badly, a light reheat can sometimes relax the shape enough to press it flat again.
Symptom: Sections separate when you lift the piece.
Probable cause: Under-fusion. Usually this happens at corners, narrow limbs, or where attention drifted during ironing.
Solution: Return the piece to the board if possible, cover it again, and fuse a little more. On a finished panel, inspect the weak area from the back. Often only a small section needs more heat.
Symptom: Limbs or torso joints shift as you try to connect them.
Probable cause: Connectors are too loose, holes are partially blocked, or glue was added before the dry fit was stable.
Solution: Clear the opening carefully, shorten the toothpick connector if needed, and dry-fit first. Use only a small amount of PVA glue once the angle is correct.
Symptom: Missing beads or crooked rows only become obvious late in the build.
Probable cause: The Enderman palette is visually dense, so shape errors hide in the black sections.
Solution: Check the silhouette often from a short distance. Side lighting also helps because raised or missing beads cast tiny shadows that stand out better than they do under flat light.
Troubleshooting gets easier with experience. The main habit to build is stopping early when something looks wrong. Most bead mistakes are simple to fix at the board stage and much more annoying after fusion.
A standard square pegboard is the easiest place to start. It gives you enough room for a full Enderman figure without the fuss of aligning multiple boards. If you want a 3D build later, the same basic size still works well for learning.
You can, but I do not recommend it for an Enderman you want to display. Different brands can vary in height, finish, and melt behaviour. That leads to an uneven surface and weaker joins. For a clean result, stick to one brand across the whole project.
Dust them with a soft, dry cloth or a gentle brush. Keep them out of strong heat and direct sun where possible, especially if they are mounted near a window. Do not soak them in water. If you need to clean a mark, use a lightly damp cloth and dry the piece promptly.
Usually, yes. A flat piece can often be re-fused carefully if the break is clean and the beads still align. A 3D piece is often easier to repair by rebuilding the damaged panel or reconnecting it with a fresh toothpick support and a small amount of PVA glue. Dry-fit first, then repair. Rushing the fix tends to create a second break.
If you enjoy projects that connect Swedish craft tradition with playful modern design, have a look at Dalaart. Their world of hand-crafted Scandinavian folk art, DIY pieces, and collectible making inspiration is a natural next stop after a pärlplatta minecraft enderman on your shelf.


.svg)


.png)


