January 28, 2026
Building your own wine rack is one of those wonderfully rewarding projects. You get to create something functional and completely personal for your wine collection. Using simple woodworking techniques, you can turn a bit of pine or birch into a stunning piece over a single weekend with just a few basic tools.
Let's move beyond simple storage. Imagine crafting a piece for your home that’s not just a place to put your wine, but a genuine conversation starter filled with Scandinavian warmth. This guide is your starting point for a wine rack diy project that perfectly marries handmade elegance with that timeless Nordic style. It's a chance to build something that is truly yours.
This kind of project isn't just about following instructions; it’s about the feeling you get from working with natural materials and bringing your own personality into your home. Whether you've been working with wood for years or you're just starting out, you'll see how a simple wine rack can become a piece of art that tells a story.
There's something a store-bought piece just can't offer: a personal connection. When you're the one selecting the wood, measuring the cuts, and putting it all together, you create a bond with the final object. This process captures the heart of Scandinavian design philosophy:
Building your own wine rack gives you complete creative control to match it to your space and collection. From the choice of wood to the final finish, every detail is up to you, ensuring it perfectly complements your home’s aesthetic.
This desire for custom, hands-on home projects is more than just a passing phase. Here in Sweden, DIY culture has absolutely taken off. We've seen a remarkable 45% increase in online searches for woodworking projects since 2015. It really speaks to our national love for sustainable crafting, with 68% of Swedes reporting they tackle at least one DIY project each year, often using recycled or reclaimed wood.
The joy of making something yourself, much like painting one of Dalaart’s unpainted Dala horse models, is a deeply satisfying experience. A handcrafted wine rack can easily become a stunning focal point in a room. And if you're looking for more ways to bring that personal, handcrafted feel to your space, you might find some great ideas in this man cave inspiration. This is all about making your home a true reflection of you.
Before a single piece of wood is cut, getting all your materials and tools in one place is the best first step you can take. A little prep work here makes the entire process of building your wine rack smoother, safer, and just a lot more fun. We’ll be focusing on sustainable choices that really capture that clean, natural feeling of Scandinavian design.
The wood you choose is easily the biggest decision you'll make. It’s what gives your finished rack its entire personality. For that authentic Nordic vibe, you can't go wrong with reclaimed or FSC-certified pine and birch. Pine is a dream to work with if you're just starting out, and it has a beautiful light grain. Birch, on the other hand, is a bit tougher and more durable, with a subtle, elegant pattern that looks fantastic.
Choosing your wood is about more than just aesthetics; it’s a great opportunity to make a sustainable choice. Reclaimed wood from old furniture or salvaged building projects brings instant character and history to your piece, plus it’s a brilliant eco-friendly option. If you're buying new, always look for the Forest Stewardship Council (FSC) certification. It’s your guarantee that the timber comes from a forest that’s being managed responsibly.
This focus on sustainable, local materials is definitely a growing trend. Interest in DIY wine storage has grown right alongside a 28% rise in home wine consumption since 2020. In Sweden, where folks enjoy about 19 litres per capita each year, home crafters are getting really creative with DIY racks. They’re often using birch wood, a material favoured by 75% of local DIYers for its strength and how readily available it is.
You absolutely don't need a professional-grade workshop to build a beautiful wine rack. For all the designs in this guide, a handful of quality tools will see you through. Think of this as the start of a great toolkit for many projects to come.
A Quick Word on Safety: Always, always wear safety glasses when you’re cutting or drilling. Work gloves are also a good idea when you’re handling rougher pieces of timber. Keeping your workspace clean and organised doesn't just make the project more enjoyable—it makes it a whole lot safer, too.
Here’s a practical list of what you'll need to get started:
Alright, let's get our hands dusty. This is where your vision starts coming to life. Below, I’ve laid out the plans for three classic wine rack projects, each with its own personality and purpose. We'll walk through building a sleek wall-mounted rack, a super practical countertop design, and a modular system you can expand as your wine collection grows.
Each guide gives you the exact measurements and simple, clear assembly steps you need. I've cut out all the confusing jargon to keep things focused and straightforward. You'll also find some handy troubleshooting tips for those little hiccups that always seem to pop up—like an uneven cut or a slightly wobbly joint. My goal is to help you create a piece that looks professional and that you can be truly proud of, no matter how much sawdust you've made in the past.
Before we jump into the specific designs, let’s get a picture of the basic workflow for any project like this.
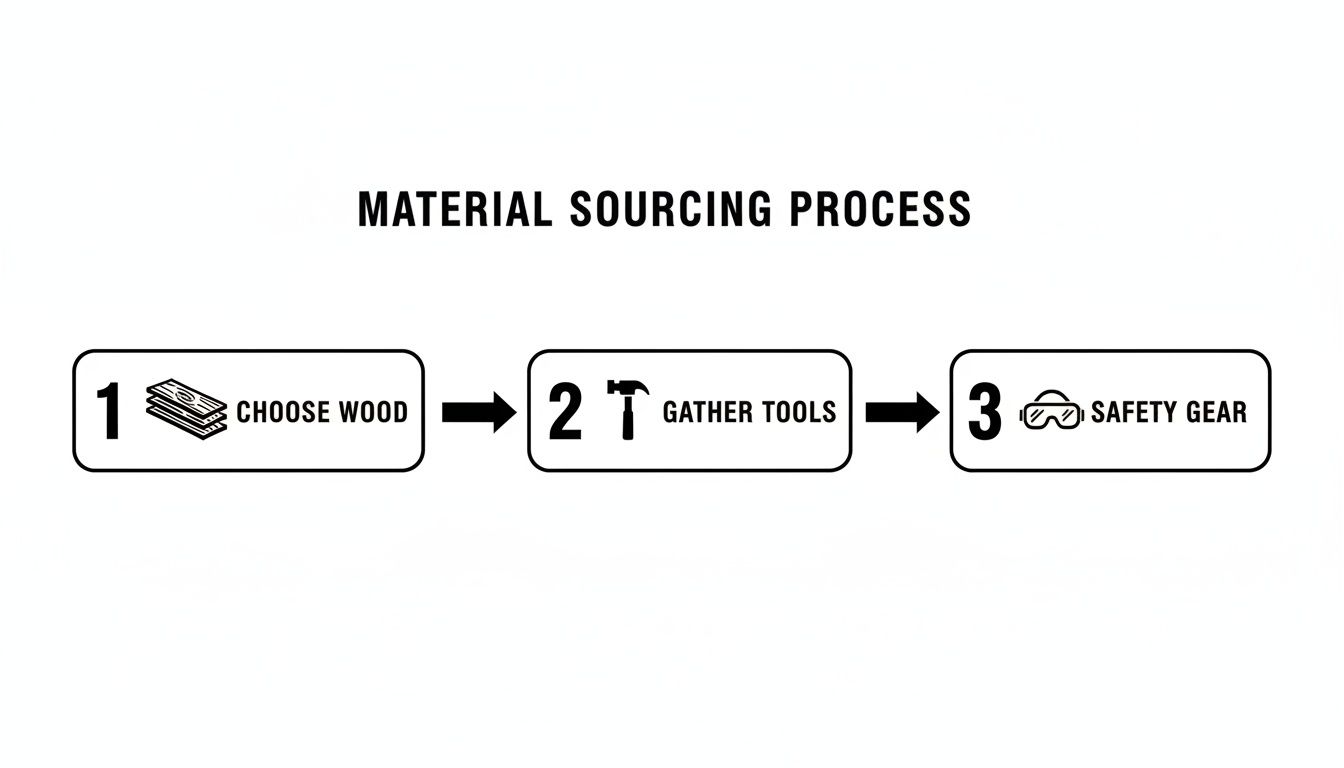
As you can see, a successful project begins long before you make the first cut. Good preparation is really the secret to a smooth, enjoyable build.
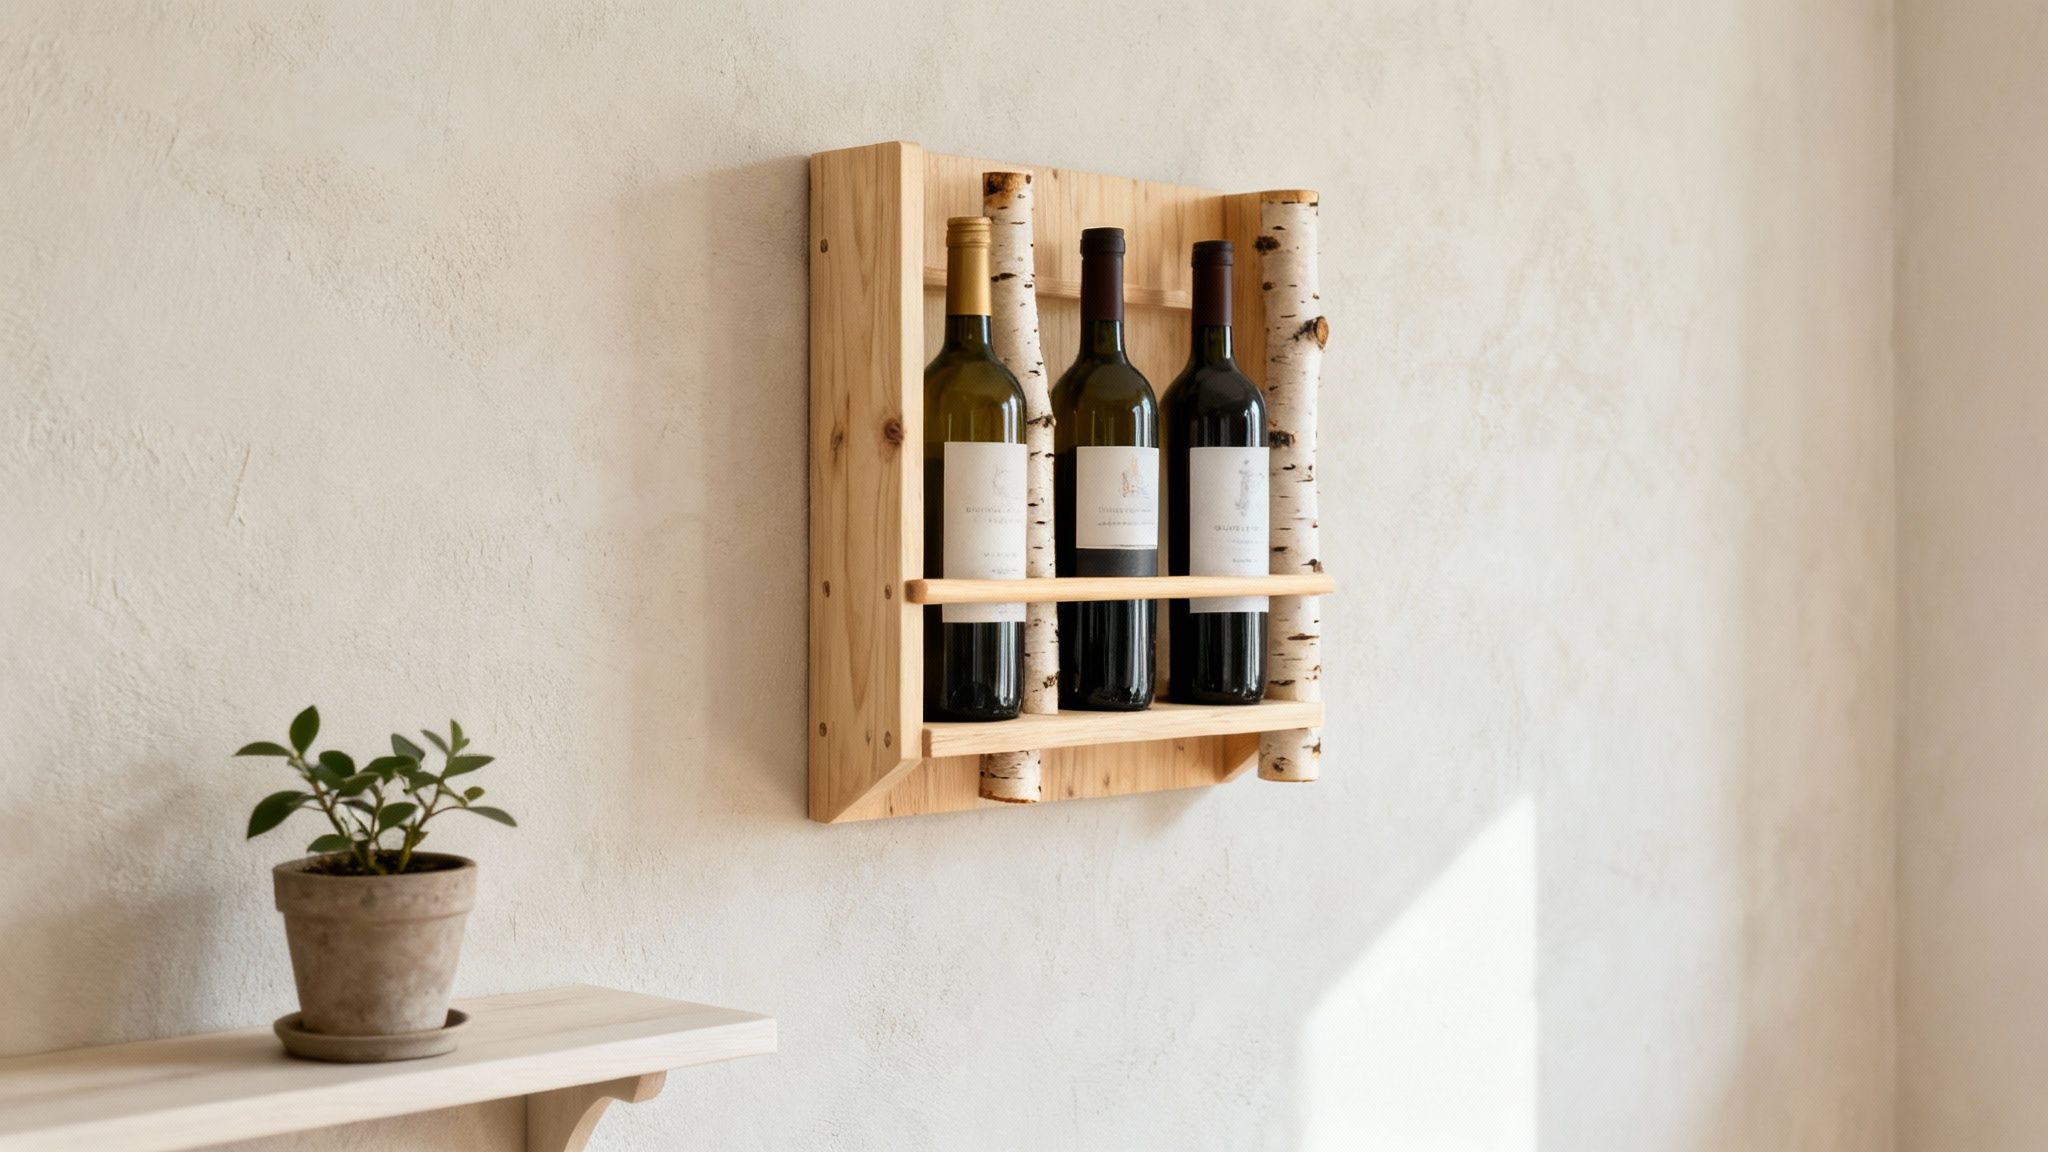
This one’s a real nod to Scandinavian simplicity. It’s perfect for smaller spaces or for showing off a few special bottles, turning your wine into a piece of vertical art.
For this build, you just need one main wooden block for the backplate and several dowels. The name of the game here is precision. That old saying, "measure twice, cut once," isn't just a cliché; it's the absolute best advice for this project.
Troubleshooting Tip: If you find your drill bit wandering a bit when you start, try drilling a small pilot hole first. It acts as a guide for the larger Forstner bit, guaranteeing your holes end up exactly where you marked them.
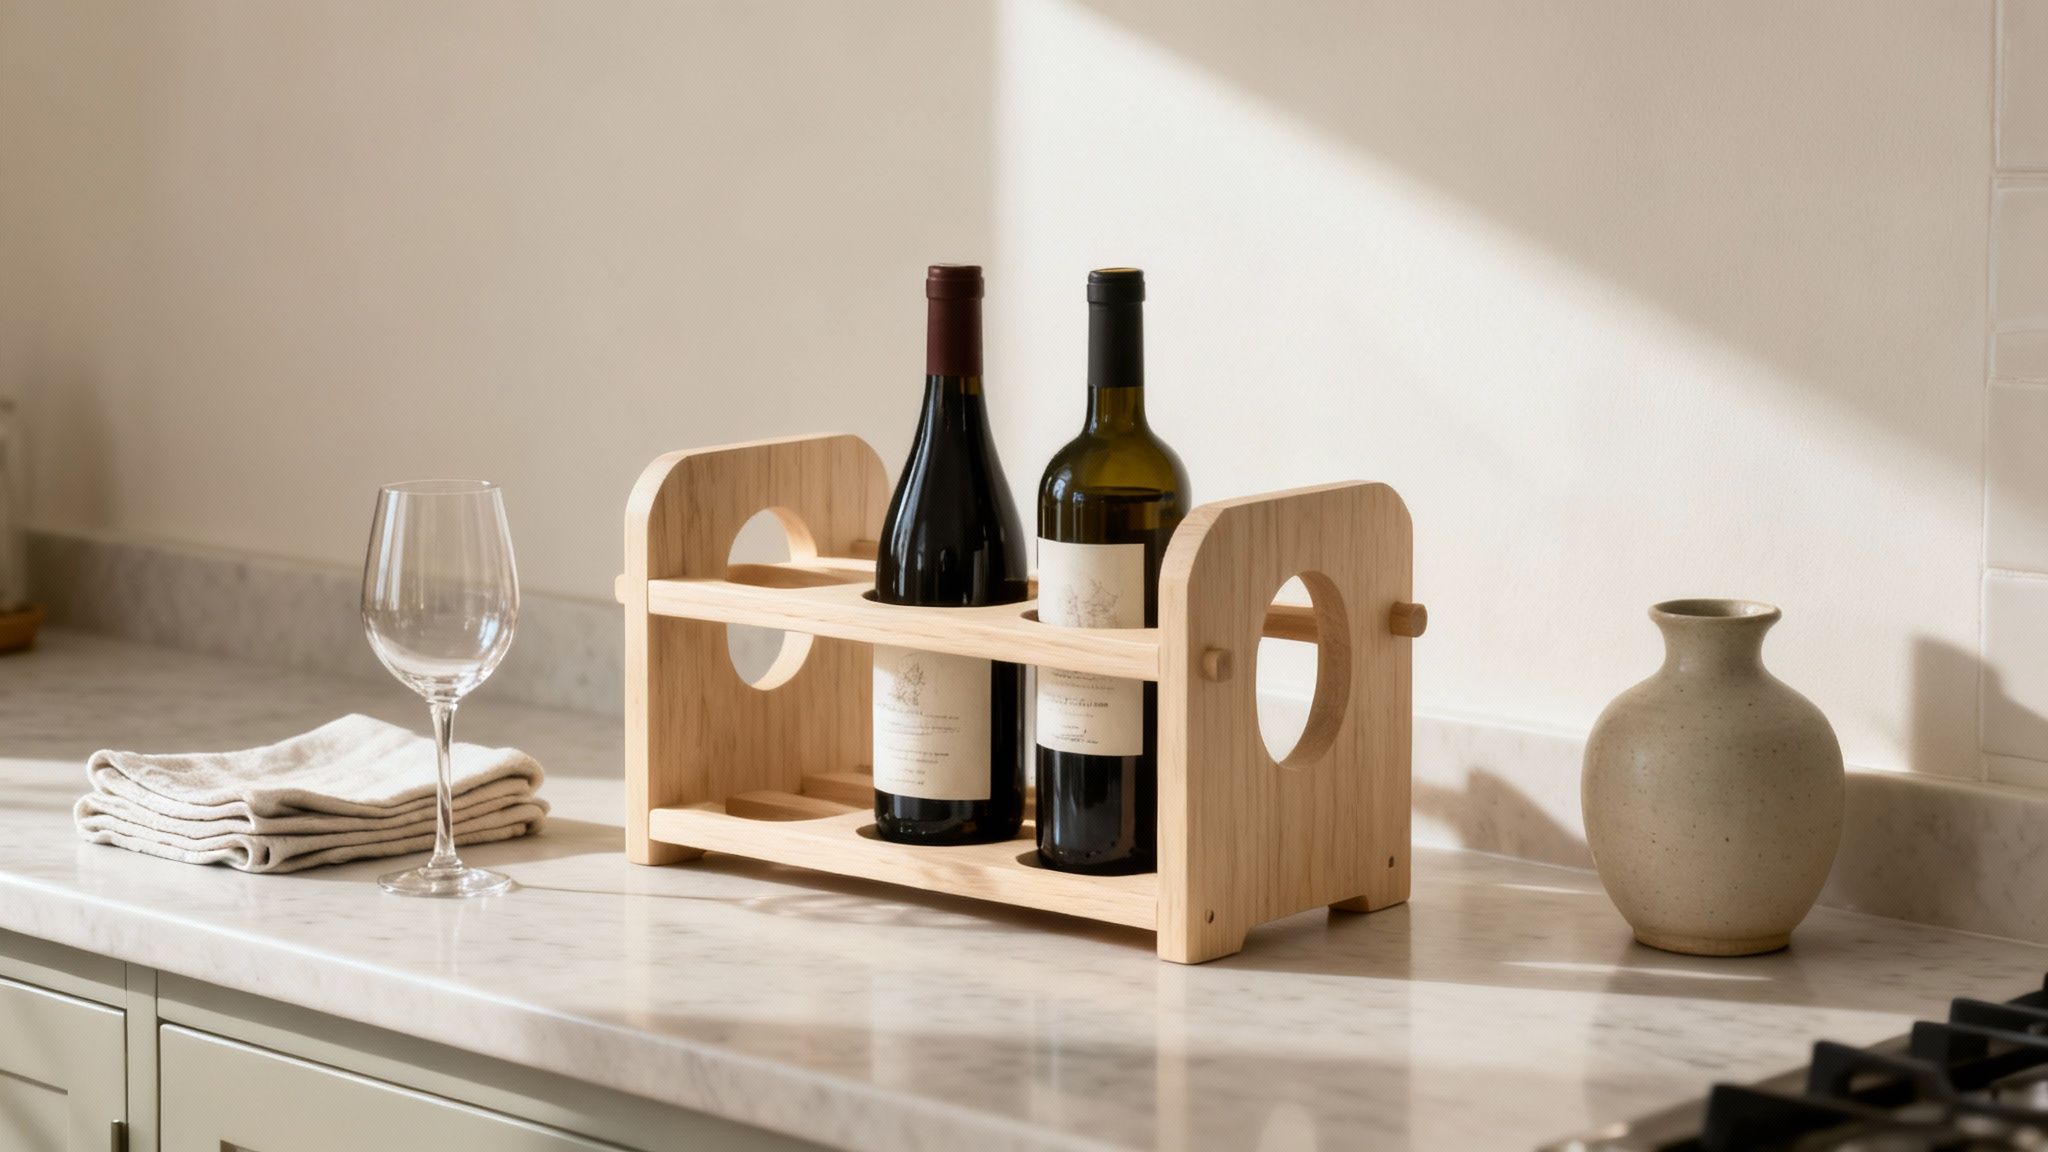
A countertop wine rack is a brilliant project for any beginner. It's incredibly functional, doesn't need any wall mounting, and you can move it around whenever you feel like rearranging things. A simple A-frame or X-design is a timeless classic for a reason—it just works.
Let's put together a simple criss-cross rack that holds four bottles.
What's great about this design is how easy it is to scale. If you want to hold more wine, just use longer boards and cut a few more slots. You can expand its capacity without making the build any more complicated.
Now, for the serious collector, a modular system is the dream. The whole idea is to build individual, stackable cubes or diamond-shaped bins that you can arrange and rearrange as your collection gets bigger.
The simplest module to start with is a basic wooden box.
The real beauty of this modular rack is its adaptability. You can build one cube this weekend and then add another one next month. Stack them vertically, arrange them horizontally—you have complete freedom to design your wine storage exactly how you want it.
With your wine rack now built, we get to my favourite part: the creative stage. The final finishing touches are what transform a simple wooden structure into a true piece of personalised art. This is your chance to really lean into that authentic Scandinavian aesthetic and make it your own.
The beauty of using woods like pine and birch is that they don't need much to look incredible. Sometimes, the simplest finish is the most effective way to honour the material.
For a look that truly celebrates the wood's natural grain and character, a clear oil or wax finish is a fantastic choice. This approach fits perfectly with the Scandinavian principle of highlighting organic, honest materials.
Whenever you're applying these finishes, make sure you're in a well-ventilated space. Use a clean, lint-free cloth, apply a thin and even coat, and then wipe away any excess. This method lets the wood grain remain the star of the show.
If you're after a bolder, more traditional Scandinavian statement, think about adding painted details inspired by classic Swedish folk art. You don't have to cover the whole rack; often, a small, thoughtfully placed accent is all it takes to make your wine rack diy project pop.
This is a route that's becoming more and more popular, reflecting a bigger trend in Sweden. A national shift toward sustainable DIY has made homemade wine racks a staple, with an expected 41% of households crafting one by 2025. This boom is all about having eco-friendly racks to store the region's much-loved low-alcohol wines. A recent poll even showed that 71% of hobbyists really enjoy painting their projects after the build is complete. You can discover more insights about the European wine market and its trends.
A key to getting this style right is the limited colour palette. Stick to the classic trio of Dala red, a deep blue, and a crisp white. This will create an authentic and cohesive look that feels both timeless and vibrant.
You don’t need to be a master painter to bring this folk-art charm to your rack. Stencils are a brilliant tool for applying traditional patterns like the flowing, floral-inspired kurbits designs.
You’ve finished your beautiful wine rack diy project, and now for the really fun part: making it a feature in your home. This is where your creation goes from being a functional object to a piece that tells a story. It’s all about finding the right spot and adding a touch of your own personality.
Whether you see it sitting on the kitchen counter, hanging in the living room, or tucked into a quiet corner, think of your rack as an anchor for a small, curated display. A well-styled rack doesn't just hold wine; it creates a moment, inviting you to pause and appreciate your collection.
First things first, decide where your wine rack is going to live. A countertop rack in the kitchen can become a practical, stylish hub for your favourite bottles. On the other hand, a wall-mounted design in the dining area acts as a piece of functional art. The idea is to make it look like it truly belongs.
Once you’ve picked its home, think about balance. A handmade piece like this has a lot of character all on its own, so you’ll want to complement it with other textures and objects.
Your handcrafted rack tells a story of care and creativity. Frame it with items that share that same feeling—a hand-thrown ceramic bowl, a favourite cookbook, or a set of artisanal coasters. This helps create a cohesive little narrative in your décor.
Don’t just slide your bottles in without a second thought! A little intention here can elevate the entire display. You could try organising them by colour, creating a subtle gradient from light whites to deep reds. Or, you could arrange them by label, turning the most artistic ones forward to create your own mini gallery.
This thoughtful approach can extend to other handcrafted items in your home. Imagine the warm, flickering light from hand-poured candles creating a beautiful ambience around your wine corner. If you're inspired by that idea, you can learn more about the art of candles of Scandinavia in our article.
Remember, a handmade rack paired with a carefully chosen bottle of wine also makes a wonderful and deeply personal gift. It’s more than just an object; it’s a gesture that shows thoughtfulness and a personal touch that you simply can't buy off a shelf.
As you get ready to dive into your wine rack diy project, it’s natural for a few questions to come up. Getting those sorted out beforehand can make all the difference, giving you the confidence to tackle any little hiccups that might appear during the build. Let's walk through some of the things people ask most often.
The choice of wood really sets the stage for both the look and durability of your finished rack. If you're chasing that classic Scandinavian feel, pine and birch are fantastic options. Both are strong, pretty easy to find, and have a light, beautiful grain that looks stunning with either a natural oil finish or a splash of paint.
Pine is usually the more budget-friendly choice and is very forgiving for anyone just starting out. Birch, on the other hand, is a harder, more durable wood, which gives the final piece a more premium feel.
For a bit of instant character and a sustainable touch, always keep an eye out for reclaimed wood. If you're buying new lumber, look for the Forest Stewardship Council (FSC) certification mark—it’s your guarantee that the wood comes from a responsibly managed forest.
This is a big one, especially if you’re planning to store a heavy collection. You need to make sure your rack is attached securely to the wall.
The golden rule for a wall-mounted rack is to anchor it directly into the wall studs, never just into the drywall. This is non-negotiable for safety and stability.
A stud finder is an inexpensive little tool that will save you a world of headaches. Plan your rack’s dimensions to line up with the standard stud spacing in your home, which is typically 16 inches from centre to centre. When it's time to mount it, use sturdy screws that are at least 2.5 inches long to guarantee they get a deep, solid grip into the stud.
Absolutely! Customisation is one of the best parts of any DIY project. A standard 750ml wine bottle fits perfectly in a hole around 3.5 inches in diameter, but you might want to make room for larger Champagne or magnum bottles. For those, a hole closer to 4 inches is usually what you need.
The best tool for the job is a hole saw attachment for your drill. It makes quick work of cutting clean, perfectly round holes.
Before you start drilling into your final pieces, always do a test cut on a scrap of wood first. Grab a few of your favourite bottles and check the fit. You want it to be snug and secure, but not so tight that it scrapes the label. This one simple step can prevent a lot of frustration and ensures you get a professional-looking result.
At Dalaart, we celebrate the spirit of Scandinavian craftsmanship, from our hand-painted Dala horses to the inspiration we share for your own home projects. Explore our collection of authentic, artisan-made decor at https://dalaart.com.


.svg)


.png)


