January 16, 2026
A simple flower line drawing is more than just a sketch; it's a foundational art skill that uses clean, flowing lines to capture the very essence of a flower's shape and form. It’s the elegant starting point for everything from minimalist botanical illustrations to the detailed painting templates we'll be using for our wooden Dala pieces.
It’s amazing how a few intentional strokes can blossom into a beautiful floral design. This guide is all about demystifying the art of the flower line drawing, connecting the clean elegance of botanical illustration with the rustic charm of folk art. It’s a skill that serves both seasoned artists and curious beginners equally well.
A well-crafted flower outline is the perfect starting point for customising handmade crafts, especially unique pieces like wooden Dala horses where form and pattern have to work together in harmony. The process is less about photorealism and much more about capturing the spirit of a flower.
The real beauty of line art lies in its versatility and clarity. Before you ever pick up a paintbrush, a strong outline acts as a confident roadmap for your project. I’ve found this approach is particularly effective when working on tricky three-dimensional or curved surfaces.
Think about these benefits:
In essence, a flower line drawing is the architectural blueprint for your final painted piece. It provides structure and confidence, allowing you to focus on the joyful act of adding colour without worrying about composition.
In this guide, I'll show you how those foundational shapes transform into delicate petals and flowing stems. You'll learn a versatile skill that bridges the timeless appeal of natural beauty with your own creative, handcrafted projects. Get ready to turn simple lines into truly elegant art.
Before we can even think about putting pencil to paper, let’s talk tools. Getting everything you need organised and within arm's reach makes a world of difference. It means you can just get lost in the creative flow without having to stop and search for something. You don’t need a fancy, expensive setup to create a beautiful flower line drawing—just a few quality essentials will do the trick.
Think of this part as setting your stage. The right tools are like old friends; they’re reliable, feel good to use, and help you bring your ideas to life just the way you imagined them.
For the first sketch, we're keeping it simple, focusing on the basics that give you the most control and flexibility. A great drawing always starts with a solid foundation, and that means choosing the right pencils to create both those faint first guidelines and the strong, final lines.
Here’s the starter kit I always recommend:
That’s honestly all you need to create a precise and beautiful flower drawing. The secret is quality over quantity; a couple of really good pencils will serve you far better than a massive set of mediocre ones.
Once your drawing is perfected on paper, the really exciting part begins: bringing it to life on your wooden Dala piece. This next step calls for a slightly different set of materials, ones designed to be permanent and vibrant on a three-dimensional surface.
Your toolkit will expand a bit here to include things for transferring the design and, of course, for painting. Getting this stage right is what gives the final piece that polished, professional look.
If there’s one piece of advice I can give, it's to invest in fine-tipped tools for the transfer process. A blurry or thick outline on the wood can make painting neatly a real challenge. A crisp, clean guide is your best friend.
To get your art from the paper onto the wood, you’ll want to have these ready:
One more thing that’s optional but incredibly helpful is tracing paper. It can make the job of transferring your initial sketch from your notebook to your final drawing paper—or even straight onto the wood—a much smoother and more accurate process.
This is where the real fun begins. We’re going to take all those lovely ideas swirling in your head and turn them into a beautiful flower line drawing, ready for your wooden Dala piece. I’ll walk you through a few simple, intuitive techniques I use all the time. Forget about trying to draw a perfect replica of a flower from a photograph; our goal here is to capture its essence, its character, and its graceful form.
The trick is to stop seeing flowers as complex botanical specimens and instead see them as a collection of simple geometric shapes. It's a foundational approach that artists have relied on for centuries, and it instantly makes the whole process feel less intimidating. This small shift in perspective is the key to creating art that feels both structured and wonderfully organic.
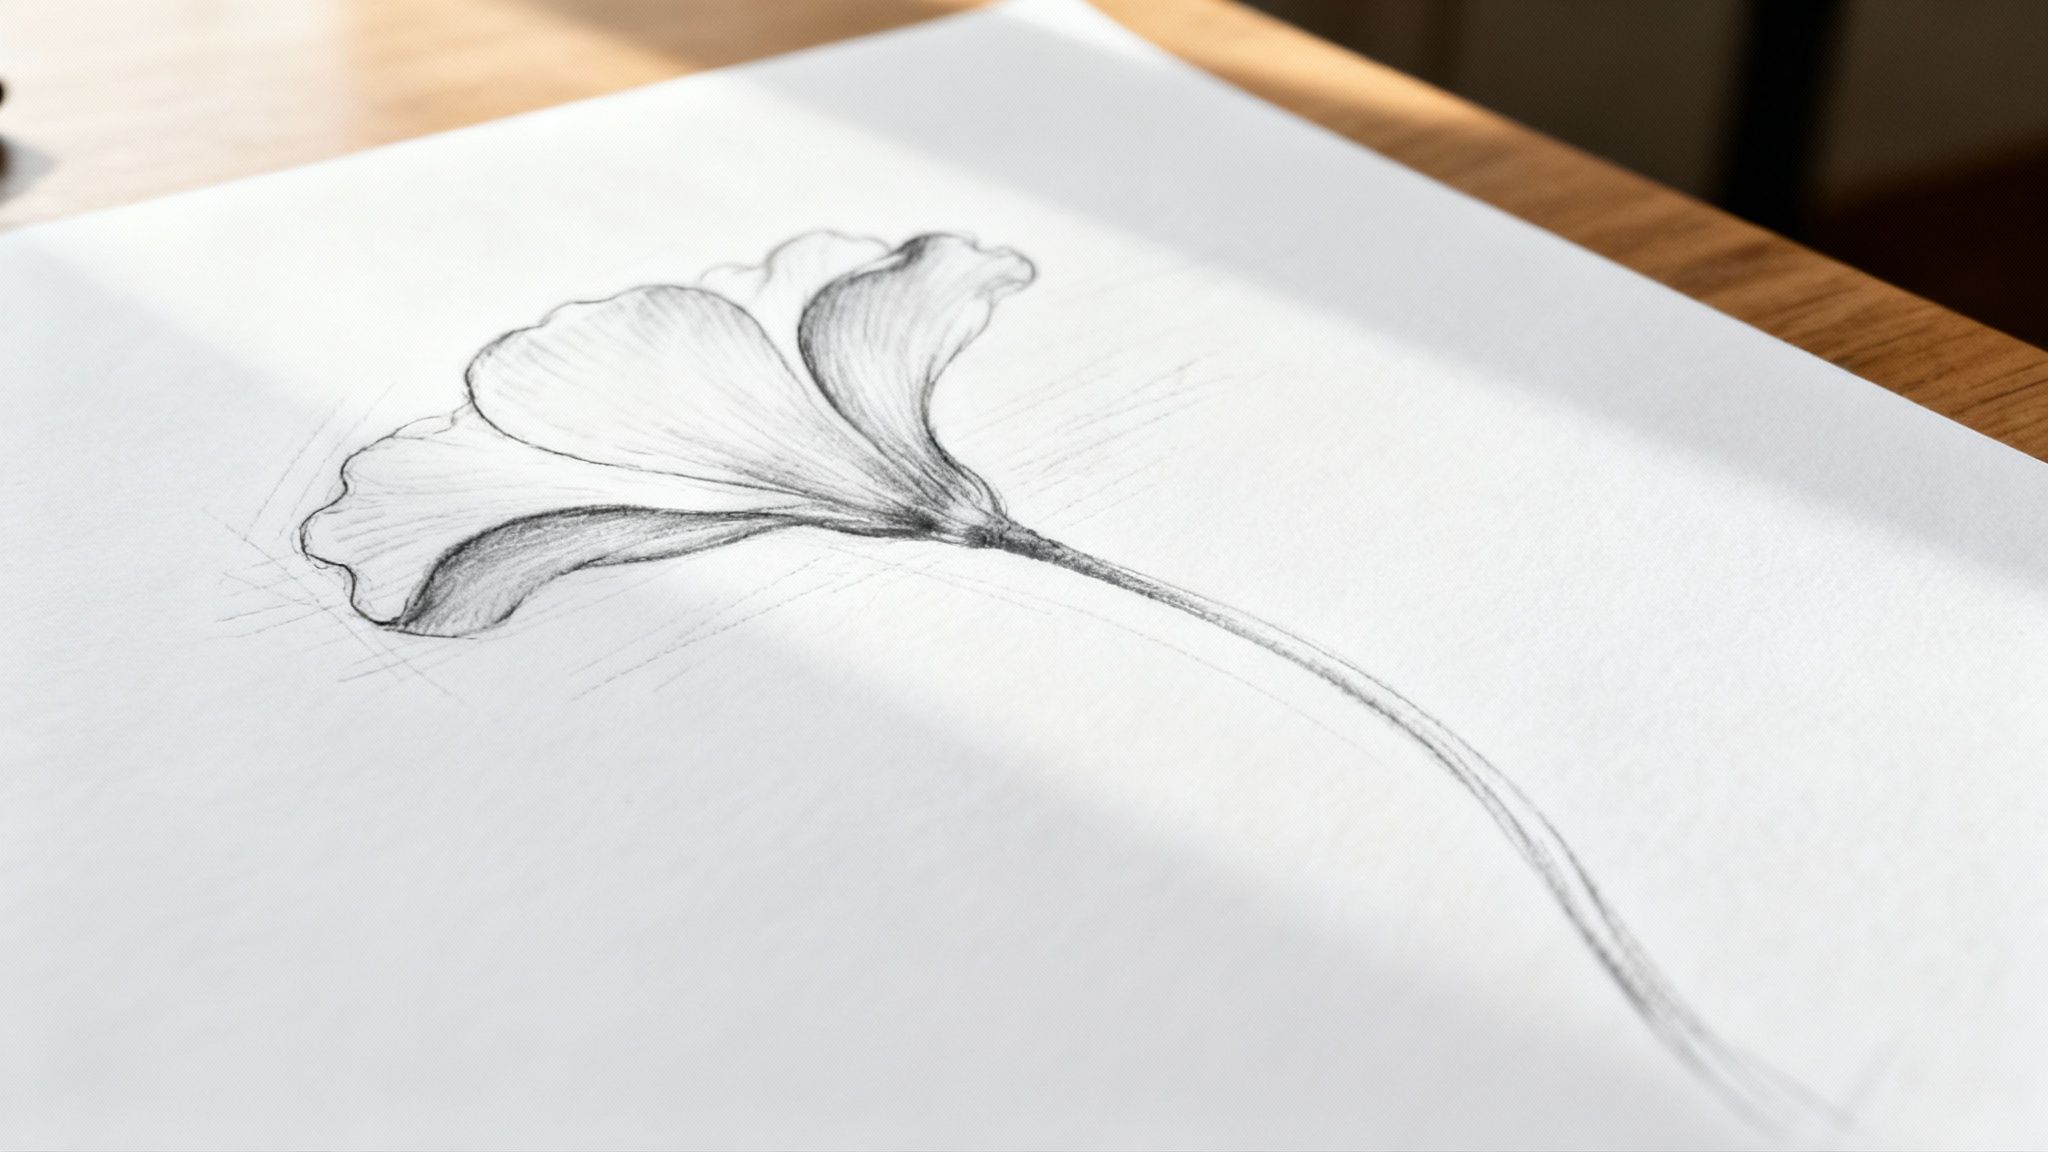
Every great flower drawing I've ever made started with a simple shape. By breaking a flower down to its most basic form—a circle, an oval, a cone—you create a solid framework to build upon. This method is a lifesaver for getting your proportions right from the very beginning, saving you a ton of frustration down the road.
Think about a rose, for instance. At its heart, it’s just a series of concentric circles or a gentle spiral. A tulip bud? That's basically an oval or an egg shape. A lily can be sketched out from a simple cone. Starting this way takes all the pressure off trying to get every single petal perfect on your first go.
Grab your 2H pencil and lightly sketch these core shapes. Remember, don't press hard—these are just temporary guides. If you're planning a bouquet, you might draw several overlapping circles and ovals to map out the whole composition before you even think about adding a single petal. This first step is all about getting the placement and balance just right.
This simple workflow gives you a clear picture of the creative journey ahead, from that first pencil sketch to the final painted piece.
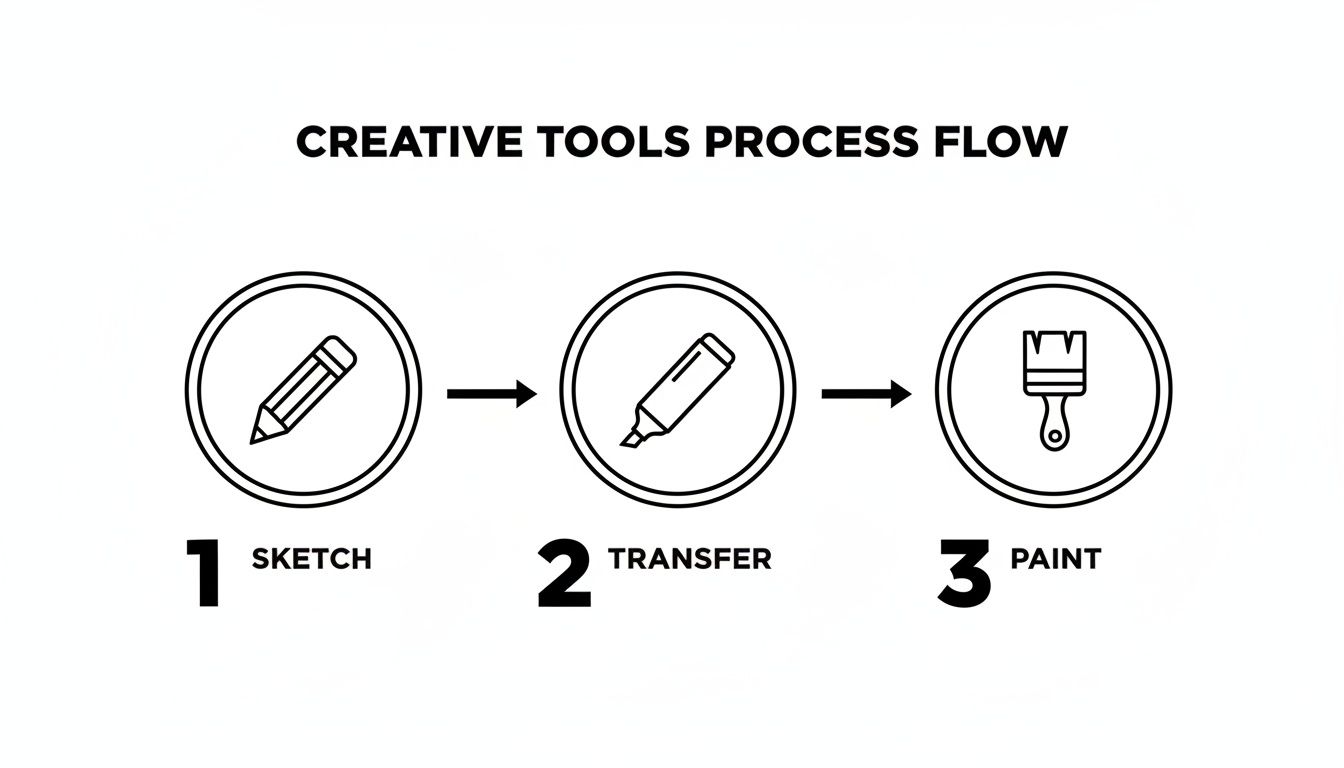
As you can see, a successful project is built in distinct, manageable stages. Each one has its own purpose and its own set of tools.
Once you have your basic shapes in place, you can start to bring the flower to life by sculpting the petals. Using those geometric forms as your guide, begin drawing the individual petals, letting them curve and overlap naturally. This is the moment your flower starts to show its unique personality.
Don’t get hung up on perfect symmetry. In nature, no two petals are ever identical. Some might be slightly furled at the edge, while others are fully open and catching the light. It’s these little imperfections that will make your drawing feel alive and authentic.
Here are a few tips I’ve picked up over the years for adding detail:
The most compelling flower drawings strike a balance between simplicity and just enough detail to suggest form and texture. Your goal isn't to draw every single vein on a leaf, but to hint at its structure with a few well-placed, confident lines.
With all the details sketched in, it’s time to commit to your final lines. Switch over to your softer 2B pencil and trace over your best sketch lines. This is the stage where you want to draw with confidence, using smooth, unbroken strokes. If you find your hand is a bit shaky, try drawing from your elbow or shoulder rather than your wrist—it allows for a much more fluid motion.
For those who love pure minimalism, exploring a continuous line technique can be a fantastic exercise. You can learn more about this style in our guide to creating a captivating one line drawing, which shares similar principles of simplification and flow.
After you've finalised your lines, carefully erase the initial light guidelines. What you should have left is a crisp, clean flower line drawing, ready to be transferred onto your Dala piece. Whether you've created a single minimalist stem or a complex bouquet inspired by traditional 'kurbits' folk art, this intentional process ensures your final design is balanced, beautiful, and ready for paint.
A beautiful flower drawing on paper is one thing, but getting it to work on a three-dimensional wooden object is where the real magic happens. This is the crucial step where your two-dimensional art gets ready to embrace a new form. It’s all about adapting your design thoughtfully, making sure it flows with the object's curves, not against them.
Making that leap from a flat page to a curved surface takes a bit of a different approach. All those intricate little details that look so stunning on paper can suddenly become crowded or distorted on the rounded flank of a Dala horse. The key is to simplify your design, focusing on the strongest, most essential lines that truly capture the flower’s character.
Getting your drawing from paper to wood accurately is absolutely fundamental. You need a method that gives you a clear, paintable guide without leaving a mess or damaging the wood's surface. Over the years, I've found two techniques that are consistently reliable and artist-friendly.
The first is the classic carbon paper technique. You just place a sheet of carbon paper (graphite paper is a fantastic, cleaner alternative) between your drawing and the wooden piece. Then, carefully trace over your lines with a stylus or a hard-tipped pencil. The pressure transfers a crisp, clean outline right onto the wood. It’s dependable and very precise.
Alternatively, there's the DIY pencil-shading method. Simply flip your drawing over and generously shade the back of the paper with a soft graphite pencil—a 4B or 6B works wonders here. Place the paper onto your wood, shaded-side down, and trace your lines just like before. The graphite you added acts as a perfect homemade carbon copy.
Whichever method you choose, always tape your drawing firmly in place before you start tracing. There's nothing more frustrating than having your template shift halfway through and ending up with a blurry double image.
Before you even think about tracing, take a moment to consider scale and placement. A design that's too large can easily overwhelm the piece, while one that's too small can get lost. I always like to print or sketch my flower designs in a few different sizes just to see which one best complements the Dala figure.
Hold the paper cutouts against the wood, moving them around to find that perfect, harmonious position. Does the stem follow the elegant curve of the horse's neck? Do the petals bloom nicely across its flank? This careful positioning is what separates a simple craft project from a true piece of art. The same principles apply to other projects, like finding the ideal placement for wood wall art in a room.
The rich history of botanical illustration often involves this same kind of thoughtful composition. For instance, Southeast Asia has an astonishing floral diversity, with over 30,000 species of flowering plants. For centuries, illustrators have sought to capture this splendour in line drawings, preserving delicate structures and intricate patterns. This tradition continues today, reflected in a 25% surge in botanical art searches since 2020 on platforms showcasing these unique flowers. You can dive into more fascinating facts about the region's incredible flora on Google Arts & Culture.
By adapting your design with care, you ensure that your flower line drawing becomes a perfectly integrated part of your unique Dala piece, ready for the joyful final step of adding colour.
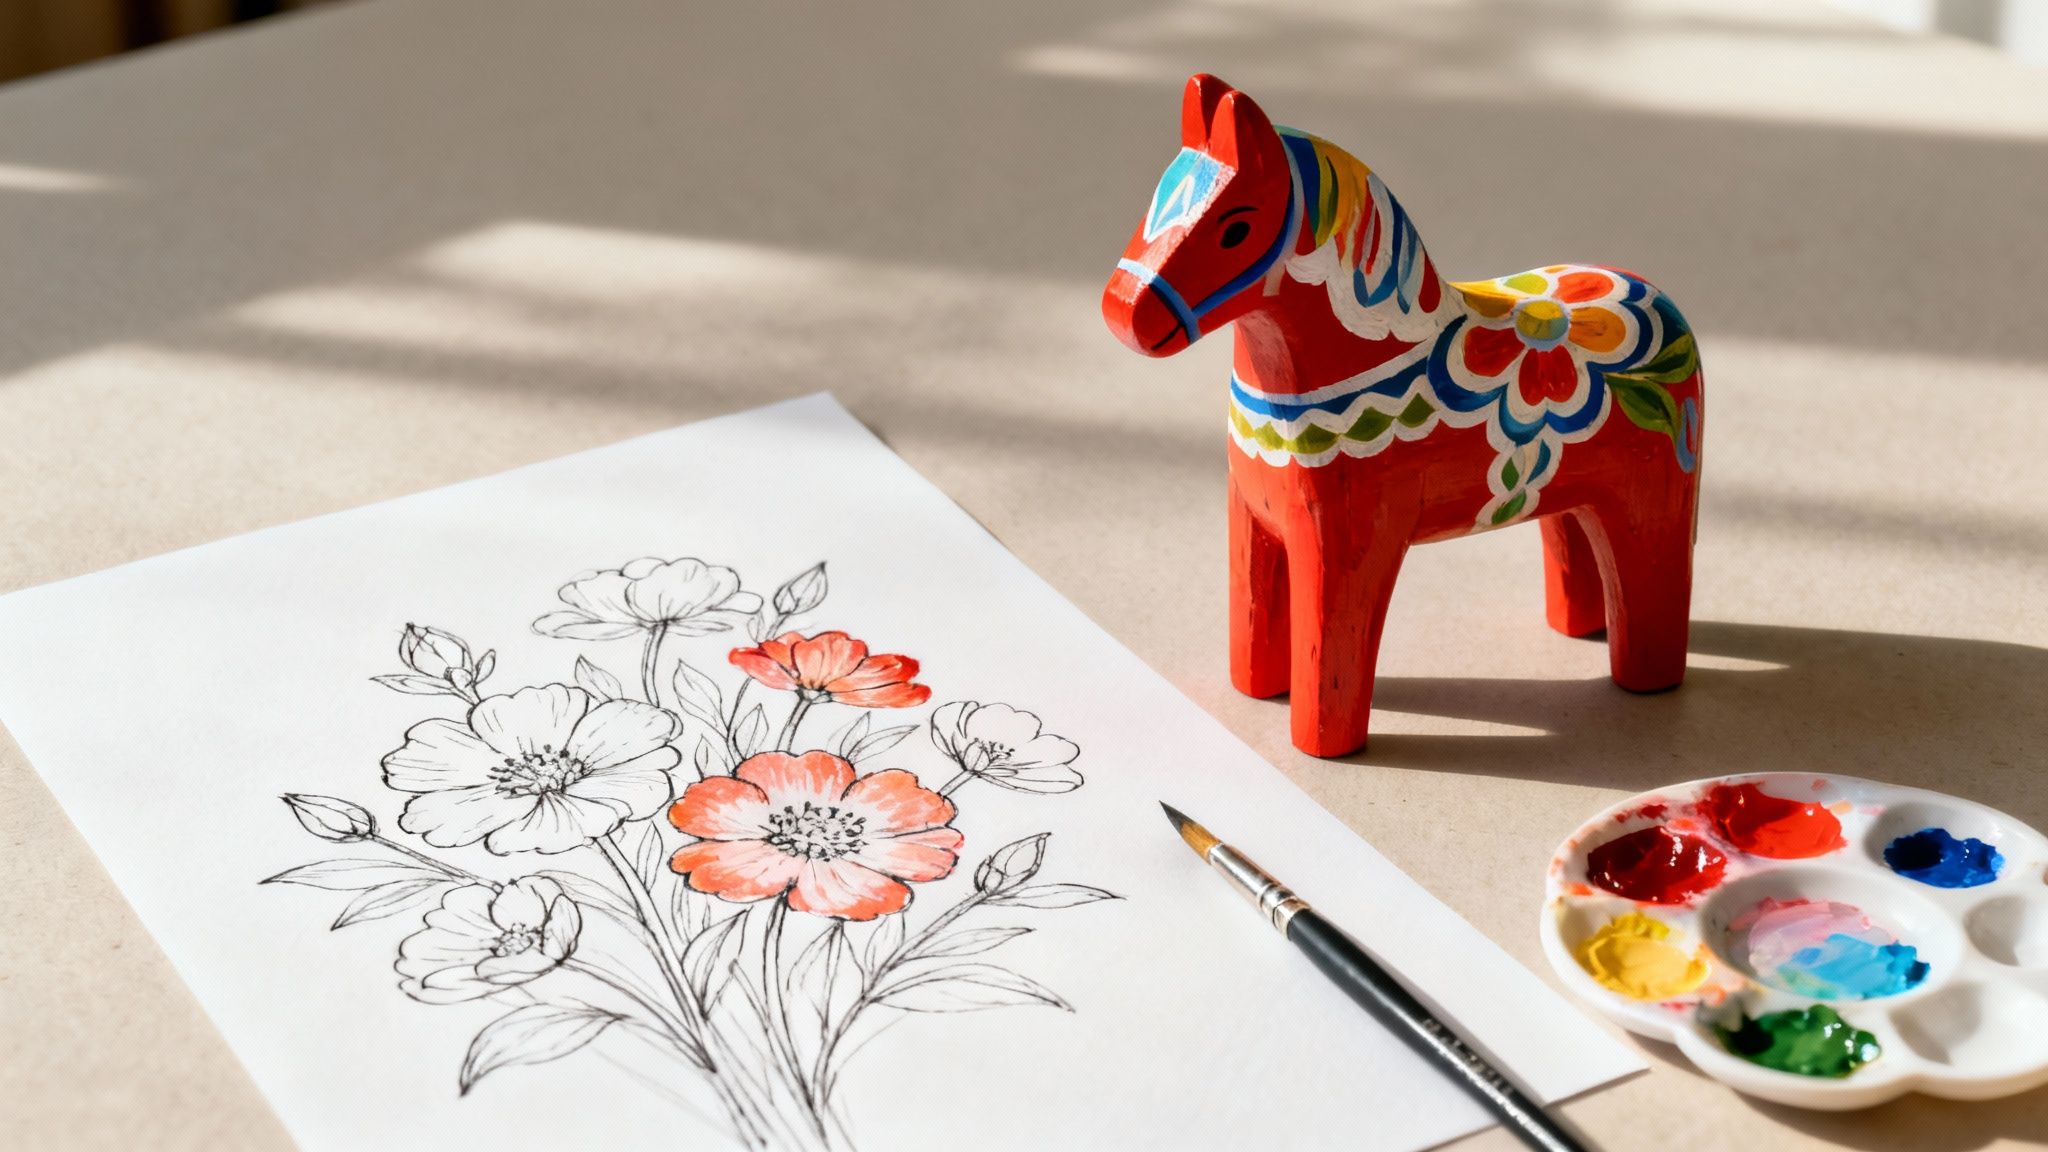
With your beautiful flower outline now gracing the wood, the real magic begins. This is the moment your precise flower line drawing transforms from a simple sketch into a vibrant, three-dimensional piece of art. It’s time to lean into the bold, joyful spirit of Swedish folk art.
Traditional Dala painting has a very distinctive palette—think deep reds, brilliant blues, crisp whites, and sunny yellows. But don't feel boxed in by tradition. This is your creation, and it's the perfect chance to play with a colour combination that feels uniquely you. The only rule is to be intentional with your choices.
Think of your first layer of paint as the foundation for everything to come. The goal here is a smooth, even application that completely covers the wood grain inside your transferred lines. I always reach for a small, flat brush for this part; it gives you fantastic coverage without leaving behind any streaky marks.
Don't panic if the colour looks a bit thin on the first pass. It’s so much better to apply two thin coats than one thick, clumpy one. Just let that first layer dry completely before going in with the second. Patience here really pays off, giving you a rich, opaque base that makes all your detail work pop later on.
If you're new to mixing custom shades, I get that it can feel a bit daunting. We've put together a handy guide on creating a color mixing chart that's a brilliant resource for understanding how primary colours work together to build a beautiful, harmonious palette.
A common mistake is to load the brush with too much paint, hoping to speed things up. This almost always leads to drips and fuzzy edges, losing the crispness of your design. Instead, just dip the tip of your brush and use steady, controlled strokes that follow the curves of your flowers.
Once your base colours are dry and solid, you can start layering in the finer details that give your piece its personality. This is where you’ll want to switch to your finest-tipped brush. Use it to add all those delicate lines, dots, and patterns that are hallmarks of the folk art style, while still being true to your own design.
A simple trick I love is to add a slightly darker shade of your base colour along one edge of a petal to create a hint of shadow. A tiny touch of white or a lighter hue on the opposite edge can suggest a highlight. It's these small touches that keep the design from looking flat.
Inspiration for these details can come from anywhere. The incredible floral diversity of Southeast Asia, with over 900 species of pitcher plants and 1,700 orchid varieties, has inspired artists for centuries. Line drawings have immortalised these unique botanical shapes since the 1800s. Even today, there's a 15% yearly growth in designers looking for vector line art of these flowers, and sacred motifs like the lotus have seen a 30% surge in stock art searches. You can learn more about these fascinating plants and their influence from the New Phytologist Foundation.
This is the final, crucial step to protect all your hard work. After you've let the paint cure completely—and I really recommend waiting at least 24 hours—it's time to apply a clear sealant. A satin or matte varnish works beautifully, protecting the paint from chips and fading without creating too much glare.
Apply the sealant in thin, even coats, always letting each one dry before adding the next. This protective layer is what ensures your beautifully painted Dala piece can be cherished for years to come, keeping the colours of your unique creation as vibrant as the day you painted them.
Even with the best tutorials, questions are bound to pop up when you're in the middle of a creative session. I get asked a lot about the little snags people run into when trying to get their flower line drawing just right. Here are a few of the most common ones, along with some quick, practical tips I've picked up over the years.
If you're just getting your feet wet, I always point people towards flowers with simple, clean shapes. Think daisies, tulips, or poppies. Their petals are distinct and easy to outline, so you won't get tangled up in fussy layers or complicated details.
The idea here is to get comfortable capturing the overall form first, before you even think about adding smaller lines inside. It’s a fantastic way to train your eye and build up that drawing confidence before you tackle more complex blooms like a rose or a peony.
Ah, the wobbly line—we've all been there! This is a really common hurdle, so you're in good company. The single best piece of advice I ever got was to draw from my shoulder and elbow, not just my wrist. This simple switch in mechanics encourages long, fluid motions instead of those short, tight, shaky ones.
A great way to warm up is to just grab a scrap piece of paper and practise drawing long, confident strokes. A sharp pencil, a light touch, and a relaxed grip will also give you so much more control and lead to cleaner, more elegant lines.
Another little trick is to avoid stopping and starting in the middle of a line. Make it your goal to draw each curve or petal edge in one single, continuous movement. It definitely takes some practice, but it's the secret to that beautiful, flowing quality you see in professional line art.
Creating depth with just lines is all about the power of suggestion. The two most effective ways to do this are by using overlap and varying your line weight.
When you let some petals overlap others, you're immediately creating a sense of three-dimensionality. It’s a simple visual cue that tells the viewer’s brain which parts of the flower are in front and which are behind.
You can also play with the thickness of your lines. Try using slightly thicker, darker lines for the parts of the flower that are closer to you, and then switch to thinner, lighter lines for details further back. This technique adds a surprising amount of visual interest and stops the drawing from feeling one-dimensional. It really helps guide the eye and bring the flower to life on the page.
At Dalaart, we believe that every handcrafted piece tells a story. Find the perfect hand-carved Dala horse to begin your own creative journey at https://dalaart.com.


.svg)


.png)


