March 20, 2026
Forget the simple triangle eyes and jagged grins. This Halloween, it is time to explore the world of genuinely masterful pumpkin carving scary designs. This guide moves far beyond the basics, offering a curated collection of ten advanced and frightening pumpkin concepts inspired by the rich tapestry of Scandinavian folklore and craftsmanship. Drawing on the artistic heritage seen in traditional Dala art, where every hand-carved piece tells a story, we will show you how to turn a humble pumpkin into a work of art that is both terrifying and beautiful.
Whether you are a seasoned carver or an ambitious beginner, these ideas will challenge your skills and elevate your festive décor. We will delve into specific techniques, from the shallow relief carving reminiscent of ancient runestones to modern approaches like using UV-reactive pigments for an eerie glow. Each idea is presented with actionable steps, tool recommendations, and styling tips to help you create a display that is uniquely yours and deeply rooted in cultural tradition. Prepare to make your neighbours look twice with these unforgettable pumpkin masterpieces.
For those who appreciate both Scandinavian folk art and a good Halloween fright, this design merges the two aesthetics into a uniquely sophisticated and scary pumpkin carving. The concept involves taking a traditional Dala horse silhouette, known for its bright colours and charming patterns, and corrupting it with monstrous features. Imagine transforming its gentle curves into something more sinister, complete with glowing, ember-like eyes, sharp fangs, or skeletal patterns overlaid on the classic design.
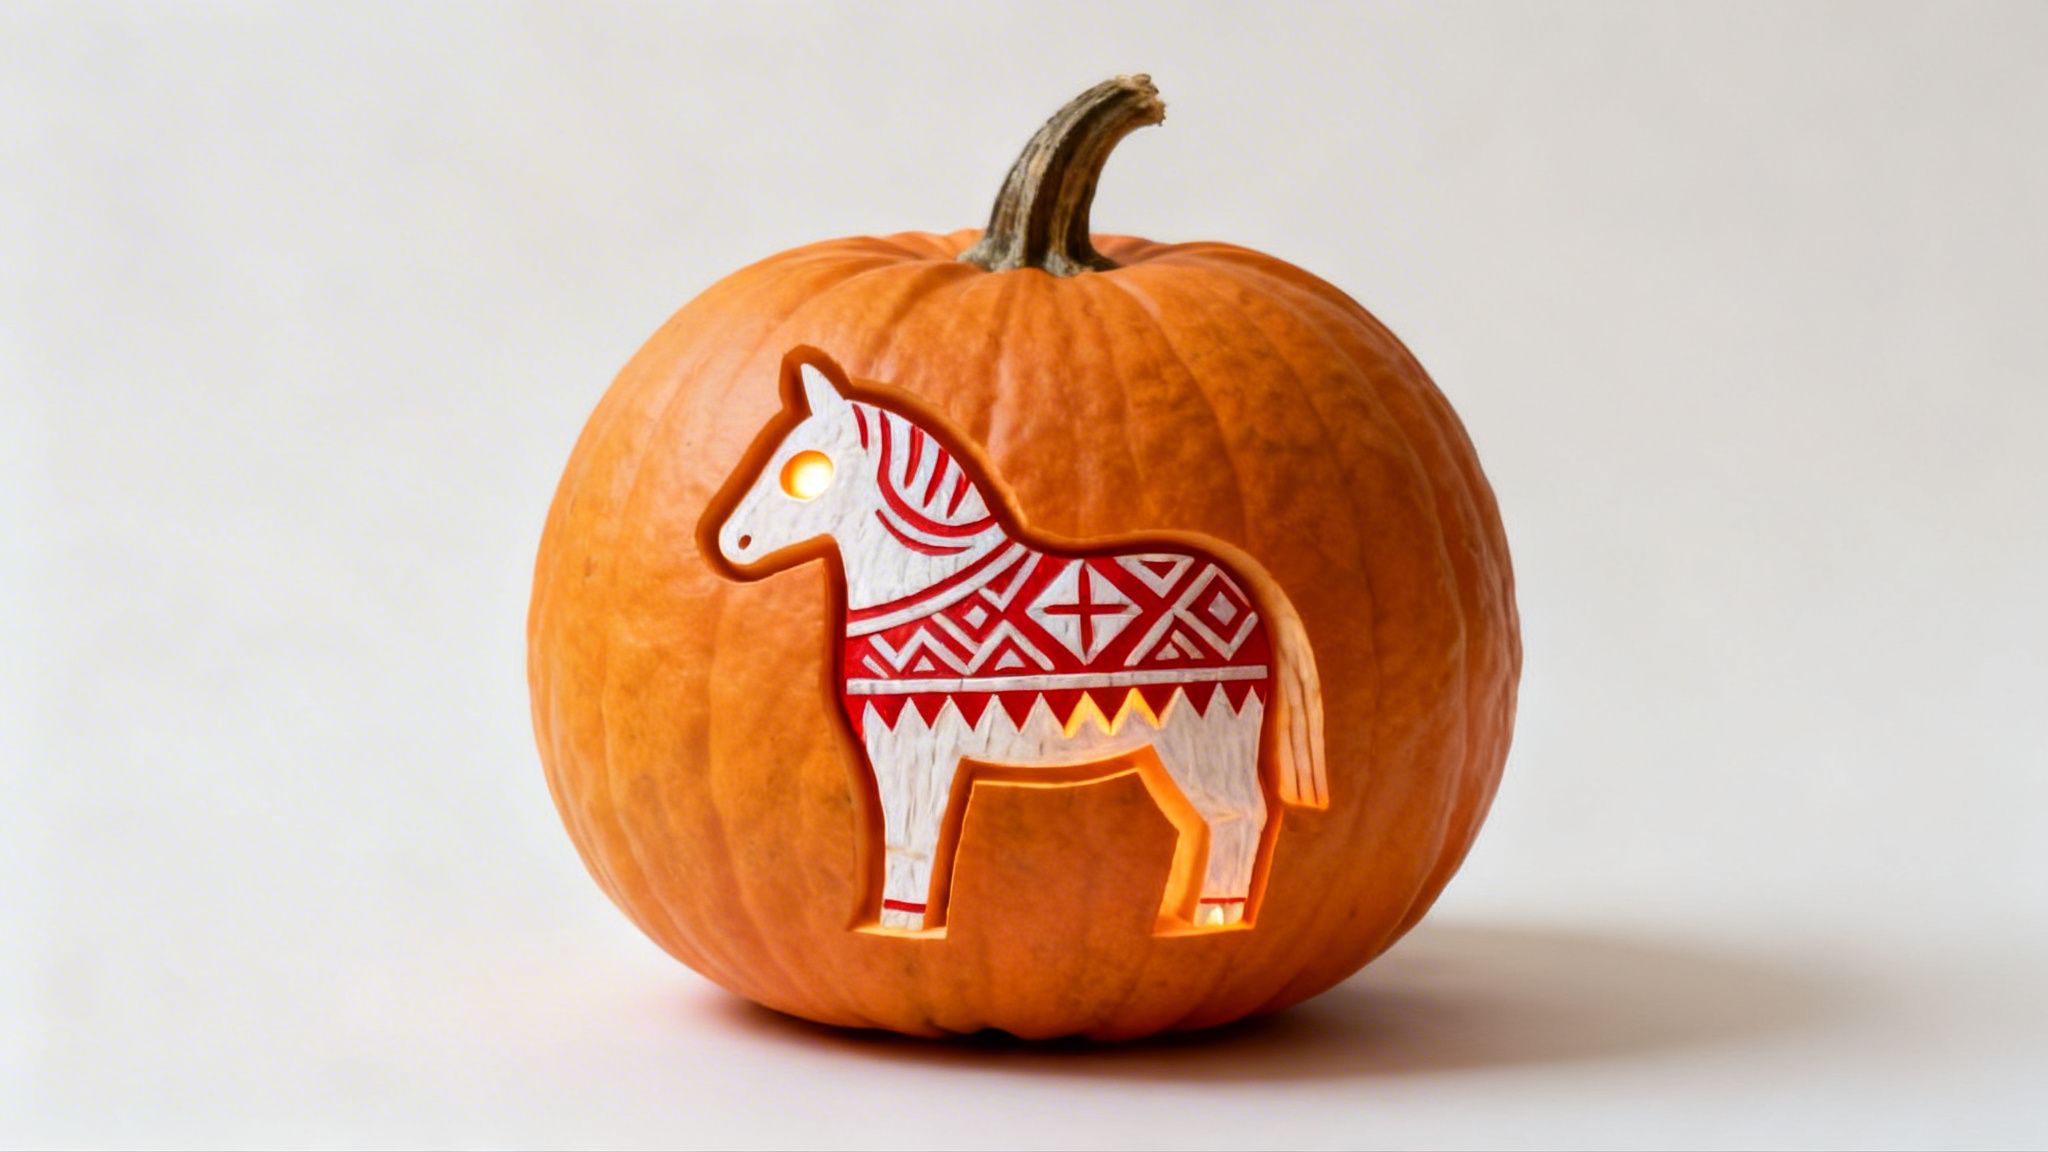
This approach is perfect for home stylists and heritage enthusiasts wanting a spooky twist that complements a Nordic-inspired decor theme. Instead of a generic jack-o'-lantern, you create a piece that feels like a cursed artefact from Scandinavian folklore, a protective guardian figure turned malevolent.
To successfully execute this pumpkin carving scary design, start with a familiar Dala horse template. You can find inspiration by exploring the behind-the-scenes creation of these figures. Once you have the basic shape, get creative with the horror elements:
Pro-Tip: Use the pumpkin's natural vertical ridges as guides for maintaining the geometric and symmetrical feel of traditional Swedish folk art, even as you introduce the scary modifications. This maintains the design's authentic roots while giving it a menacing edge.
Evoke the mysteries of the Viking Age by transforming your pumpkin into an ancient Swedish runestone. This design moves beyond typical jack-o'-lantern faces, instead replicating the intricate carvings and shadowy ancestral imagery found on historical Nordic monuments. The technique relies on shallow relief carving to mimic the weathered, twilight appearance of runestones from regions like Uppland, creating a sophisticated and chilling effect when illuminated.
This approach is ideal for history buffs and anyone seeking a uniquely atmospheric and pumpkin carving scary idea. Rather than a jump scare, it builds a sense of ancient dread, as if the pumpkin holds cryptic warnings or protective glyphs from a long-forgotten era. It becomes a piece of storytelling art, perfect for a refined and spooky home decor theme.
To achieve an authentic runestone look, research is key. Look at genuine Swedish runestones or medieval monument designs to understand their flow and symbolism. Once you have a pattern, focus on carving techniques that create depth and shadow.
Pro-Tip: When carving, shave away the outer skin but leave the inner flesh intact. This technique allows light to filter through the flesh, giving your runes an eerie, ambient glow that looks especially powerful in low light.
Subvert childhood nostalgia by transforming the beloved Moomin characters into figures of fright. This design concept takes the famously gentle and round silhouettes from Tove Jansson's stories and imbues them with grotesque details, creating a powerful contrast between innocence and horror. Imagine Moomintroll, usually a symbol of comfort, carved with hollow, haunting eye sockets, or Snorkmaiden sporting a skeletal grin instead of her usual sweet smile.
This approach is ideal for fans of Scandinavian literature and those who enjoy a darker, more psychological scare. The familiarity of the Moomins makes their corruption particularly unsettling, turning your pumpkin into a statement piece that plays on expectations. It's a truly unique pumpkin carving scary idea that moves beyond generic monsters into something more personal and eerie.
To create a terrifying Moomin, study Tove Jansson’s original illustrations to capture the authentic proportions before twisting them. The goal is to keep the character recognisable while adding sinister elements. Consider these modifications:
Pro-Tip: Draw inspiration from the more unsettling parts of the Moomin stories, such as the ever-approaching Groke or the lonely Hemulen. This will help you tap into the underlying melancholy of the source material and translate it into a genuinely scary design.
For a truly artistic approach to your Halloween decor, the relief carving method transforms a standard pumpkin into a dimensional work of art. This technique, borrowed from traditional Swedish wood carving, involves carving away the pumpkin's outer skin at varying depths to create layers and texture. The result is a sophisticated and detailed design where figures and scenes appear to emerge from the surface, creating an incredibly pumpkin carving scary effect through shadows and depth.
This method is ideal for those who want to create a museum-quality piece with intricate details. Imagine a haunting forest scene with layered trees that create a sense of perspective, or a Nordic monster whose fur has a realistic texture. The play of light and shadow on the different levels of carving adds a dynamic quality that a simple cut-out design cannot match.
To master this technique, begin with a simple design before moving to more complex, multi-layered compositions. Studying the shading on traditional folk art pieces can provide great inspiration. For instance, you can examine the details on an unpainted Dala horse to understand how depth is suggested.
Pro-Tip: As you carve, shine a light inside the pumpkin frequently to see how the different depths are affecting the final look. This real-time feedback allows you to adjust your carving to perfect the shadow effects and create a truly dimensional and scary masterpiece.
Bring a legend of Viking lore to life with a carving of Jörmungandr, the formidable World Serpent from Norse mythology. This design allows you to create a truly pumpkin carving scary masterpiece by depicting the colossal serpent, fated to battle Thor during Ragnarök. The key is to blend its monstrous form with traditional Scandinavian geometric patterns, creating a carving that feels both ancient and menacing. Imagine the serpent’s body coiling around the pumpkin, its fanged mouth open in a roar.
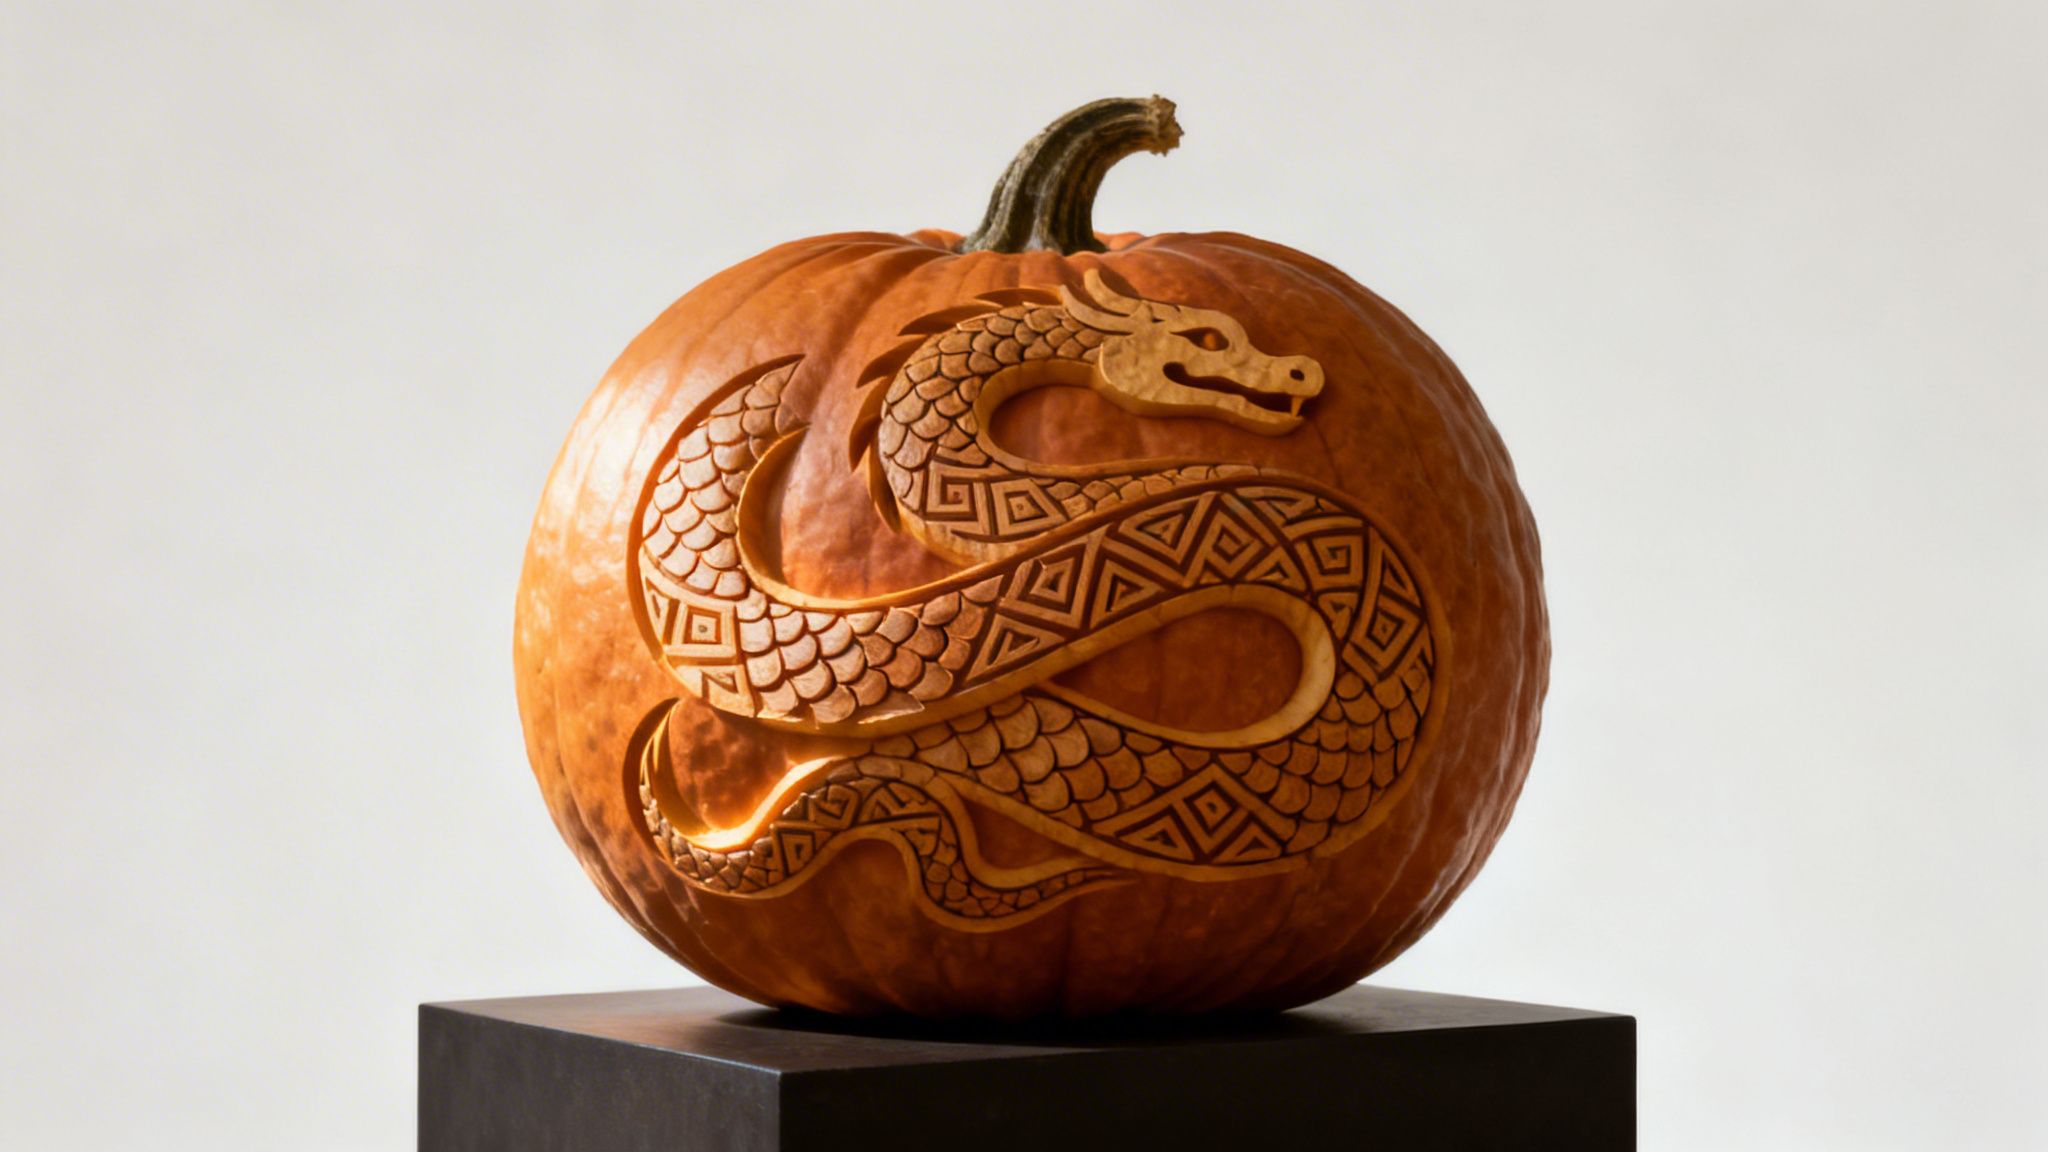
This concept is ideal for anyone fascinated by mythology, history, or Viking culture. It transforms a simple pumpkin into an artefact that tells a story of gods and monsters, perfect for an educational yet terrifying Halloween display. You can find authentic inspiration by exploring the Prose Edda and Poetic Edda; for a curated overview, you can learn more about Norse mythology and its key figures.
To capture the essence of the World Serpent, focus on dynamic movement and intricate detail. Start by sketching a coiled design that wraps around the pumpkin's circumference, giving a sense of immense scale.
Pro-Tip: Use the natural shape of a taller, more oblong pumpkin to your advantage. This allows you to create a more dramatic coiling effect, as if Jörmungandr is rising from the depths and constricting the gourd itself.
This design channels the mystical power of Norse culture, creating a truly atmospheric and pumpkin carving scary experience. It focuses on the völva, a powerful seeress in Viking-age society, using a silhouette-based approach. The idea is to carve the outline of a formidable witch or seeress, allowing the internal light to create a dramatic, glowing figure against the dark pumpkin, making her appear otherworldly and ancient.
This concept is perfect for those interested in mythology and history, offering a sophisticated alternative to typical Halloween monsters. It transforms your pumpkin into a beacon of ancient magic, depicting a figure of wisdom and power that feels both awe-inspiring and deeply unsettling. The silhouette technique is especially effective for conveying a sense of mystery and foreboding.
To bring your völva to life, start with a strong silhouette that evokes power and mystique. Research historical descriptions of their appearance, which often included fur-lined cloaks, distinctive tall headdresses, and a magical staff (seiðstafr).
Pro-Tip: Emphasise the headdress and staff, as these are historically recognised symbols of a völva's power. A tall, imposing headdress will make the silhouette immediately recognisable and add to its dramatic and intimidating presence.
Delve into the deep, dark woods of Scandinavian folklore with a design that brings ancient trolls and forest guardians to life. This concept involves carving a creature that is part beast, part humanoid, and deeply integrated with nature. Picture a formidable troll with a gnarled, mossy texture, crowned with antlers, and possessing a fiercely territorial stare, emerging from the very skin of the pumpkin.
This powerful pumpkin carving scary idea is ideal for those who love mythical creatures and want to create a centrepiece that feels both ancient and menacing. Instead of a simple monster, you are crafting a character with a story, a guardian of a long-forgotten realm whose presence commands respect and inspires awe.
To give your troll or guardian an authentic folklore feel, focus on texture and natural elements. Start by sketching a design inspired by Swedish fairytales or traditional Dala animal carvings to get the creature's anatomy right.
Pro-Tip: Study traditional Swedish folk costumes to add small, authentic details to your creature's clothing or adornments. This small touch can ground your fantastical beast in a recognisable cultural tradition, making it even more compelling.
For a truly horrifying design rooted in ancient lore, this pumpkin carving scary idea brings the draugr of Norse mythology to life. These powerful, corporeal undead warriors were greatly feared, said to possess superhuman strength and guard their burial mounds with relentless ferocity. A draugr pumpkin moves beyond a simple skeleton, depicting a decaying Viking warrior still clad in burial armour, its flesh rotting away to reveal the bone beneath.
This concept is perfect for enthusiasts of mythology, history, and anyone seeking a genuinely menacing and culturally rich Halloween decoration. It transforms the pumpkin into a scene from a Norse saga, suggesting a cursed warrior reanimated from its barrow mound, its hollow eyes glowing with ancient malice.
To successfully depict a draugr, research is key. Look into Norse sagas like Grettis Saga for vivid descriptions, then combine these with historical Viking Age armour and weaponry for authenticity.
Pro-Tip: Focus on creating a dynamic pose, such as the draugr rising from the ground or brandishing an axe. This adds a narrative element and makes the carving more terrifying, as if the creature has just burst forth from its tomb.
This technique elevates a standard carving into a dynamic, two-state work of art by using food-safe fluorescent pigments that react to ultraviolet light. By day, your pumpkin can display an intricate, traditionally carved design. By night, when exposed to a black light, hidden details or the entire pattern bursts into a ghostly, neon glow, creating a truly surprising and modern pumpkin carving scary experience.
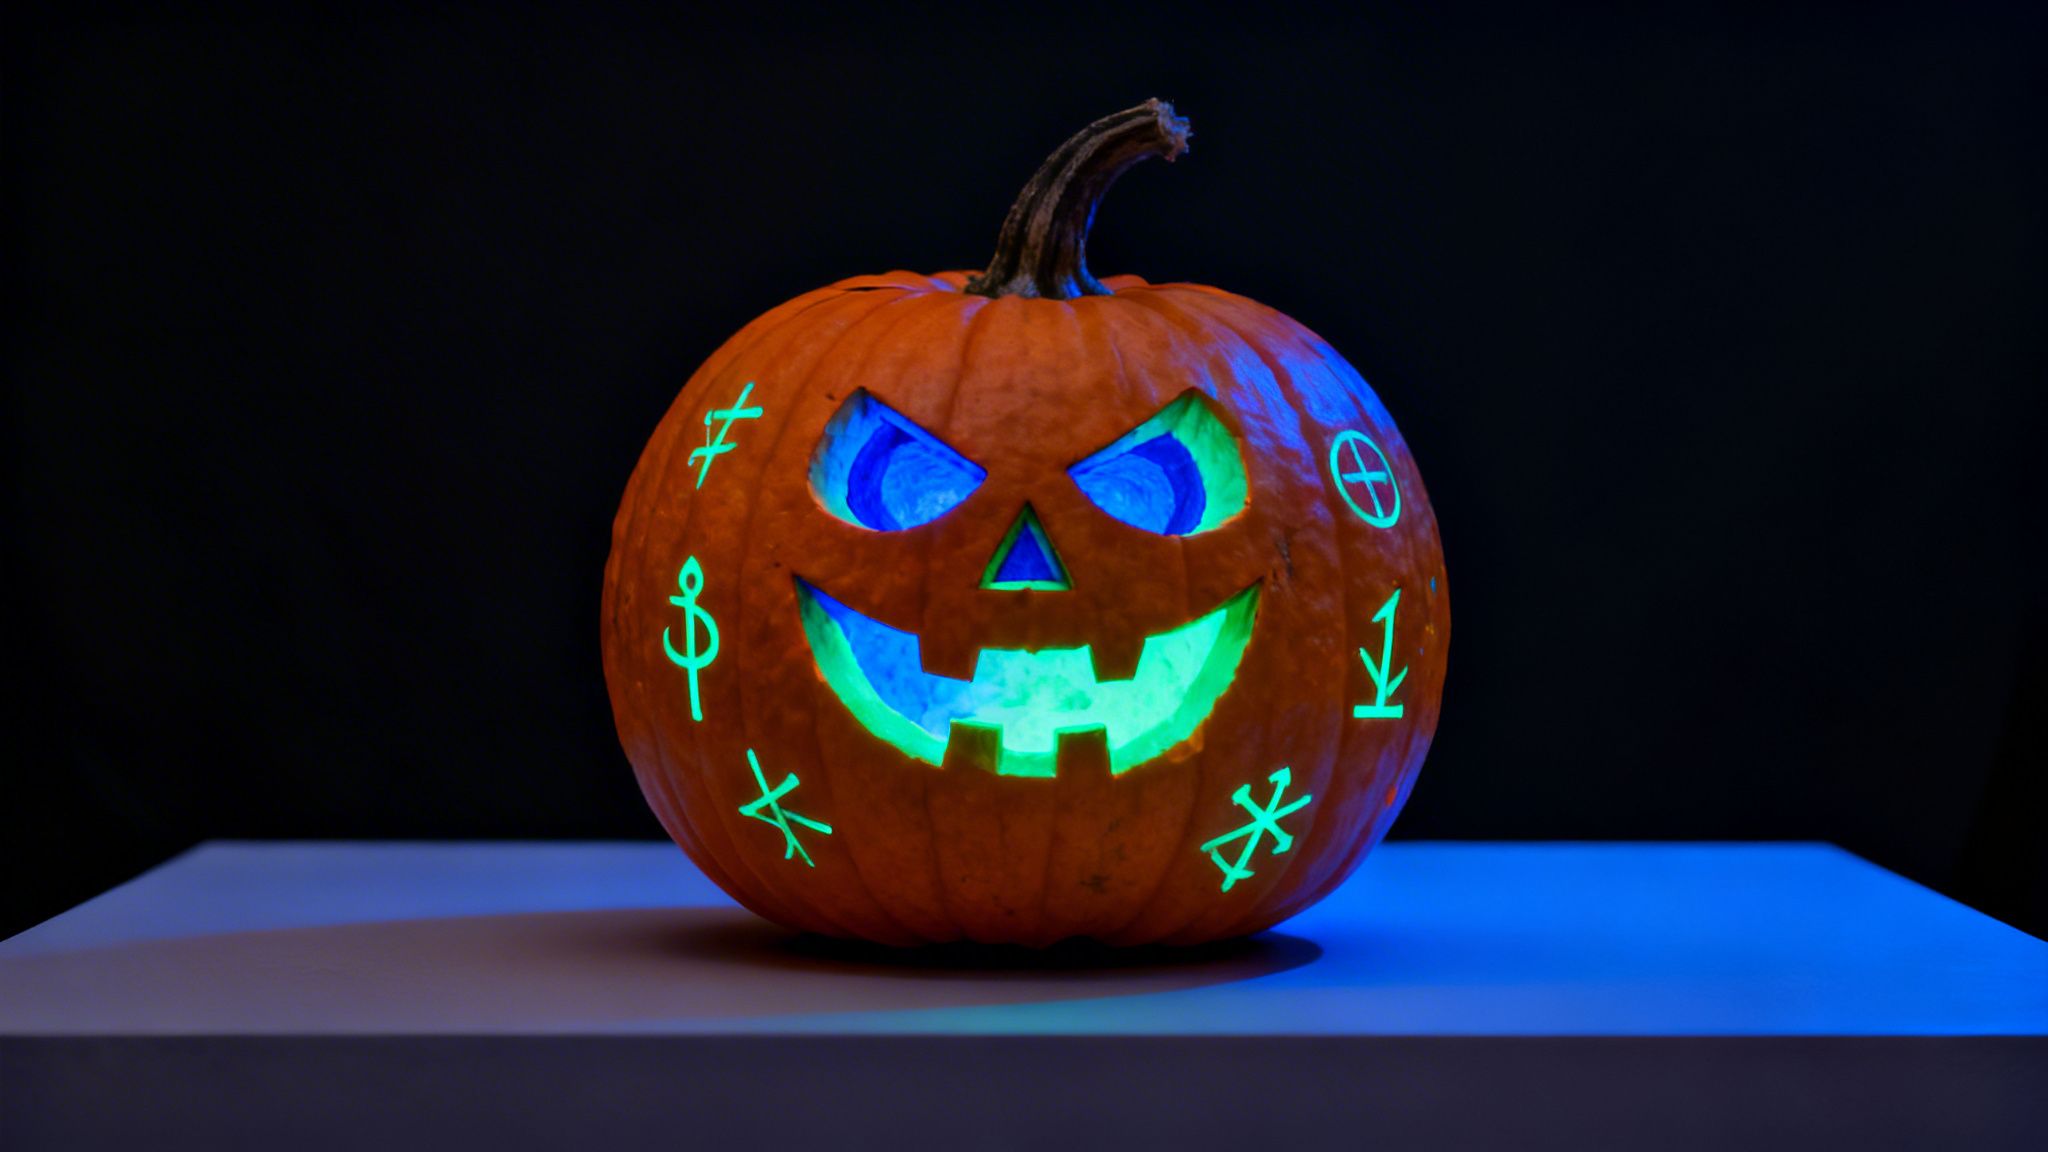
This method is ideal for those looking to add a high-tech, supernatural twist to their Halloween decor. Imagine carving a monster whose eyes and mouth remain dark until a black light reveals their eerie radiance, or etching Nordic runes that are invisible in daylight but flare with mystical energy after dark. The transformation creates a memorable and dramatic effect for guests.
To bring this glowing concept to life, complete your carving first before adding the reactive elements. The key is to paint the fluorescent pigments directly onto the exposed flesh of the pumpkin where you want the glowing effect to appear.
Pro-Tip: For the most dramatic reveal, position your black light source to shine on the pumpkin from an angle or from slightly behind it. This enhances the glowing effect and makes the unpainted parts of the pumpkin recede into darkness, putting the focus entirely on your luminous design.
Negative space carving is a refined method that focuses on what you don't carve away. Instead of cutting through the pumpkin, you meticulously scrape off the outer skin to reveal the lighter flesh underneath. This technique creates dramatic, shadowy images where the uncarved, dark skin forms the outlines and details, making it a sophisticated approach for a pumpkin carving scary project. It is especially effective for rendering intricate designs like geometric Nordic patterns or folkloric scenes in pure shadow.
This approach is ideal for those who favour subtlety and artistry over overt gore. By using light and shadow, you can create an unnerving atmosphere that feels both elegant and eerie, turning your pumpkin into a decorative piece that complements a Scandinavian-inspired home aesthetic. The unlit design appears as a beautifully etched object, while illumination reveals a haunting, silhouetted image.
To master this technique, patience and precision are key. Start by selecting a pumpkin with thick, consistent skin to allow for depth variation without puncturing the wall. Transferring traditional Swedish folk patterns, like those from Dala horse paintings or textiles, works exceptionally well.
Pro-Tip: For a truly sophisticated look, consider displaying your negative space pumpkin without any internal lighting during the day. This highlights the intricate etching itself and allows the natural shadows to define the design, saving the illuminated, scary reveal for the evening.
You have now journeyed through a curated collection of designs and methods, each one a gateway to creating genuinely unsettling Halloween art. From the deceptive charm of a Dala-inspired monster to the ancient dread of a runestone inscription, this guide has provided the blueprint. The power of these ideas lies not just in their scary appearance, but in the rich Scandinavian folklore and artistic traditions they represent. This year, your porch can showcase more than just a grinning jack-o'-lantern; it can become a gallery of mythological beasts and storied figures.
The key to achieving a professional and frightening result is to move beyond simple cut-outs. Mastering techniques like relief carving for the Draugr warrior's weathered features or negative space for a haunting Völva silhouette is what separates a good pumpkin from a great one. These methods add depth, shadow, and a sense of realism that truly brings your pumpkin carving scary concepts to life. Remember the impact of using specialised tools, as noted in each design, which allows for finer detail and more complex textures, crucial for capturing the essence of Jörmungandr’s scales or a Troll King’s gnarled skin.
The true value of these projects is in their ability to tell a story. When you carve a Moomin Troll transformed into a fearsome creature or etch the serpentine form of the World Serpent, you are participating in a tradition of storytelling that has captivated people for centuries. Consider these important takeaways as you begin your work:
Ultimately, your pumpkin is a temporary canvas, but the skills and creative satisfaction you gain are lasting. The process of turning a humble gourd into a work of art is a rewarding experience that connects you to both an ancient craft and a modern celebration. This Halloween, challenge yourself to create something that not only looks scary but also feels significant. Your efforts will result in a display that is a true conversation starter, a testament to your creativity and dedication.
For those inspired by the unique blend of folk art and frightening imagery, continue your exploration with Dalaart. Our collection of authentic, hand-carved Dala creatures and art pieces captures the same spirit of Scandinavian tradition and craftsmanship discussed in these pumpkin designs. Discover the genuine articles that inspire these terrifying transformations at Dalaart.


.svg)


.png)


